 Let me introduce you to the talented lady running Oak & Olive: Krizia. She reached out to me after finding my Weatherwood Insta feed. We decided she should get some product to try out and it was on! I knew what her rough idea for the project was from her Pinterest Board, but was so so happy to see how the final table turned out. Here's her project:
.

Showing posts with label Guest Post. Show all posts
Showing posts with label Guest Post. Show all posts
March 18, 2015
Oak & Olive: Geometric Weatherwood Stained Table
Let me introduce you to the talented lady running Oak & Olive: Krizia. She reached out to me after finding my Weatherwood Insta feed. We decided she should get some product to try out and it was on! I knew what her rough idea for the project was from her Pinterest Board, but was so so happy to see how the final table turned out. Here's her project:August 6, 2014
Houseologie: DIY Rustic Glam Bulletin Board Accessories
I am so excited to introduce you to a new favorite blogger, Leigh Anne from Houseologie! After seeing her fa-u-lous Hallway Makeover in our Handmade Hangout Linky Party- I had to have her come share with us! I know you will enjoy her fresh style and creativity, as much as I do!
∙ ∙ ∙ ∙ ∙ ∙ ∙ ∙ ∙ ∙ ∙ ∙
Hi There! I'm Leigh Anne, the creative mind behind Houseologie. I'm so excited and honored to be contributing here at FromG2B! Becca is the sweetest and I'm very thankful to her for having me here.
Recently I've had back-to-school on my mind. I know, I know it's hard to believe Summer is almost over. At least for us it is. My kiddos go back to school this coming Monday. Time flies when you're having fun, right? Since school is so close and an organized home is the best way to start out, I've been working on projects that will help us transition to a routine.
Today I'm going to share with you my Rustic Glam bulletin board accessories.

July 2, 2014
Guest Post: 5 Best DIY Bathroom Projects

Hello! I am Anna from My Bathrooms blog. If your bathroom needs some TLC this year and you are determined to do a lot of the work yourself, here are some ideas for bathroom D-I-Y projects, I recently came across these wonderful blog posts which I just couldn’t resist sharing!
August 20, 2012
✥ Feature: Anthro-esque Girl's Bedroom ✥
Hello cute lady friends~ Hope you all had super awesome weekends! So far I'm surviving the 8-12 hour days in the MBA orientation- though I'd rather be blogging! Do you think I could get a bumper sticker that reads that?
Anyhow- I am pretty excited to start something new and see what the program brings. The peeps I'm in school with are rad so far and really diverse, so that's a lot of fun!
We are on week two of our children's room tours- and for all the fun anthro fans out there, I thought this room would be perfect. It comes from Danielle Oakey {Danielle Oakey Interiors}- another UT design blogger. It's her daughter's bedroom and it's been featured all over the dang place- in big blogs like Apartment Therapy!
Last week we saw an almost all-white space and talked about if that was a good fit for kids and, of course, I thought it was totally rad! Now let's check out another sophisticated children's space.

I totally heart the homemade art above the bed! I think it's another move that keeps the room young and playful, though I wouldn't mind a few of them in my home either!!
I am also in love with the homemade headboard- the shape and fabric choice were jut peeerfect!!

How much do you dig the bold black and white stripes along the wall? I am way to much a baby to make that happen in my home- but I do adore a strong graphic element in a room. It was a total "have no fear" decision and I think it paid off. Danielle made the awesome decision to use chalkboard paint for the stripes- and I think this helps keep the room young feeling.
Look how much her darling daughter, Emory, enjoys it!!
I love how Danielle used a deer head from a craft store to create her own mounted bust for next to nothin. I have sent his copied time and again- but her's was the very first I saw! It was so creative!!'

Most of the items in the room were thrifted. I love this bookcase for kid's books, which so easily look messy and busy. A little out of sight and a great place for a few toys, too! Besides, you all know I'm a sucker for a globe! 
The furniture Danielle found she just painted to freshen the up and unify the look. I also liked how the bedside tables are different, but she painted them the same color and they're about the same size. I like this look so much better than the traditional matching set. I've been looking for some to do this to.
Thanks for stopping in today-what did you think of Danielle's daughter's space? Did anyone think it looked too old for a kiddo- or just right? As for me, I think it's a wonderful cohesion of spunk and color creating a sophisticated children's space--and I especially liked that it was unusual.

August 14, 2012
✥ Guest Post: Southern Lovely ✥
Hey friends! Today you can find me over at Southern Lovely. My lovely friend Lindsay is moving and I was thrilled to be asked to share a post over at her place today!

And just because loved it, I thought I'd share a little project Lindsay posted the other day-a pinwheel party for her 6 year old daughter! Isn't it lovely? I think it turned out beautifully and was so unique. Isn't it the perfect follow up to Shelly's amazing little girl's room yesterday? I thought so. ;-)
I hope you'll stop by and say hi!

August 9, 2012
Vintage Index Card Recipe Box w/Printable Recipe Cards
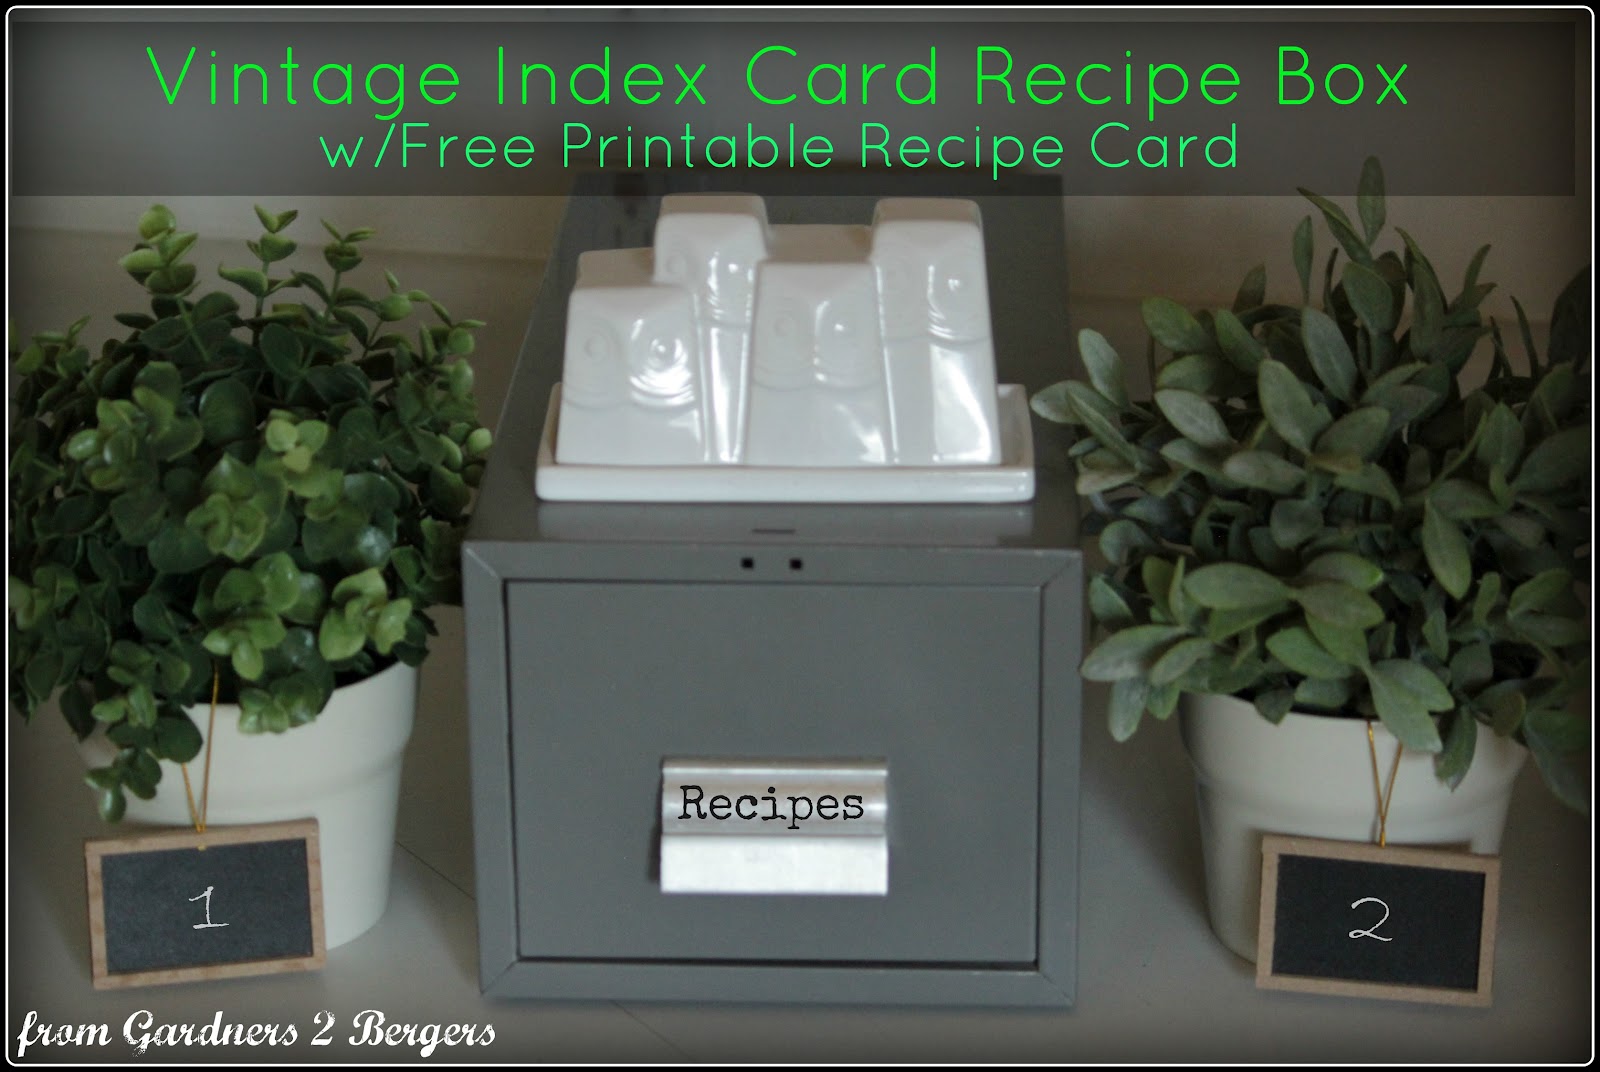
Hey there, cute lady friends! I am reposting a little project I whipped up the other day for Cassie, when I guest posted at her place. If this is a repeat, then this is where you sign off, and I'll catch you on the flipside.
To the rest of ya, here's my latest dish, I found this vintage, metal index card box the other day while garage sal-ing. It cost me three beans and I had actually been on the lookout for this very item! So I snatched up my sweet score without even an attempt at bartering for this sweet treasure. I thanked my lucky stars it was so cheap. I've seen them on Etsy and Ebay, but for nothing less than $15.
To the rest of ya, here's my latest dish, I found this vintage, metal index card box the other day while garage sal-ing. It cost me three beans and I had actually been on the lookout for this very item! So I snatched up my sweet score without even an attempt at bartering for this sweet treasure. I thanked my lucky stars it was so cheap. I've seen them on Etsy and Ebay, but for nothing less than $15.

I've wanted one to put my recipes in for ages and, now that I have one, I can walk towards the light with a sense of accomplishment. Like I came, I saw, I conquered- my work here is done, you know?

Not too fast. What. About. The. Recipes?
Instead of using old magazine tear-outs or scratch paper, {yeah, so maybe I had some of that going on before} I made my own recipe cards. For these, I used some vintage-y styled freeware graphics so the new cards would have a retro feel to go along with the retro filing drawer.
 You can grab your own, if you want to. Just DRAG the recipe card onto your desktop and you can print your own. {Google Docs and I are currently not on speaking terms, as it keeps distorting my images- even the pdfs. So whatever!} Oh yeah, and printing them on cardstock is a good idea for stability and durability.
I know that was a super easy project, but you know what's not super easy?
Copying all my old recipes onto my new cards! Dope!
I don't do a ton of kitchen projects, {because my rental kitchen is where inspiration goes to die} but coincidentally, last week I made my own vanilla extract. Of course I made my own printable for that, too. If you missed that post, you are welcome to grab that one here!
And that, folks, is all she wrote.
I'm also linked up here.
July 25, 2012
✥ Guest Post: Setting for Four ✥
Good morning, lovelies! Today I am excited to be guest posting over at Heather's blog {Setting for Four} and I'm sharing how I put my gallery wall together. Stop on by and find out how I got my pal, "thermie" and how I made every piece of art on my wall!


While you're over there, make sure to check out Heather's adorable butterfly place cards! Cute, right?

Hope to see you there!
-xoxo-
July 18, 2012
✥ Guest Post: DIY French Label Towel ✥

Good morning lovelies! Today Heather from Setting for Four - will be here with you all! I asked her to share her DIY project that's sos awesome, it's now on my to-do list!
You guys will love Heather- she is one of my bloggy besties. Truly one of my all time favorite peeps I have met in Blogworld. She's an Army wife and is actually moving to Canada this week, where her and her hubby just bought a new home! I am super excited to see what they do to it- now that she no longer has to rent {unlike me- *boo.} Heather is totally sincere, super thoughtful, and a great friend! You guys will love getting to know her!
You guys will love Heather- she is one of my bloggy besties. Truly one of my all time favorite peeps I have met in Blogworld. She's an Army wife and is actually moving to Canada this week, where her and her hubby just bought a new home! I am super excited to see what they do to it- now that she no longer has to rent {unlike me- *boo.} Heather is totally sincere, super thoughtful, and a great friend! You guys will love getting to know her!
✧✧✧✧✧
Hello everyone! This is Heather, from Setting for Four, and I blog about creating a home and decor that won't break the bank. Today I am sharing a very easy DIY Sharpie French Label Towel. This project is one of the most inexpensive and easiest projects I have ever made!
It doesn't even require transfer paper or Citra Solv - just a black permanent marker! I love that there is no need to buy transfer paper and no mess from using Citra Solv!

Supplies:
.JPG)
Flour Sack kitchen towel, pack of 2 - Mainstays brand, Wallmart
Ultra Fine Point black permanent Sharpie marker
Black and White photocopy of French Chocolate label - I used the 'Cacao Payraud' label from the Graphics Fairy. There are also many other graphics and labels on this wonderful site to choose from.
2 straight pins
Tutorial:
Wash and dry the flour sack towel.
Place photocopy of French label on table, with the printed side facing up (make sure something is under the photocopy to protect your table).
Place towel on top of photocopy.
Pin the towel to the paper in two places to prevent shifting.
Trace the words onto the towel using the sharpie (The towel is see through enough that you can see the black wording underneath.)
That.Is.It!!! No kidding - you're done!


Because this project uses permanent marker - it won't disappear in the wash! I have washed mine and the printing didn't wash out or 'bleed' at all.


You could vary this tutorial in so many different ways: use a different color of permanent marker, a picture or other script to customize this to your home!

It doesn't even require transfer paper or Citra Solv - just a black permanent marker! I love that there is no need to buy transfer paper and no mess from using Citra Solv!

Supplies:
.JPG)
Flour Sack kitchen towel, pack of 2 - Mainstays brand, Wallmart
Ultra Fine Point black permanent Sharpie marker
Black and White photocopy of French Chocolate label - I used the 'Cacao Payraud' label from the Graphics Fairy. There are also many other graphics and labels on this wonderful site to choose from.
2 straight pins
Tutorial:
Wash and dry the flour sack towel.
Place photocopy of French label on table, with the printed side facing up (make sure something is under the photocopy to protect your table).
Place towel on top of photocopy.
Pin the towel to the paper in two places to prevent shifting.
Trace the words onto the towel using the sharpie (The towel is see through enough that you can see the black wording underneath.)
That.Is.It!!! No kidding - you're done!


 Make sure you stop by my blog to see another towel idea. Where I share how to turn your children's art into tea towels!
July 13, 2012
✥ Guest Host: Vintage Recipe Filing System @ Primitive & Proper✥

It's Friday YO!!!! Today I'm super stoked to say you can find me over at Cassie's place, Primitive & Proper. I am SURE you all know her- she kinda famous like that. But in case you don't, then here's a few of my favorite furniture transformations- a la Cassie.

This recent turquoise gem- this lovely vintage dresser is now dressed in a vibrant new color! Though this is like one of a hundred awesome furniture makeovers. It's kinda just what she does!

Cassie's "Color My World" coral challenge- look at these chairs. I just die for that color!!! {And PS, can I get an antique sign like that toooo.....?}

Now this may not look like much- but you are WRONG! Cassie has replicated the crazy awesome finish the stores like Restoration Hardware {my personal fav- duh] charge an arm and a leg for. Stop by to see how she does it!

Holy cow! I almost forgot- I am sharing a NEW project!
I hope to see you there! Come on over and show me some comment love! ;-)
May 23, 2012
✥ Guest Post: Top 20 @ It's So Very Cheri ✥

Good morning friends! Today you can find me at my sweet friend Cheri's-she runs the place over at It's So Very Cheri.


So stop by and get a little beach inspiration. And make sure you come visit me, too- while you over there! I'm sharing my Top 20 Posts- probably at least a few will be new to some of ya- since I had maybe 6.2 followers when I did some of them! ;-)
April 4, 2012
Burlap and Ruffles Union Jack Pillow

I almost forgot about this little DIY pillow cover post I shared at Cherished Treasures a few weeks back. So here ya go- in case you missed it! {and if you already saw it- eek! sorry to be repetitive!}
I saw this super, duper cute pillow from darling Aimee at Twigg Studios and I knew I had to make my own! Well, I love most of the pillows she makes- but since I don't sew, this was the only one I thought I could make! Haha!

I made a no-sew pillow using a down pillow that had seen better days and this no-sew pillow tut from the hilarious Cassie. Since it's basically ironing and cutting, even I could handle it!! The key was the Peel n Stick fabric fuse. It works like a charm and made the pillow so easy to make!

For the cute little ruffles I followed Aimee's tutorial. Just cut strips of cream flannel, which incidentally I had on hand- lucky coincidence. Then I wrote out the union jack pattern with chalk {just like she said to.}

 Isn't the pillow charming!? I think it makes the perfect textural addition to the little sitting area in my bedroom. I love how burlap adds an earthy feeling, grounding my silk curtain panels.
I'm sure this new addition will make the 5 whole minutes I get to sit down there and read that much more enjoyable!!
Do you have any special spots for reading? Little nooks you creep away to for a few minutes to yourself?
Looking for places to link up your projects? Check out my Party page.
I'm also linked up here.
Subscribe to:
Posts (Atom)