Showing posts with label Knock Off. Show all posts

August 15, 2023

RH Cerused Driftwood Gray Table


For this week's project, we're back to my roots! Which means we're creating knock off Restoration Hardware colors today! This project is easy peasy, just apply to wood and watch the magic happen! You're going to love this tutorial to easily achieve the Reclaimed Gray Oak look.

Materials


Directions


Here's the "before" of this typical, out dated oak table. There's a million of these babies floating around from the 80's and 90's. It shouldn't be too hard to get your hands on one, and at a good price. 

If you're using a brand new, or raw wood table, please skip down to step #5. Thanks!

1.] STRIP
First you'll want to apply a thick layer of Citristrip to the table. Citristrip has a tendency to dry out before it can eat away at all the layers of stain and lacquer. So covering the wet stripper with a garbage bag helps keep the moisture in while it works.
2.] SCRAPE
When the stripper turns white, it's ready to be scraper off. Remove the bags and scrape as much of the mixture off, as you can. You'll want to try and get down ti the raw wood if you can. But being careful not to scrape or damage the wood itself. 
3.] CLEAN
You will want to wipe the table down with mineral spirits and a rag to remove any existing residue. This should remove any sticky residue from the tabletop. 
4.] SAND
Here's the labor portion. You want to use a palm sander and 80 grit sandpaper to make sure the wood is completely down to raw. You can see in this video what I mean.
5.] STAIN
Weatherwood released a new stain that can turn oak into a beautiful driftwood gray, called Light Oaking. This product can work on any wood, so it's incredibly easy to use.


6.] LIGHTEN
If you want to lighten the look, you can add a coat of White Maintenance Oil. It adds the look of patina and is just generally gorgeous. Simply brush or wipe onto wood, allow to sit 3-7 minutes. Then wipe off with a clean cloth. Or you can watch the video above. 
See how pretty and soft the white maintenance oil is? It's much more subtle than a paint product and really just makes the wood look sun-kissed.


For additional project looking to achieve the Restoration Hardware look, you can search our archives for tons of inpiration or check out this popular post below!


http://www.fromgardners2bergers.com/2017/02/diy-rh-reclaimed-gray-oak-table.html

I've also got a paint update for you guys! We are selecting our final shades for our The Furniture Paint launch, so keep your fingers crossed for me! xoxo

Follow on Bloglovin

photo signature7-2.jpg

October 25, 2022

Getting Restoration Hardware's Weathered Grey Oak

If you love Restoration Hardware's color as much as I do, this project is for YOU. The below image is from their catalog, it's Restoration Hardware's Reclaimed Grey Oak. The color is completely perfect and now's it's also easy to achieve!


Restoration Hardware


MATERIALS


Directions

1] SAND
To achieve this look, start with a raw wood surface.
The wood must be sanded, you can have it sent through a large sanding machine at the mill or you can sand it really well with a hand sander. You should start with 80 grit and then 120 grit. (You can do a finish sand at the end, at 220 or above.)


2] STAIN
Applying the Restoration stain is like a piece of cake, read "even easier than typical stains." 
Using a large brush and drench the wood with stain. (See above video, also shown on oak.) Let the wood air dry for 60 minutes.


3.] SEAL
If your project is on a high traffic or water area, you will want to let  seal with 2-3 coats of Weatherwood Varnish, allowing 120 minutes between coats.


Didn't the color turn out dreamy? The process could not be easier. Do not forget readers save 10% with code: WELCOME10. If you have any  questions, leave'm in the comments below and I will see you tomorrow at the party!
Follow on Bloglovin
photo signature7-2.jpg

July 15, 2021

Restoration Hardware Modern Table Hack


Have you seen Restoration Hardware's new-ish branch, RH Modern? It's the same gorgeous RH look, but with the clean lines of mid-century modern pieces. I found this bedroom with the perfect "gray oak" furniture and I had to see if I could replicate it! 

Materials


Directions

1.] SAND
For this project we used alder, if you're using a different species check out this color chart for weathered wood options: Color Chart. Sand the boards and with 80 grit sandpaper and now they're ready for you to apply stain. 


2.] STAIN
If you want a pure gray, you should use Reclamation, if you want a gray with brown in it, use Salvage. Using a wide brush or sponge brush, apply heavy coat of stain. Like in the above video, the wood will absorb the stain as it dries. The color will change from raw wood to stained. 

3.] LIGHTEN
To lighten the wood, use White Maintenance Oil Topcoat. This will lock in that light driftwood look and protect the wood. It's a wipe on and wipe off application. Use a brush or rag to apply and a clean rag to immediately take it back off the wood. The longer it stays on the wood, the whiter the wood will get.

4.] PROTECT
Apply 2-3 coats of Weatherwood Varnish to protect furniture. 


You can save 10% on Weatherwood products, like you saw here, with code WELCOME10. I hope to see you at tomorrow's party!

Follow on Bloglovin
photo signature7-2.jpg


May 13, 2021

RH Style Balustrade Coffee Table & Bologna, Italy


Take a walk down this Bologna restaurant alley with us!! It’s packed with tourists, fresh food, people eating, & rad details. I’m crazy obsessed with these colorful buildings- they’re all shades of red, orange and yellow. It’s looks so warm and inviting. Bologna was such a wonderful surprise. We did an overnight here and toured the famous spots!


Materials


Directions


1.] SAND (SORT OF): Normally, I'd say you should sand wood and with 80 grit sandpaper, but for projects that have intricate carving you'll want to use something else. You can purchase denatured alcohol, it's inexpensive and faster than sanding. Apply it like you would stain, with a spray gun or paint brush. Make sure to the wood the day before you plan to stain, so it can completely dry. 

Create & Hold White Washed Gray Cabinetry

2.] STAIN: If you want a pure driftwood gray, you should use Reclamation. If you want a brown with brown in it, use Salvage. Using a wide brush, roller, or sponge brush, apply heavy coat of stain. Like in the above video, the wood will absorb the stain as it dries. The color will change from raw wood to stained. 


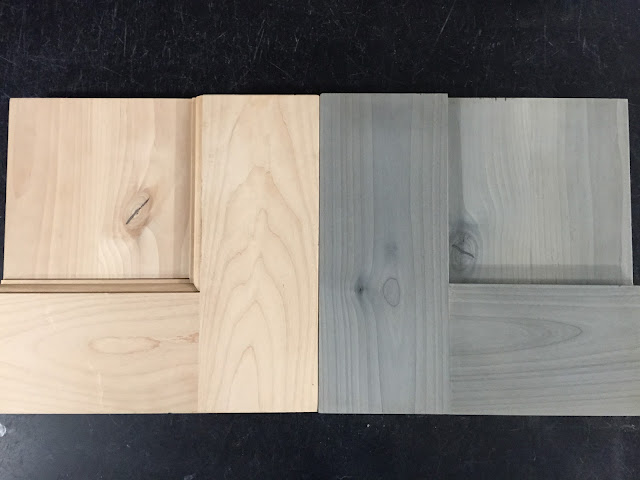
Once you're wood is dry, which takes about 30 minutes, you're ready to move to the next step. You will see the before and after transformation of raw alder to Reclamation stained below. 

Then you want to decide if you like the color as is, in which case just seal it with Weatherwood Varnish. 


If you want to lighten it, you'll want to use Weatherwood's WHITE Maintenance Oil Topcoat, RIGHT. However, if you want to darken it, and enhance the warmth of the wood tone, then use  Weatherwood's CLEAR Maintenance Oil Topcoat (LEFT).


If you want to lighten it, White Maintenance Oil Topcoat. This will lock in that light driftwood look and protect the wood. 


3.] LIGHTEN / DARKEN: We decided to lighten the wood, so we used wipe on application, brushing is faster but a rag will make the product go further. It's a brush or rag it on.


Allow the oil to penetrate for 5-10 minutes. The longer it sits, the whiter the effect. The use a clean rag to wipe off. If it gets too pale, just buff the finish back down. The White Maintenance Oil will provide light to medium wood protection. 

4.] SEAL: Depending on your project! If you need heavy duty wood protection, you will want to use Weatherwood Varnish over the cured oils. If it's a cabinet or something, that will need the varnish!


If you're really loving this color and you'd like another project idea, check out this:

Awesome DIY Restoration Hardware Reclaimed Gray Oak Finish Tutorial and Video#fg2b

1-2-3 that was so easy! If you have any questions, don't hesitate to reach out! 
Lots of love!

Follow on Bloglovin
photo signature7-2.jpg

April 3, 2020

Salvaged RH Style Pine Coffee Table & The Vecchio Bridge


We were on our way to dinner, but the second we stepped out the amazing sunset demanded to be seen! So we headed to our favorite spot, the Ponte Vecchio bridge, to take in the colors. The bridge was a totally party, as usual!! Enjoy the videos!


Let's get to this awesome project. It's my favorite kind of post! Where usually hard to achieve colors are a piece of cake! This client wanted to match her new farmhouse coffee table to Restoration Harware's "natural" color, on this Salvaged Trestle Table. This look is easy to achieve on pine and it's just a subtle aging.


Materials


  • Pine Furniture 

Directions


1.] SAND: Begin by sanding the wood piece, that way the wood will easily accept the stain and create a good pallet to begin your work. Start with a rough grit with a 120 grit. 


2.] STAIN: Once the wood has been stripped or sanded back down to raw, you can stain it using Weatherwood Stain's Reclamation stain. Simply apply Reclamation with a sponge brush, brushing product onto sanded wood and allowing it to air dry. Allow to dry one hour. You'll see in the above time-lapse, the color change is subtle and is pretty similar to Restoration Hardware's "Natural" color. 


3.] SEAL: Apply a wax or varnish seal coat to protect the piece. SatinVarnish will give the look of raw wood, but the protection of cabinetry!


The texture on this maple just makes the color POP, don't you think? This stain will turn most wood species this shade. 

Follow on Bloglovin
photo signature7-2.jpg

March 11, 2020

Restoration Hardware's Natural color on PINE & Palazzo Vecchio TOUR


Ever wonder what it looks like inside a Florence castle? This Medici castle doesn’t disappoint! This castle sits in the square right outside of our AirBNN- in the promo tourist area of Florence. We walked by it nearly every day for four months- if you're interested what the inside looks like, check out my post!


October 23, 2019

Restoration Hardware's "Natural" Color


Let's get to this awesome project. It's my favorite kind of post! Where usually hard to achieve colors are a piece of cake! The inspiration comes from Restoration Harware's "natural" color.  This look is easy to achieve and it's just a subtle aging.

August 28, 2019

Restoration Hardware Salvaged Table Hack & The Spanish Steps


The Spanish Steps! 135 steps connect two large piazzas, at the top and bottom of the stairs. They’re also the site of famous movies like Roman Holiday, The Man Called UNCLE & The Talented Mr Ripley. The square is literally packed with people and street performers.

June 19, 2019

Restoration Hardware's Wood Beam Round Dining Table & Florence Piazza


It's Saturday night and the mood is right...we went and checked out the Lenarda DaVinci museum here in Florence. Although DaVinci lived here there's only three pieces of art from him, all found in the Uffizi. The DaVinci museum is more of a hands on place to see his experiments. After that we strolled the Florence streets, juts like the locals and all the other tourists. The Italians call this a passegiare and it's typical to find street performers are almost every square. Check out this rolling, 2 man band and the dancing pinnocchio.  


June 7, 2017

DIY Restoration Hardware Gray Oak Finish


Today's project is sort of exciting, because before reactive stains we didn't have a way to create the Restoration Hardware finishes we love. Now in just a couple of steps, with minimal work, you can have the RH look in your home, and you don't have to spend $3K for one piece of furniture! So let's get to it, we are going to DIY the Restoration Hardware's Gray Oak Finish on oak, just like they do.

November 23, 2016

DIY Anthro Box Set Book Shelf


Happy Thanksgiving week! I am guessing most of you will be with your family this holiday. Zack and I are still on the road and decided to spend the holiday alone rather than send our pets to a boarder so we could travel to be with family. We have decided to spend the holiday in Williamsburg- in the area where the first Thanksgiving took place. I wanted to tell you how thankful I am for this blogging community. For the first year+ I started my business, this was the only thing each week I would do for myself. Now things are more manageable, but you all have been there through the ups and downs, thick and thin and I am grateful for it. I hope you have a wonderful holiday.

October 5, 2016

DIY Restoration Hardware Manchinto Gray Oak Finish


Oh friends, I have just had the time of my life in NY this past month. We just barely left and rolled into Boston this weekend. I know I've mentioned it before, but it's where I'm from and I haven't bee back since I got married nearly 15 years ago. Now Zack and I will be here for a month and I can finally show him all the amazing sites. If you like American History, or sports,... or food, it's one  best cities to visit. 

June 29, 2016

DIY Anthro Garden Plant Markers


This week I have a 30 minute craft that you can do and then enjoy all summer. I had Anthropologie's Garden Plant Markers pinned for like a year and totally missed my chance to buy them, so I figured I would make this one. I always have clay on hand, because I love the slightly imperfect look of handcrafted...crafts. So this one for me, was free and super cute when it was all done. 

June 22, 2016

DIY Restoration Hardware Grey Oak Finish


Look, any of us can build a farmhouse table. But to really get the Restoration Hardware look, you'll need to recreate with their gorgeous finishes, too. I'll how you how to easily and realistically get the Restoration Hardware Grey Oak finish. 

June 1, 2016

DIY Restoration Hardware Reclaimed Gray Oak Finish

Awesome DIY Restoration Hardware Reclaimed Gray Oak Finish Tutorial and Video#fg2b

Have you seen Restoration Hardware's new-ish branch, RH Modern? It's the same gorgeous RH look, but with the clean lines of mid-century modern pieces. I found this bedroom with the perfect gray furniture and I had to see if I could replicate it. 

March 9, 2016

DIY Restoration Hardware Modern's Black Oak Finish


You know I love me some Restoration Hardware, I mean, what girl doesn't right? So their new RH Modern line is so exceptional. I noticed this gorgeous finish and realized how easily you can get that look with Weatherwood. So I'm here to help all you RH sisters out. I mean, it's hardly fair that they exclude 99 out of a 100 of us on price alone. This is me, helping my fellow ladies out. Create this beautiful RH Modern black oak finish in 3 easy steps!