August 27, 2012

✥ Feature: "Big" Girl's Bedroom Reveal ✥

Happy Monday, everyone!! Today is my first real day of graduate school- since we finished our 9 day orientation. I am kinda excited to get started- you know when you have a really big build up, and it's like- let's do this!? I can't wait ti get in there- and get settled. So maybe I can visit my friend's blogs again!!
This is week 3 for our kid's room show off. I wanted to share the cutest kid's bedroom with you all today, via Shelly at Crazy Wonderful. Her blog is perfectly named because Shelly's style IS crazy wonderful...or super wonderful, either way she rocks the house. 
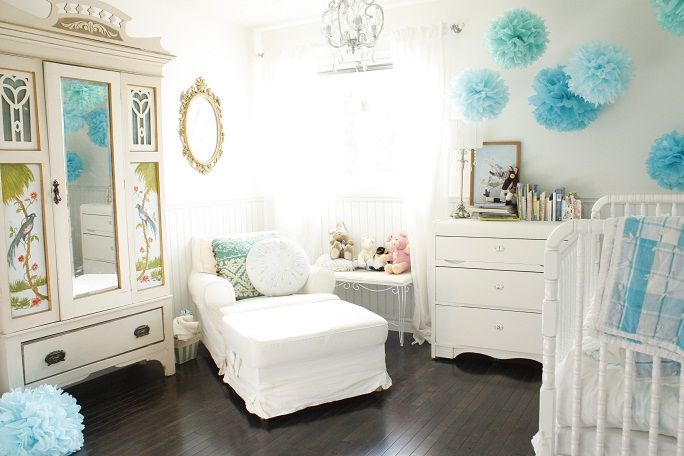
Duuude, do you love those curtains- or what?! I am lOviN them!
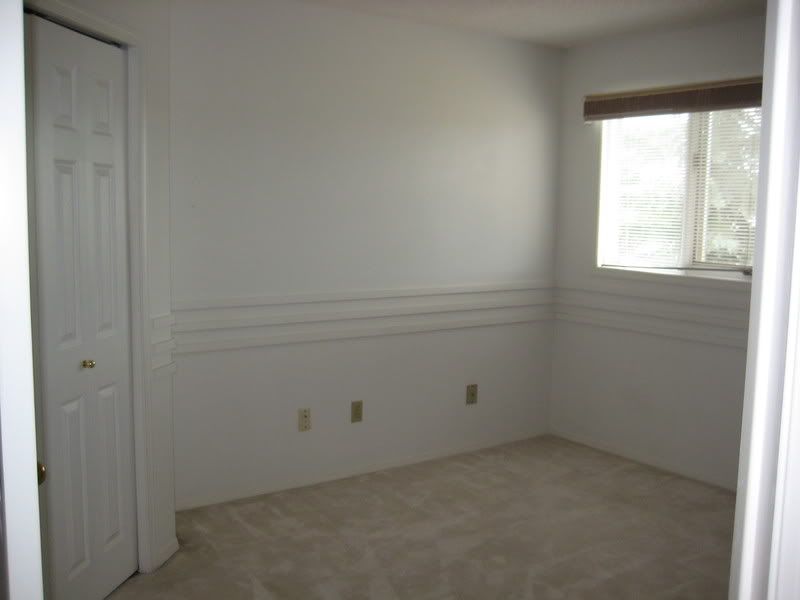
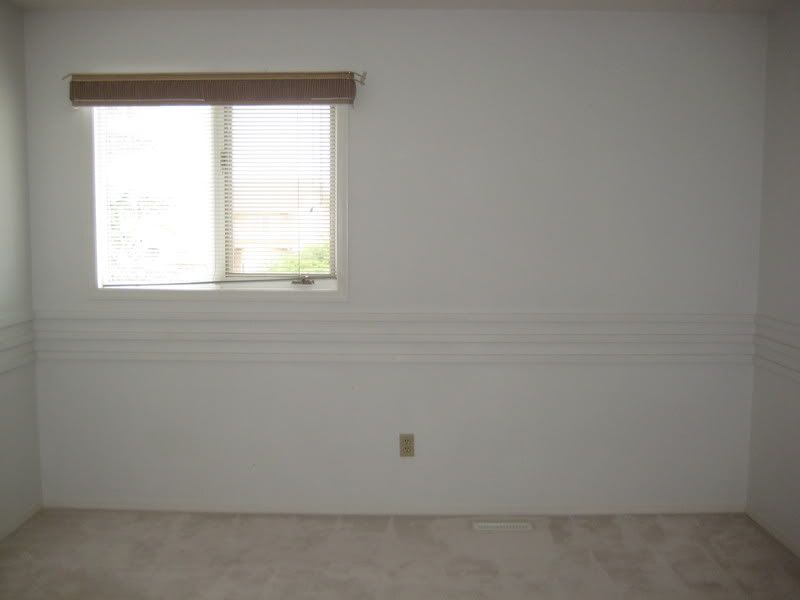
I know we love a good before and after- check this out! Here's what she started with.

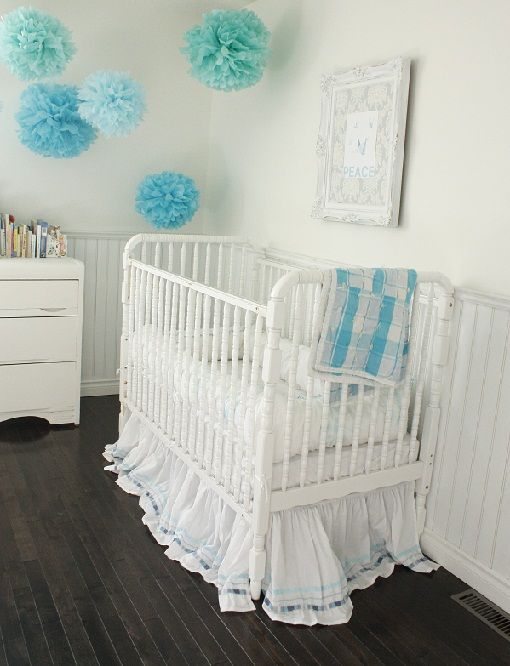
And, here's the reveal!


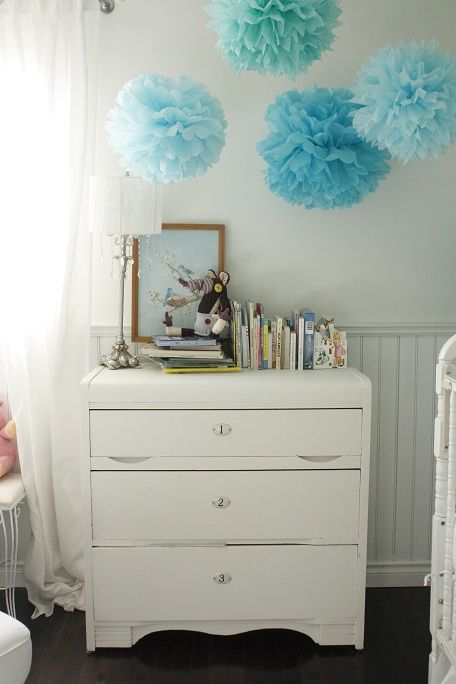
SHelly is a DIYer after my own heart- she made a DIY chalk paint for the bright little night stand. 
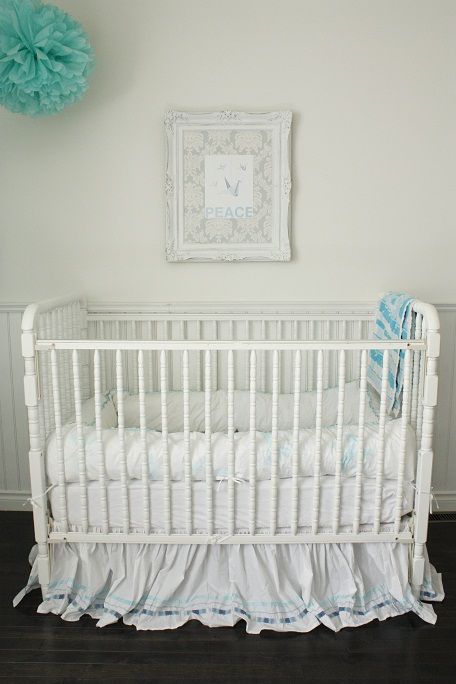
The ruffled bedskirt was another great DIY, Shelly used a plain white bedskirt and added the ruffles. I love the cute details like that and like the bird on the pillowcase, but look how darling this pompom pillow is!!
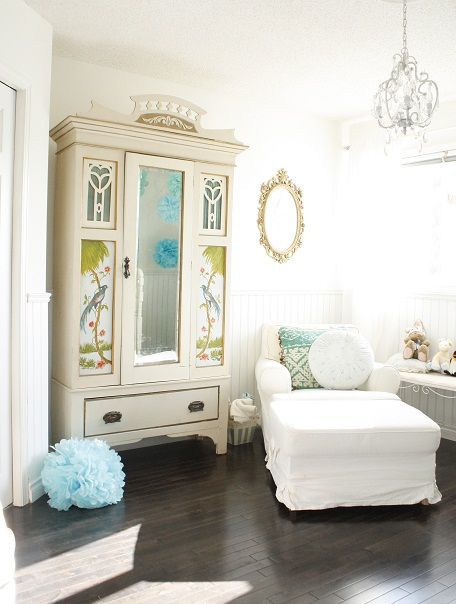
Shelly says the reading nook and a place to display her daughter's books was a must have. But my favorite part- she was able to slipcover her grandmother's wingback and use it! What a sweet place to sit and hold your daughter! 

Make sure you pop over to find the sources and list of projects that made this whole room makeover possible for ONLY $350!!

I hope all of you are doing well!! I miss you guys!
xo

August 23, 2012

✥ Mod Podge Transfer Tute {archives} ✥

 The MBA program has officially started, so I thought I'd share a post from my archives. This project is so old, I doubt hardly anyone has seen it. But it was was stinkin handy, I just had to share it. I've been wanting to use this technique for another sign, for absolutely ages, but I just have not had the time! I think most of you would be able to use this tute- has anyone already done this? 


More Bees in this Berger home! This time it's an "Apiary" sign with an image of a bee and a hive.
I got this sign for free, regardless of what that little sticker says. Z and I hit a yard sale right at the end and cleaned house with all our free goodies. I knew pretty quickly what I wanted to do with it. I saw this sign from Miss Mustard Seed. I loved the idea behind it and thought I could personalize it.


Z and I often call each other "B" as a nickname- {Becca Berger}.
I can't imagine how the nickname came about.

So obviously the bee is a perfect dual meaning. I did this bee lamp last week, but thought the house could use one more. 


I made my sign with a Mod Podge transfer technique that works for words and graphics but you will want to follow the tutorial exactly is you want good results. This project is excellent because you can transfer complicated images without leaving behind residue or shine around the pictures.
 
How I made mine:

[1] Sand and paint sign black
[2] Lightly sand and then paint sign white- took about three coats.

[3] Distress wood now,  before the image is transferred. The words will be too vulnerable to withstand sanding. 


[4] Paint one side of a piece of printer paper with Washable Elmer's Glue, getting complete coverage.

[5] The image: I grabbed my pictures offline {again.} I'm not selling these items, so I think it's legit to snag the pics.
 I just made my own  design for the word using Microsoft Word. I would strongly recommend using only black ink for the graphics.  My image had grey ink and it looked lilac! I had to use touch up paint to cover it.
You can change the image to "black and white" in Microsoft Word by clicking 1 button and it will remove shading and grey tones
Make sure to REVERSE THE IMAGE if you're doing words, again this is accomplished by the click of one button. {Google it if you're unsure of how to make these changes.}

[6] Once your paper is dry you can print out the image on the glued side.

[7] In this picture I am determining the spacing I wanted.
With that decided, you'll paint the wood with Mod Podge, try to only put Mod Podge where paper will be over it. It will leave shiny spots otherwise.
If this happens to you my suggestion is to decoupage the entire board so the whole thing is shiny. Do not try to sand the Mod Podge off- this did not turn out well for me!
Put the image face down on the wood. Make sure to rub it in order to get air bubbles out and to get a good adhesion. Leave it overnight, no peaking!
{It is possible that I take cardboard from Ikea every time I g, so that I can use then for projects.}
This is what mine looked like the next day.
[8] Wet the paper, dunk it in water or use a spray bottle, whatever method you like, just wet it down. You want the paper to be completely saturated. You'll know when it is wet enough because the ink will be much more visible through the paper. You can see at the top where the ink is darkening, becoming more visible through the paper.
 
[9] After the paper is soaked and has set for a couple of minutes you can gently peel the paper off. Don't rub or the ink can come off.

[10] I used craft paint to touch up the image a little. {Here's ^ the gallery wall when I was still adding to it!}
That's all I can think of girls! Let me know if you all have any questions. This technique was the bomb. I know other people have had problems with it- they say the ink won't transfer. I have never had problems, so follow the steps carefully!


I pretty much love this project- the sign makes me smile.
Thanks for looking!


Looking for places to link up your projects? Check out my Party page.
I'm also linked up here.


August 20, 2012

✥ Feature: Anthro-esque Girl's Bedroom ✥


Hello cute lady friends~ Hope you all had super awesome weekends! So far I'm surviving the 8-12 hour days in the MBA orientation- though I'd rather be blogging! Do you think I could get a bumper sticker that reads that?
Anyhow- I am pretty excited to start something new and see what the program brings. The peeps I'm in school with are rad so far and really diverse, so that's a lot of fun!

We are on week two of our children's room tours- and for all the fun anthro fans out there, I thought this room would be perfect. It comes from Danielle Oakey {Danielle Oakey Interiors}- another UT design blogger. It's her daughter's bedroom and it's been featured all over the dang place- in big blogs like Apartment Therapy!
Last week we saw an almost all-white space and talked about if that was a good fit for kids and, of course, I thought it was totally rad! Now let's check out another sophisticated children's space.

I totally heart the homemade art above the bed! I think it's another move that keeps the room young and playful, though I wouldn't mind a few of them in my home either!!
I am also in love with the homemade headboard- the shape and fabric choice were jut peeerfect!!
How much do you dig the bold black and white stripes along the wall? I am way to much a baby to make that happen in my home- but I do adore a strong graphic element in a room. It was a total "have no fear" decision and I think it paid off. Danielle made the awesome decision to use chalkboard paint for the stripes- and I think this helps keep the room young feeling. 
Look how much her darling daughter, Emory, enjoys it!!
I love how Danielle used a deer head from a craft store to create her own mounted bust for next to nothin. I have sent his copied time and again- but her's was the very first I saw! It was so creative!!'
Most of the items in the room were thrifted. I love this bookcase for kid's books, which so easily look messy and busy. A little out of sight and a great place for a few toys, too! Besides, you all know I'm a sucker for a globe! 
The furniture Danielle found she just painted to freshen the up and unify the look. I also liked how the bedside tables are different, but she painted them the same color and they're about the same size. I like this look so much better than the traditional matching set. I've been looking for some to do this to.

Thanks for stopping in today-what did you think of Danielle's daughter's space? Did anyone think it looked too old for a kiddo- or just right? As for me, I think it's a wonderful cohesion of spunk and color creating a sophisticated children's space--and I especially liked that it was unusual. 

August 16, 2012

✥ Succulents {Even Walmart Can Make Something Beautiful}✥

I could only think of one title for this post- I kept thinking about how even Walmart could sell something that would turn out beautiful!

I've been wanting to jump on the succulent train for awhile now- and just never seemed to have the time. Then Zack and I were grabbing some last minute camping stuffs and I saw these babies. I had this free vase/bowl thingy I got from my bro-in-law and thought it was perfect for these guys. 
I had some potting soil on hand because I planted herbs this year- which were, by the way, super fantastic! If any of you are condo/apartment dwellers and are on the fence about a pot garden- jump off that fence and come on over to the bright side! It was so easy and I loooved having them on hand. That is, they were on hand until Zack and I went on a spur-of-the-moment four week vacation!! I am certain everything was fried by the UT son ages ago.

OK- long detour, now back to the succulents.
I potted my cute little plants and thought they looked kinda lonely in there. So I threw in some polished stones {I think they were from a fish tank we had a zillion years ago??} 
and then called it a day!

 This is just part of my master plan to beautiful my honey oak horror kitchen by giving my eye some beautiful vignettes to look at instead. 
As a total PS- I think my landlord's wife reads my blog, so to her I say: thanks for reading and please don't be offended about my dislike for the kitchen cabinets!! {And wouldn't they look so totally rad and awesome painted white!?! ;-)
Hope the rest of you chicas are doing well!!

August 14, 2012

✥ Guest Post: Southern Lovely ✥

Hey friends! Today you can find me over at Southern Lovely. My lovely friend Lindsay is moving and I was thrilled to be asked to share a post over at her place today! 


And just because loved it, I thought I'd share a little project Lindsay posted the other day-a pinwheel party for her 6 year old daughter! Isn't it lovely? I think it turned out beautifully and was so unique. Isn't it the perfect follow up to Shelly's amazing little girl's room yesterday? I thought so. ;-)
I hope you'll stop by and say hi!

August 13, 2012

✥ Feature: Dreamy Child's Bedroom ✥


I am super stoked to share a room from one of my favorite blogs! I may even have a blog crush on this one- I can't help it, I just LOVE everything Holly does. Her home is beautiful, she refinishes furniture and she has great style- in clothes and decor. If you don't know her blog already- this on one not to miss. I promise!

This feature is kicking off 4 weeks of children's rooms features. I know a ton of you gals have kiddos, so I thought I should include some kiddo inspiration in these features!!

This is the room Holly put together for her daughter, Wren.  These pics share the blank slate she started with. 


And here is the dramatic after!!
Doesn't it look so dreamy and soft?!?

Holly said that Wren's bedding created the color scheme for the room- meaning soft creamy whites and every shade of blue was welcome! 


Holly painted this old waterfall dresser/changing table herself. Of course we all love the enamel numbers she added to the front. 

I love the whimsy the colorful blue poofs add to the room! I think it reminds you it's a kid's space and to have some fun in there.

The antique cabinet is a real stand out piece and was store bought rather than repainted. I don't know if I would have seen it and had this vision in mind- but now I think it makes the space. Seems like a very expensive nursery- right?

What do you guys think? Too white for a kiddo's room? I have to side with Holly- in that children come with a ton of colorful accessories, toys, books and clothes- this is a perfect backdrop for all of that. Such a lovely space- not unlike the rest of her home- you should stop over and check out one of my all time favorite blogs! Make sure to tour her home renos page and don't miss Wren's new big girl room {I loooove her bed!}!

August 9, 2012

Vintage Index Card Recipe Box w/Printable Recipe Cards

Hey there, cute lady friends! I am reposting a little project I whipped up the other day for Cassie, when I guest posted at her place. If this is a repeat, then this is where you sign off, and I'll catch you on the flipside.
To the rest of ya, here's my latest dish, I found this vintage, metal index card box the other day while garage sal-ing. It cost me three beans and I had actually been on the lookout for this very item! So I snatched up my sweet score without even an attempt at bartering for this sweet treasure. I thanked my lucky stars it was so cheap. I've seen them on Etsy and Ebay, but for nothing less than $15.


I've wanted one to put my recipes in for ages and, now that I have one, I can walk towards the light with a sense of accomplishment. Like I came, I saw, I conquered- my work here is done, you know? 

Not too fast. What. About. The. Recipes? 
Instead of using old magazine tear-outs or scratch paper, {yeah, so maybe I had some of that going on before} I made my own recipe cards. For these, I used some vintage-y styled freeware graphics so the new cards would have a retro feel to go along with the retro filing drawer.

You can grab your own, if you want to. Just DRAG the recipe card onto your desktop and you can print your own. {Google Docs and I are currently not on speaking terms, as it keeps distorting my images- even the pdfs. So whatever!} Oh yeah, and printing them on cardstock is a good idea for stability and durability.
I know that was a super easy project, but you know what's not super easy? 
Copying all my old recipes onto my new cards! Dope! 


I don't do a ton of kitchen projects, {because my rental kitchen is where inspiration goes to die} but coincidentally, last week I made my own vanilla extract. Of course I made my own printable for that, too. If you missed that post, you are welcome to grab that one here
And that, folks, is all she wrote. 

August 2, 2012

My Living Room [Before & After!!]

I've been thinking about this post for awhile. I think a lot of people get stuck in a decorating rut- due to lack of support or finance. Sometimes, you start to think you'll decorate later- when you have more time. At least that's what happened to me.
Back in 2004-05 Zack and I built our house. It was our first home and I was pretty ridiculously happy with it. Here are some pics our realtor took when he listed it.
It was staged to sell in these pics, but devoid of personality. Mostly, I just removed anything that could come off a clutter, so plants and little furniture were removed. But if I were to be honest, I'd say it never had a lot of spunk to begin with.


But like I was telling you'll last week, we sold our house because we wanted to go back to graduate school. Since both Zack and I wanted to get our MBAs- {for separate reasons of course.} We had plans to attend the same school, so we needed to do reasonably well on the entrance exam to make sure we could do that.
A little more info about how we ended up renting...
We packed up everything and moved into a condo in UT, where we proceeded to shop for homes. The housing market was just beginning to fall apart, so we finally decided to ride it out and rented our little condo. All the while I was thinking, you know, soon we'd get our own place, and I could decorate again.


I thought I could put my head down and march- just get through it and then I could breathe again- and play around with ideas again. But then- I started to hate our furniture. Especially in the new space. 
And our decor- oh, I especially loathed our decor.
Circumstances be darned- I decided I would NOT live like *this anymore! 
{*By this, I mean the feeling that you're not at home when you are, in fact, in your home!...not like we were living in squalor or anything!}


These are some pics I took right after I decided to make the change. Because, of course, I had not been planning to take any photos of the space for the duration of our existence there!
 So one night I had had enough and I took some pics, so I would at least be able to someday show people a "before" pic. 
{Note: This was before I knew not to take pics at night with the lights on- oh, how much I've learned!! Note 2: These are not watermarked fr GOOD reason!! ;-)  }


I made up my mind to sell everything we had brought with us and decided to start fresh. 
Instead of buying from big box stores and purchasing matching sets, I would search out just the right piece. I made the decision to only buy things I loved. 
I sold our old crap things on Craig'sList and Ebay so we could get the most possible for them. I even spent some time to fix up/paint/ redo some of my old goods- so I would be able to modernize'em and get more moula!!


In fact- we made enough money to pay for almost all the projects, furniture and makeovers I have done ove the last year!! Crazy, right!? Even the custom sectional we got from Bassett was paid for from the proceeds- though Z did sell a couple of guns and added that to the furniture fund. {Now that's true love, right ladies?}


I judiciously decided where chunks of the budget would go- like the couch and printer's cabinet. While most everything else cost me less than 20 bucks each- 
Either used to rehab something we already had- like my end tables, ottoman, large art over the couch, clock
 OR to make something from scratch, myself. Like the map art flanking the window, the subway art, tree stump table---to name a few.
I know you gals are no stranger to buying second hand- but I'll share my criteria with you. The second hand item cannot be bought merely because it is a good deal!! ;-) This is tempting, but should be avoided! It must have the exact lines and scale that I'm looking for. No settling! 
If you wait long enough, the right item will come along! Like my tapestry chair- I paid 50 bucks for it, but Arhaus sells it for $2200!


When I look around my small space- I now feel like there is something to be proud of! It is a rental- but it is MY space, I feel ownership over it. It definitely feels like it's "me"- and who could ask for more than that!
I know you guys can do it, too. No matter what your budget is, no matter where you live. Just decide what you like- and bit-by-bit, make it happen!
Zack and I are on the vacation of our lives right now- it has been so fantastic...but I do look forward to getting home and digging into my kitchen project!