January 23, 2012

✥ Reader Feature: Literature Wallpaper! ✥

I am happy to share a cute little blog with you all today! Jen, a newish blogger, from A Place to Call Home  agreed to share her Mudroom Makeover with you guys!
I am super excited to introduce you to Jen because she is such a sweetheart! I have loved getting to know her better and I'm sure you will like her too! Her and her hubby have made over almost every corner of their two story home- while, of course, keeping a budget in mind.
✧✧✧✧✧
Hi...I'm Jen. And I write at A Place 2 Call Home. I'm so happy to be here today to talk to you about my mudroom.


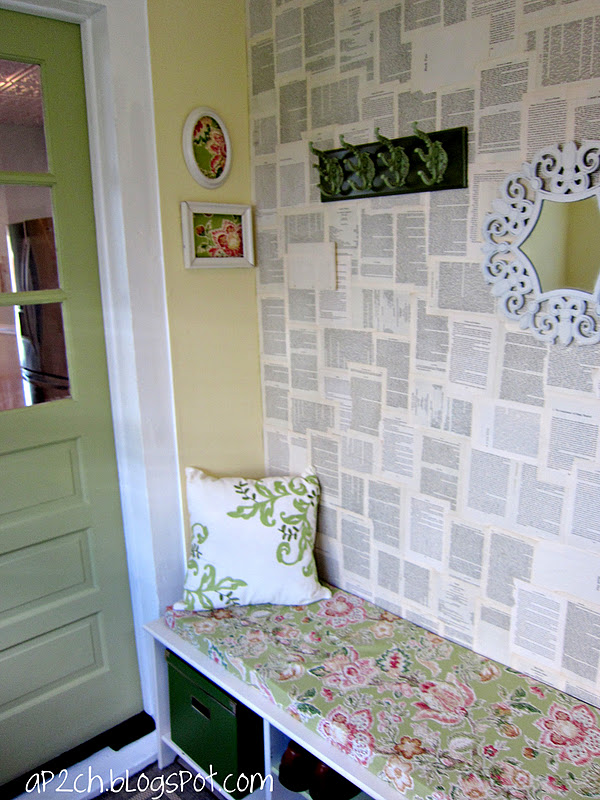
This is our mudroom that's filled with tons of organization, as well as fun style.


We used an expedit bookcase from Ikea to give us plenty of storage.


Since the room is small, I wanted it to have big personality, so I added this vintage book page wall.


This is an old ikea tv stand turned bench. I painted it, added some boxes. Then I got a piece of foam from Joannes and hot glued this pretty and fun fabric to the foam.


This bookcase is super organized so that life is simpler. The metal boxes hold recycling. The fabric boxes hold everything from toys, scarves to flip flops. Up top we have a glass jar for loose change, and a place to put our keys when we get home.


And I painted the door green because its a mudroom and I thought it should be fun, right?

If you like my vintage book page wall, here's the how to. Its probably about the cheapest easiest DIY project ever.

Get some Modge Podge. I usually use the matte clear glue. Its the yellow one.

I love vintage books, so that's why I think they are perfect for accent walls. You can find vintage books at garage sales, thrift stores, the free pile at the library, and lots of other places too. Most of my books were free. And since the book will cost you close to nothing, and you don't need much glue, this project really is great for next to nothing.

I love the color and discoloring on antique books, I think it really warms up a space.


Simply take off a page and use a paint brush to wipe on the glue. It doesn't have to be perfect. I use foam brushes because they are pretty inexpensive and I like that they are thicker and can spread the glue faster.


Once you put the glue on the page, and stick the page onto the wall, you can run your foam paint brush over the edges of the page so it sticks down. You may notice that some parts are sticking up, you can just lightly dab or brush on a little paint to those areas. I just make sure its stuck to the wall and no edges are curling. This is why I use the matte glue finish, because it dries clear and you cant tell I put glue on it.

Vintage pages are so versatile-

Here they are all lined up, they look neat and more modern.

AT - wallpaper wall - Hungry Mother restaurant in Cambridge-1

Here the pages are barely sticking on the wall. It looks much more shabby chic and romantic and over the top in a great way

This is a great mix of both those styles. I love that they used bold black and white images too. If I were to do another vintage page wall, I think I would go for this look.

So now that you know there are different ways to put the paper on, here's what I did. I put some of the papers vertical while others horizontal. I haven't really seen too many other people who did this, but I just thought it added depth.  I also overlapped pages to give it a more layered look too.


Think about the book you are ripping your pages from. This book page wall was created using two books. One about marriage and one about mothers and daughters. I had lots of great titles and words on the wall that made me feel like it was special to our family.

Do you have a favorite number? Or a number that's important to your family? Maybe the number of your house, or birthday or the date that you were married? I tried to incorporate these numbers into the wall too. I used chapter numbers and page numbers to sprinkle in a little bit of family history.


Thank you so much Becca and From Gardners 2 Berger readers, I hope you'll stop by my blog A Place 2 Call Home to check me out. I'm all about cleaning, organizing and decorating. Hope to see you soon.
✧✧✧✧✧
I love Jen's wall treatment, don't you? I have seen a couple of rooms wallpapered with book pages, but I wouldn't have the nerve to do it! Not only has Jen done this book page wall, but she also has a bathroom "wallpapered" with a MAPS. 
You should definitely check out the before and after post, it gives  me a lot of hope abut what can be accomplished in a home with determination and hard work!

January 19, 2012

Monogramed Soap Dispensers [Tutorial]

Know what's missing in that bathroom of yours? Nooo, not an oh too obvious role of toilet paper. Uh-ah, certainly not that ugly, dirty, filthy toilet plunger. Nope sillies, it's a customized hand pump soap dispenser. I have been working on some majorly time consuming projects- as well as dealing with some medical crap with the hubs- so I thought I'd share one last pre-holiday project I'd "pumped" out.

Since there are a zillion people to thank around the holidays I made some monogrammed soap dispenser bottles. I saw a tutorial fromThe Idea Room about a bazillion months ago and saved the link.

Here's what you need:
-Soap Bottle
-Something to help Remove the Label from the bottle {I used Goo Gone}
-Transparency Sheets
-Monogram
-Laser Printer
-Scissors

1] Get the monograms-I browsed the Net for free source monograms. There actually weren't a ton to choose from. You could absolutely make your own- and I would have if I weren't in the pre-Christmas crunch. 
2] Copy and Paste the monograms to a Word doc-Select the Size you want the image to be. Measure your bottle, make sure you know how much blank transparency needs to be under the monogram so the transparency can rest on the bottom of the soap dispenser, keeping the monogram right where you'd like it. See the dashes in the above pic? That's a rough estimate of where my transparency is placed.
3] Print up the transparency-I had my transparencies printed up at Staples-cause I go there for everything, they're cheap! Since I was already printing up a page, I might I have thrown a few "B's" on the page for our own home! May as well fill that sheet, right?
4] Cut out the monogram {leaving the space at the bottom that I just mentioned} and Insert into the bottle- I just curved mine, like shown in the pic, and popped it right in the bottle. I used my little finger to push it  against the front of the bottle.


There you have it, an easy peasy way to show your gratitude!  And, a very nice way to encourage people to wash their filthy little hands.
For anyone wondering- The artichoke tea light holder is from Anthropologie and both soap dishes are from West Elm. 
Now get to pasting, printing, placing, and pumping!


January 16, 2012

✥ Reader Feature: Total {Gorgeous} Kitchen Remodel ✥


I look forward to these features each week, because I LOVE sharing YOUR projects! Remember each Reader Feature is from one of my subscribed readers -I think it's totally awesome for you guys to get to see some of the A-Mazing talent that follows my little blog!

This feature is a grade A prime example of a super fabulous blog you all should check out!
You're getting to see some of the beautiful rooms designed by Kelly from Oak House 5. She's a relatively new blogger but has been getting some major features for gorgeous rooms like the ones she's sharing today!


✧✧✧✧✧


I am so pleased with the final result and honestly, there is nothing that I would change at this point. 

-- Kelly Lokey

✧✧✧✧✧

 Did you just die for that kitchen makeover! I full gut job and so worth it! I would love that "after" kitchen in my home! I also love what Kelly did with the walls in her dining room, the wainscoting is gorgeous. I love the pic of the chandelier looking into the kitchen- simply stunning!


The rest of her room is just as beautiful as what you've already seen- so make sure you check out her home tour.

January 12, 2012

Family Tree Word Art [Tutorial]


So, Christmas is the most wonderful time to show your family just how "GANGSTA" you are with DIY. I had to come up with gifts for the type of people who have enough "DOUGH" to buy whatever they need/ want! Perfect time to "SHOW 'EM WHAT YA GOT!" I saw this type of family tree and thought it was just perfect for my family, minus the $50 price tag.

January 9, 2012

✥ Reader Feature: Modern Country Kitchen Remodel ✥

Hello Lovelies!
Today I get to share an amazing kitchen makeover from Heather at At the Picket Fence. Heather and her sister Vanessa run the show over there- and besides being so super cute they share fun little projects as well as home improvement projects. I make sure to link up at "Inspiration Friday" their weekly Linky party.

We know there is a wide spectrum as far as kitchen makeovers go- from the cabinet painted projects to the full gut and remodel.
The after shots of this kitchen look completely different from the before pics- but all these projects are very doable.  The number one change- painted cabinets.
Night and day changes- right?

I think my second favorite change was the kitchen island build. She shares the details here and here- 
Love the extra space it provides and how she trimmed the original island in beadboard.
Heather added a a few extra feet of prep space to the island by adding a beautiful Ikea butcher block counter top, stained walnut. I have to be honest, I love this change! So clever and an awesome way to make your kitchen look custom.

Another special feature- Heather added the look of open shelving by taking off a few cabinet doors, but made this feel really special by creating an ornate curved header for the top of the cabinets. Makes it look custom, right? Throw in a couple of baskets and you have a beautiful vignette right there in the kitchen.
Ahh- don't you just love the farmhouse kitchen sink…swoon. I love that faucet with it, I mean really!

Did you guys notice the feet that were added to the cabinets- making the pieces look more like furniture? SO clever and it fits with the stye of the kitchen just perfectly!
Here's a shot of her before and after for ya. {PS She even added beadboard wallpaper to the toe kick, I mean every detail is perfect!}
I thought the countertops were soapstone- but nope! Heather says they're from Ikea and super affordable! 
Everyone loves the look of stainless steel appliances- but after owning them {not here in my condo- obviously}, I have to say- they are not my favorite, too many fingerprint marks, blah, blah, blah. {Not that I'm hating on any of your guys' appliances! }
But I do love the look of white appliances mixed in with white cabinetry. It is one of my favorite looks. It looks more seamless, don't they blend in better?
Don't you just love the breadboard backsplash- a great choice for this farmhouse inspired kitchen and comes at a price most anyone could afford.

The whole time I'm looking at her kitchen, I am thinking I really need to figure out how to style a kitchen cause Heather has it down pat!
 On the other side of her kitchen she removed the old desk to make room for an antique buffet- I was in love with Heather's Christmas decor in her kitchen- it looked fantastic!
Lastly, they added built in seating in the bay window! Perfect touch, right?!

Doesn't this makeover make you want to grab your paint brush and RUN to your cabinets? I love it because it is just SO DOABLE! But I give Heather a TON of credit cause everyone know, kitchens are a labor of love! 
  I gave you a few of links for kitchen projects- but head over for  more tutorials on just about every project in this kitchen- and many more awesome ideas on their blog!