May 18, 2011

Spray Grip Goodness

In my last post I mentioned I was desperately hoping to have at least one of the lamps I have stashed finished for Mandi's lamp linky party- but the weather completely foiled my plans. I have to spray paint outside and it has been big time WINDY and RAINY.  Bummer.

So instead I have a recent find for you all that you'll LOVE.

So, if I ruled the world my first official decree would be the gift of one new spray grip for everyone!!

OK, maybe not actually- 
but it's so fantastic it's understandable why I would say such a thing!

No longer must we always pay 7 bucks for the spray paint with the trigger sprayer- now we can spend 3.43 for the regular stuff and attach our 2.50 Spray Grip Goodness to it.
 
The spray grip is, in fact, goodness. It clips onto most bottles of spray paint and then allows you to adjust the amount of pressure you're apply using your whole hand and not just your index finger. I was able to lacquer like never before!

So just in case you were wondering if you should drop the 2+ bucks, and you don't have a Z Berger standing by to tell you that your index finger is worth it- then allow me to be your Z Berger and say to you-

BUY IT!!

- Becca -

May 16, 2011

Thank YOU!

A huge thanks to YOU peeps for following my blog!
I am so excited to have people interested in the little projects I LOVE to do! I love all you comments and your thoughtfulness! 
Thank you, thank you for making this soo fun to do!

Hope all your days are flled with fun crafting DIY adventures!

P.S. Have you guys seen Mandi's (from Vintage Revivals)  post about a lamp-off linky party starting tomorrow? It's gonna be tight but I'm hoping to get my next redo done in time!

- Becca -

May 14, 2011

Copyright-I mean Copycat Book Wreath!

This project is no biggie, cause basically I'm a total copycat. 

I love these book pages wreathes that you find all over the Blogosphere and decided to make one for myself. I saw them selling for $40 on Etsy- so let's save some dollars, shall we? 

I looked high and low for a wreath form from a dollar store and they don't sell them around here.
My cheap side almost won out and I was going to make a 10 inch cardboard circle to use as a base but finally decided I wanted the final product to include the depth created by a 3D form. So I bit the bullet and bought one from Joanne's for a whopping $5.

The book, however, was a 49 cent find from Saver's (thrift store)- and it came with aged pages and beautiful teal colored trim- just what I wanted!

I looked up "book page wreathes" on Google Images and decided on my favorite style. In the end I went with this one as my model from Lindsay at Living with Lindsay. She did a great and easy to follow tutorial.

For my wreath I ended up checking the OCD at the door and tried to let the creativity flow. {Easier said than done! lol} In the end I primarily used two shapes over and over. I circular tube and a ruffled looking page. I really liked the varying textures.


The tutorials I looked at said they used under 200 hundred pages to complete their projects- so I made sure my book was over two. However- 4/5 of the way through I had about 4 pages left. *ugh*

For about a minute I thought about waiting to finish so I could look for a matching book-but I really don't think I would find one and I'm so impatient!

See? Crap-ola.
So I was left trying to thin out the layers I'd already done and scrape together enough pages to cover the middle. The back looks like crap-ola cause I took off the bottom two rows- see where I cut some off? But...I got it done.


I still need to use some pages of something(?) to cover the styrofoam back so that it cannot be seen in the mirror.

To hang it up I just bent a paper clip into a hook- I didn't have any straight pins, you know- cause I don't sew!

I think it turned out pretty close to the inspiration- but still uniquely mine.
Not bad close up- but now you can see why the mirror isn't hung- darn thermostat. This wall will probably be the new gallery wall anyhow, so this setup is temporary until we can make up our mind about those new couches already!

literally inspiredSAS InteriorsChocolate Drool and Kisses


Thanks for popping in today!
- Becca -
Partying HERE this week and here.


May 11, 2011

Picture Personalized Coasters

I keep a file on my computer of homemade gift ideas. Awhile back I came across these cuties on Chameleon Girls

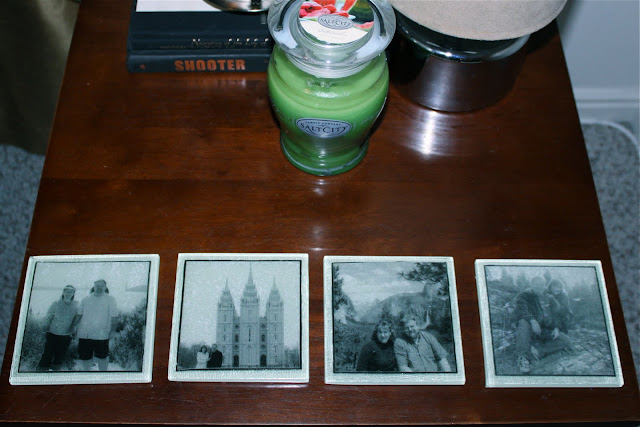
I've been waiting for the perfect occasion and I found it. I thought they'd be a perfect thank you to my wonderful father and his wife for having us to Cali and graciously providing a family vacation. 

At Lowe's I decided on these gorgeous glass tiles.


I love the inspiration tissue paper but wanted a more personalized look and something to fit their aesthetic.
In the end I had my Pops send me a few of their favorite photos. I converted them to pdf and cropped them down to 4x4in. 
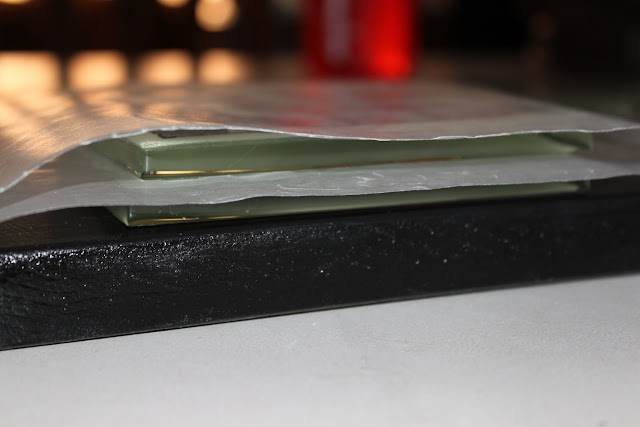
Then the tricky part- you want to print them on tissue paper so they will be very thin and look more a part of the tile. I taped tissue paper to a regular 8 1/2 x 11 sheet and stuck it in the printer that way.

Cut them down to size and then modge podge them onto the tile. You don't want to apply modge podge to the back of the tissue, only to the tile. Wait to out it on the tile until
the tile looks dry and feels tacky.
Lay the tissue paper where you want it, then put a piece of wax paper on top and then rub out any bubbles. (I didn't really have many.)
After 15-20 minutes you can apply the second coat of modge podge.

When everything is thoroughly dry, I waited overnight, you can lacquer the tiles. You don't want to skip this step if you're planning on using the coasters because they aren't waterproof without it.
I used light grey felt on the bottom of mine- but you could use cork if you wanted to.

 I love being able to give a personalized gift-
and it's especially perfect for those people who are able to purchase the things they need/want!

Thanks for swinging by!

- Becca -
Cherished Treasures”=

Partying here this week and more specifically here and here.

May 10, 2011

➹ Homemade Cleaning Supplies ▻ Part 1 ➷

I mentioned that Z and I have incorporated a years' supply of cleaning and hygiene products as a part of our food storage. I discussed how to keep track of what you've bought and buying on sale, but now let's talk cleaners.

I thought a lot about how I wanted to store all these cleaning products in our home- how much, where, which ones. In the end I surprised even myself with the answer.  We've decided to store the items that go into cleaners so that we can make our own, store less toxins in the condo, make anything we want as we need it.

Recipes can be found all over the Internet- but here are the basics you'll need to start:

Liquid Castile Soup, Washing Soda, White Vinegar, Lemon Juice, Borax, Baking Soda, Olive Oil

With these items you can clean just about anything- and they're pretty stinkin' cheap too!

Homemade  Laundry Detergent- All Natural

1 cup Borax
1 cup Washing Soda
1 bar (of grated) Castile Soap 
Just grate a dried out bar of soap and mix in with other ingredients in reusable container .
Use  2-3 tbsp per load depending on its size.


Homemade Surface Spray- All Natural
2 tsp Borax
1/4 tsp Liquid Castile soap
16 oz Spray Bottle
Hot Water 

Furniture Polish 
 1/2 tsp Olive Oil
1/4 cup Vinegar or Lemon Juice
Mix in a glass jar and use rag to polish surfaces.

Floor Cleaner
1 cup Vinegar
2 Gallons Warm Water 
 
Toilet Cleaner 
Baking Soda or Borax
Liquid Castile Soap
 
Dishwasher Detergent
2 cups Borax
2 cups Baking Soda
4 packages Lemon Unsweetened Kool-Aid or 1/2 cup Citric Acid

Window/Glass Cleaner
 5 parts Water to 1 part White Vinegar
Spray Bottle 

 Carpet and Stain Remover
 1 part Borax
10 parts Warm Water 
Spray Bottle
Mix and then spray on stain, wait 5-10 minutes and blot clean.

That's the basics! Isn't this the perfect project to put in cute bottles and make some homemade labels? Do you see it?
source
I do! Let me know if you have any questions,  have recipes to add, or want some more recipes from me.

I'll be back tomorrow from my trip. Gotta get my projects going!! Woot Woot!

UPDATE:
I've added more recipes! Check'em out here!
And Here!

Follow on Bloglovin

 photo 2fc9bcc8-3007-4b83-a06b-544496708353.jpg


May 9, 2011

More Helpful Tips {Food}

DID YOU KNOW?

*Peel a banana from the bottom and you won't have to pick the little "stringy things" off of it. That's how the primates do it.

*Take your bananas apart when you get home from the store. If you leave them connected at the stem, they ripen faster.


*Store your opened chunks of cheese in aluminum foil. It will stay fresh much longer and not mold!


*Peppers with 3 bumps on the bottom are sweeter and better for eating. *Peppers with 4 bumps on the bottom are firmer and better for cooking.


*Add a teaspoon of water when frying ground beef. It will help pull the grease away from the meat while cooking.


*To really make scrambled eggs or omelets rich add a couple of spoonfuls of sour cream, cream cheese, or heavy cream in and then beat them up.


*For a cool brownie treat, make brownies as directed. Melt Andes mints in double broiler and pour over warm brownies. Let set for a wonderful minty frosting.


*Add garlic immediately to a recipe if you want a light taste of garlic and at the end of the recipe if your want a stronger taste of garlic.


*Leftover snickers bars from Halloween make a delicious dessert.  Simple chop them up with the food chopper.  Peel, core and slice a few apples.  Place them in a baking dish and sprinkle the chopped candy bars over the apples.  Bake at 350 for 15 minutes!!! Serve alone or with vanilla ice cream.  Yum!

More helpful hints from my home to yours!

- Becca - 

Track your Year's Supply of Storage (Hygeine/Food)

Along with the traditional year's supply of food storage and the 90 day supply of short term foods we have decided to add a year's supply of hygiene and cleaning products.

We started with and excel spread sheet and made a list of all the items we would NEED for one year.
 We made a list that we kept handy and each week when the sales ads would come out we would look for our usual foods and also the items we needed to stock up on. 

Instead of buying all at once, we saved a ton of moula by buying good deals and keeping the items we HAD and NEEDED ORGANIZED on the computer.

If you're not Excel savvy these cute girls from Food Storage Made Easy have made a downloadable spreadsheet for short and long term food storage needs. You can either modify the long or short term storage sheet to keep track of your hygiene products and cleaning supplies.


 Now that we're on this system we need to make sure we track when something's empty. For us it's easiest to print off copies of the spreadsheets and put one in each bathroom and in the kitchen. This was we can write it down right as we're throwing out the old deodorant or whatever.

 Here' what the cabinet in Z's bathroom looks like. It has mostly his year supply of hygiene products.

 
Then on the cabinet door we have our spreadsheet printed out.  We just write in when we've opened  a new item.

There's probably a fancier way to display it and keep track of it- but the truth is, you have to have a system you'll actually do.

It would be easier if we could remember to input the stuff directly, but it never seemed to work out that way.

Each week when I look over the ads and fliers I input all the lists into the computer and add whatever is needed to the grocery list. A little work each week keeps us stocked up and helps us to buy things when they are on sale.

And who doesn't like saving money?!
- Becca -
lil luna featured button
Partying here 
and  here !

May 5, 2011

A "Home" Tour

So maybe this isn't the typical home tour, but on Z and my last trip to Cali we were able to go to Alcatraz.

What?

Alcatraz was a home of sorts to tons of people!

Besides, you wouldn't believe the strange beauty found on the deserted little island.

Warning- this is an image HEAVY post.


If you've made it through to the end- well, bravo!

Isn't there something hauntingly beautiful about these old prison walls?

- Becca -

Could be linked up at any of these great parties.