April 16, 2012

✥ Reader Feature: Boy's Vintage Airplane Room ✥


 I hope you all had fabulous weekends!
 I think we're on a bedroom spree over here. We had a super romantic adult retreat last week, and before that we showcased the awesomely stylish  tween bedroom. 

Well today we get to see a super rad boy's room! I know you will love it- and you'll adore Kim, the gal who runs the show over at Too Much Time on my Hands!! I love her take on a airplane inspired bedroom, and just wait until you see the Anthro inspired dresser she refinished. I would put it in MY room!! Love.

✧✧✧✧✧
Hey there From Gardners 2 Bergers readers! My name is Kim and I am running the house over at Too Much Time on My Hands.
I do lots of crafty decorating and creating, some cooking, lots of upcycling, just a big smorgasbord of fun and excitement.
I also host a linky party that starts every Friday evening and lasts through the weekend.
I am here today to show you my son's vintagey airplane bedroom redo.
Done!
Finally!
I am tired!
 
This is the view into the room from the hallway. The map wreath found a home on the door.
This is the long wall across from the door and the closet. I really do love the headboard.
Like the paper airplane I painted on the wall? The trail is electrical tape! Found the idea here in this unbelievable bedroom.
There is the luggage tag lamp, which I decided to paint black,
and my reclaimed fence turned into wall art.
Got the clip boards for $1.99 each at Target. Then, I printed some images from Graphics Fairy and displayed my fun telegram announcing Everett's birth. Buy your own here.
The kids found a big branch on a walk with dad and it was the perfect size to use as a curtain rod.
The curtains are cloth drop cloths which I just cut off at the bottom and attached with shower curtain rings. Total project was $14.99, including the curtains, rings and brackets to hold the stick.
I think the dresser is my favorite piece in the room.
I made a copycat Ballard board to display some sentimental items. The "Happy Journeys" block print was made by the Everett my Everett is named after.
Here is a ski pass his godfather made for him when he was 1 week old!
I got my big airplane from Hobby Lobby and made little wooden discs with vintage images to hang above the closet.
I am just in love with the room and how it turned out. I spent next to nothing on it....I didn't save receipts or anything, but my guess is under $100.
This was a really big project and now that it is done, I am looking around and wondering, "hmmmm, what next?
P.S. The paint was from WalMart...believe it or not it went on easily and covered great! The color is Cinder Pebble Gray


✧✧✧✧✧
Great right? I love the rustic, vintage feel and freaking die over those DIY projects!!
 You guys will fall in love with Kim's blog- it's a lot like mine- except she totally ROCKS projects. She has a ton of crafts projects, like this Pottery Barn Typewriter art knock off.


There's super rad DIY's- I mean look at this framed, tufted headboard, it's made from an old fence!


And I die for this dresser!! It only cost her 16 bucks and just look at the after pic!!


Kim also has tutorials {I told you her blog was like mine!} Look at this super amazing Pottery Barn knock off clock. I love the rustic wood!

 I hope you get a chance to stop by, and tell her I sent you!
I'll be back Thursday with my final reveal for the Spring Into Action project!! Eeee!

[PS] I feature YOU GUYS  {my readers} every Monday! Do you have a room makeover- or maybe have a home tour you'd like to share? 
Drop me a email or shoot me a link. Let's see if we can work it out!!  xoxo

April 13, 2012

Herringbone Pelmet Tutorial


Isn't pelmet a funny word?
Well I think it is, and I decided it was the perfect solution to my kitchen window dilemma. I'm not a kitchen curtain person- and if you are, I'm not judging. I'm just saying, they're not for me. I saw a pelmet tute ages ago from Cassie, and filed the idea away for later.  Today, my friends, is later!
Wanna know how to make one? {This is where you start skimming if you don't care how to make one of these bad boys!}
Here's how I did mine. You Need: Fabric, Foam Core, Exacto knife {or something like it} Ruler or Carpenter's Triangle and Batting, L bracket or Curtain Rod Hardware

1] First, measure your window and determine the measurements of your pelmet. I used two pieces of foam core- then taped them the length of the window with packing tape.
2] Measure your curtain rod hardware, then cut the top of your board the same amount as your hardware is long. Like my hardware was 2.5 inches, so I cut down the board 2.5 inches.  Make sure you don't cut all the way through the board. I cut through the outer layer and the foam so I could bend it.
  3] Then cut out the corners. You can cut them all the way through, then remove the piece.  
 4] Then bend the sides and the top down and secure the corner. Again, I just used packing tape. I also taped the tops and sides to reinforce them. You can see from the pic on the right what mine looked like.
5] Once you have the pelmet shape, you can cover it with batting. I used a spray adhesive to secure the batting to the board. Then again, I just used tape to adhere the batting to the back of the board.

6] Lay out you fabric, and repeat the process of the securing it to the board just like you did the batting. This time I used a combo of staples and tape because I wanted the fabric to be stretched tight.
About this time- I looked over my finished pelmet and thought my linen looked a bit plain. So although I had already secured the fabric- I decided to spice it up a bit.
I wanted a herringbone print- but I couldn't find a place that sold a stencil resembling anything like I wanted. So- I made one with Word. I just manipulated rectangles and their angle, until I made something I liked. I wanted an abstract herringbone with a Native American flair. I love how this resembles the feathers on an arrow.
If you want to make your own print, here's what you need: Freezer Paper, Paint, Fabric Additive, Exacto Knife, Cutting Board, Brush, Container, Spray Adhesive and a pattern
I] Make a pattern or download a template.
II] Once I had a pattern I cut it out using my Exacto knife, then used that as a template to cut a stencil from freezer paper. It didn't take long at all, and if I did anything differently, I would have spent the time to cut out a bigger stencil. That would have saved time in the end. 
III] Mix your fabric additive and paint
IV] Use the spray adhesive to coat the PAPER side of your new stencil.
V] Your ready to use your stencil, make sure you're stencil is straight and using a foam brush apply the paint. Make sure the stencil is pressed down firmly and that there isn't a lot of paint on your brush.
And that, folks, is how you do it! I wanted a slightly handmade look. Like I the end product to look like it was hand done or done with block printing. You know- how the color will have variations and each line will look different? So I was careful to load the brush differently here or there, or apply different amounts of pressure.
I used the same gray paint that I used to stencil the damask curtains in the rest of the room. I wanted something that tied in- but that stood out. Damask is such a timeless print, but I wanted something more fun and current for the small kitchen area. 
And remember, you cannot judge these glorious {yeah right} honey oak cabinets. You guys know we rent this place- so what you see is what you get! Though I did try to convince Z that the landlord would never notice if they were suddenly turned white! Sadly, he was not on board! ;-)
Now for the money details! I purchased my supplies mostly at Joann's. With several coupons for "March Madness" the supplies totaled around 15 bucks. I bought a linen fabric (2 feet, half off, coming in at $8.) At the time I thought linen was important {to tie on with the linen-like Ikea curtains}, but now that I see the final product- I think a drop cloth would have looked almost the same. If I had used the leftover dropcloth this would have cost $6. 
Now who wants to make one of these bad boys!?


April 12, 2012

✥ "Spring into Action" Challenge {Week 2} ✥

Ughhhhhh! Did I at some point in time claim to be undaunted by this project? Because if I did, ahem, that would be false advertising. This project is kicking my trash up one side and down the other! 
Can I just say how bad I such at glazing or faux finishing or whatever you want to call it. I mean, like seriously. I thought {like a faithful kindergartner} I could pull it off if I really, really tried my hardest - but in fact, it just means I try and then it sucks, and then I start over, then that sucks.  
OK- well this post is supposed to be an update- not a RANT! So as an update- I can say I needed a primed table and I needed a table painted black. I thought to myself, self- why don't you make some black chalk paint and skip a step? I bought some off the shelf black flat paint and mixed my own chalk paint- tutorial and recipe here. The chalk paint worked great on the MDF- just like peeps say it will- though I was always a little scared excited to try it.

Unfortunately that's where the easy stuff ended. I actually thought more than once {and may not have completely given up on the idea} of scrapping this table makeover and making a new one from scratch. 
I guess we'll see what I end up with next week! Not even I know!
Here's the links for the other crazy people adventurous crew who decided to take on the challenge. Check'em out, see where there projects are at, and show'em some love!

Linda – My Crafty Home Life      Suzy – Saved by Suzy           
Tiffany – Living Savvy                 Cathy – Room Room Rx
Kerry – Design du Monde             Laurie – Traditional & Modern    
Carrie – Hazardous Design            Lisa – A Room with A View        
Jean – Flower Hill Design             Nancy – Powell Brower Home
Sam –The Junk House      
Wish me luck...I'm afraid I'm gonna need it! Oh yeah, and I'll be back later today with this week's project! {Yay, something that turned out!}


April 9, 2012

✥ Reader Feater: Romantic Bedroom Reveal ✥

 I hope you all had a super wonderful Easter holiday!  I ate myself sick on Cadbury eggs and Lindt truffles- now I need to get to the gym! Eek!

Today one of my bloggy friends, Katie, has agreed to share her bedroom with us! She's a crafty mommy of 5 and blogs at Creatively Living. {Where does she find the time!?!}
Katie focuses on making regular old thrifted or plain looking items into fabulous home decor. She also shares room makeovers, like her bedroom, done on for next to nothing. Now that's a talent. I also make it a point to link up at her: Tell it to Me Tuesday PARTY!!

✧✧✧✧✧
Welcome.... 

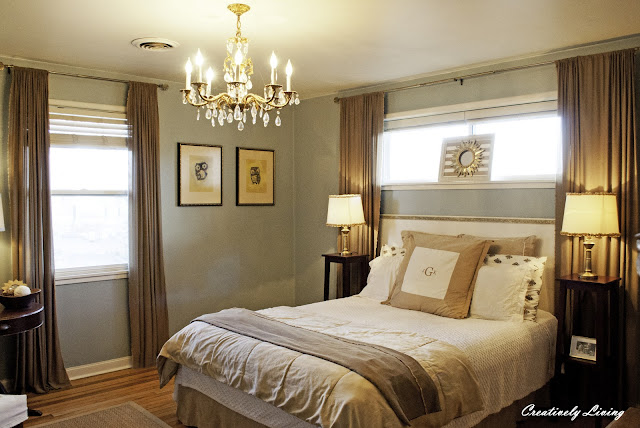
To a tour of my newly renovated bedroom. 
I've tried for the life of me to find some before pictures, but I painted this bedroom 4 yrs ago, before I blogged, and although we found pictures of the rest of the house pre-reno, I guess the bedroom didn't get photographed much. (Although I distinctly remember seeing a picture of a kid in a playpen in the room....so I'll keep looking.) 

Anyways, it was (no joke) sponge painted a mint green and sky blue...and when I say sky blue...it couldn't have been BLUER! Even the window trim and baseboards were sky blue..and the ceiling! The vanity area and the bathroom were a dark brown and light brown that were also sponge painted on and it also had a sand castle boarder.....so as you'll see, this is quite a change.


I've had the room painted for 4 yrs (only because the bright blue/green sponge paint job was somewhat difficult to sleep with every night), but I had literally lived with the window seals 1/2 painted, 1/2 finished everything, tape still on, and huge gaps where the previous owners had taken off the quarter round for carpet, for four years! It's funny how we put our bedrooms off! Then a couple challenges came along (Imagine the Impossibilities and the First Project of 2012, which you can see at the bottom of the post) and I thought, yep, I better finish up that bedroom!

The 1st year, I took the carpet out and re-did the wood floors myself, and painted.
2nd year I found some of this bedding and added the chandelier. The tables I also found, but redid them last week. You can see that here. 


This is my favorite wall. I started this gold frame picture collage last summer, but didn't have any matting, frames painted, or pictures in it until the last 2 weeks. I LOVE it!!!
The fire place was a Christmas present to ourselves 2 years ago (Costco). I LOVE it also. It and the lamp shades are the only things in the room not found either 90% off, from Craigslist the Goodwill or a yard sale. 

 This is the most cozy place in my world. I get up, before the kids with a cup of coffee, that cozy throw and my bible. I have that light and the fireplace on and sit and do my devotions, and then get on blogs.....I could stay there forever! It's pure awesomeness! 


I recovered the chair and made the pillows last week also (told you it has been a crazy week!). Tutorial on my tassel edged and the Union Jack inspired pillows to come!

This is my bed. Everything in the room is a Goodwill find, a Craigslist find, a yard sale find, or on super clearance at Walmart. I honestly think the lamp shades and the fireplace are the only exceptions. You can find a run down of where I acquired just about everything in this picture here.  Don't you just love the owl pictures from the GW. They have names written underneath...Winky and Blinky! lol


Another bed picture.


So, you've seen one side of the room. If you turn you'll see the vanity area, walk-in closet and a teeny, tiny bathroom. This house is a 1948 ranch. If you google Alphabet houses in Richland WA. You can read about how the entire town was built by the government in four years for the Manhatten Project (to build the Atomic Bomb).  It's incredible history. The original owners took one of the upstairs bedrooms (you know those tiny bedrooms in old houses that aren't really even bedrooms) and turned it into this vanity/walk-in-closet/bathroom area. GREAT idea!


Here's one more bed shot from the hallway.


My little plant and recovered books.


This is my Junk Art Wall. You can read about it Here. I found both the mattress wall art and the table below it along side the road. 


Pictures of my husband and I, my kids and my grandma on her wedding day.


This area I do have before pics of.....somewhere. I'll have to find them, but I'm excited, so I'm posting this without them. This was the wooden light fixture box, wooden 3 hinged mirror, and dual brown sponge painted area....with the sand castle boarder :)   Can you believe I found these mirrors for $3.95 each at Lowes when I lived in HI??!!  They must have priced them wrong. I bought ALL of them (I think there were 6 left at the time), sold some, and have hauled these around for 4 years lol! Now they look great in their new home. 
I'll do a tutorial on how I refinished the cabinets later. 


My little grouping of things from yard sales/ GW. The middle one is candle sticks stuck together. 


You can see I how I made my Junk to Jewelry holder here.  


My DIY wall art out of clearance picture frames that I made last week. You can see the tutorial here. 


So, I'm soooo excited to have this finished! I'm glad that I had some good "challenges" to link up to, in order to keep me going!  Thanks for stopping by on my room tour!


--Katie

✧✧✧✧✧
Hasn't Katie done an awesome job on this master suite? I have to keep telling myself- one day I won't have my elliptical next to my bed- and then I can have a pretty bedroom too! ;-) I love her chandelier- I mean, LOVE it!!
A few of my all time favorites from Katie-
 How about chalkboard backed kitchen cabinets? Yes, please! A bold move- but it paid off. I love how the black walls make the items pop!
And this oh-so-sweet nursery!
Do you see the reflection of yet another chandelier? I am dying right now!! I've wanted a over-the-bed chandy for over my grown up bed for ages- am I having infant jealousy? Haha!


[PS] I feature YOU GUYS  {my readers} every Monday! Do you have a room makeover- or maybe have a home tour you'd like to share? 
Drop me a email or shoot me a link. Let's see if we can work it out!!  xoxo