Showing posts with label Knock Off. Show all posts

April 19, 2012

[Restoration Hardware Hack] Faux Zinc MDF Table Makeover

If this piece of furniture {Baker's Rack Open Shelving} and this piece {Zinc Open Nightstand} fell crazy in love and had a little furniture baby, then it could look something like my side table makeover! Can you see it?

But let's start at the beginning- this is the 3rd update for our "Spring into Action" challenge. Remember my before pic- this side table in need of TLC. I almost tossed'em or yard saled the pair- since they were only 60 bucks brand spankin new and aren't even made of real wood! BUT the size and shape could work, and I needed the little drawers for living room storage- so I stayed with it. 
  Last week I let your know I had painted the tables black- using a DIY chalk paint formula. I used chalk paint so I could skip the prime step and skip right to the paint. And for the record chalk paint does have great adhesion to MDF, I was very pleased with it. 
What I didn't show you- I took off the top of the table, to be replaced with some real wood!

To create a metallic look I started off using Jamie's {Freckled Laundry} tutorial-it's about the best tutorial I've ever seen. Jamie is so super duper talented.
 I happen to have the right paint on hand to follow through her directions. I probably shouldn't have taken a pic with the freezer paper- it's really just a trick I use to keep the paint from soaking into the paper plate. So you can disregard it when/if you buy supplies.
Following the tutorial, you use a rag to blend three shades of silver, creating a slightly varied finish in color. Buuuut, I followed all 14 steps and wasn't that happy with my version-{*super sad face.} Though this was at no fault of the tute. More like I'm still working on my glazing skills. So I backtracked to step 5.
 
You can see from the pic- it's silvery and shiny from the paint. But I wanted a more reflective surface.

Then I used my old friend, Rub n Buff, to apply another level of sheen. I also used this to create imperfections in the finish and create depth. Look at how the furniture reflects light. I took this pic n an overcast day with the curtains closed, and still you can see the shine!
Here's a few close up shots so you can see the finish. I applied the Rub n Buff with a toothbrush, like I explain here. I used it in spots, making it thicker and thinner in areas to help recreate the look of metal.
 
I used cheap-ish preassembled pine wood and had it cut it to size. I decided to cut them the same size as the base, trying to modernize the traditional tables a bit. The wood cost me 20 bucks and would have been cheaper if I had decided to make my own with planks- probably costing $12-13. This time easy won, though!

Then I used a homemade stain made from vinegar and steel wool to age and stain the wood. {I describe it in depth at the bottom of this post.} The wood is warm with gray tones in it. It is a little more yellow than I'd like- but that's due to the polyurethane, not the stain. 
I can't belive how many projects I've done in this room now! Things are finally starting to wind down in here a little bit. Looking around the room from left to right I made:
Last but not least- Z Gallerie Subway Art Knock Off  {on the left of the next pic}
 I think things are starting to come together. Although I removed the previous {fake} medium brown wood tone side tables- there's still lots of dark wood in the room. You'll find ebony wood on- the feet of the couch, picture frames, and for the entertainment center. You can see the corner of it poking out on the left side of the pic. 
And on the other side of the room, more dark wood found in the {yet-to-be-recovered}chair and mirror. It feels a lot calmer and cleaner to have just two-ish looks to the room. Of course the West Elm knock off tree stump table I made isn't an exact match for the new tabletops, since they're different woods- but since I used the same homemade stain, it is pretty similar.
That pretty much sums up the challenge- I can say I'm at peace with how the tables turned out. For about 25 bucks I don't have to stare at that red-toned "wood" ever again! Not bad for a 60 dollar Target table, huh?
I cannot wait to see how the other 11 participants fared in the challenge! Check'em out when you get a sec!


March 22, 2012

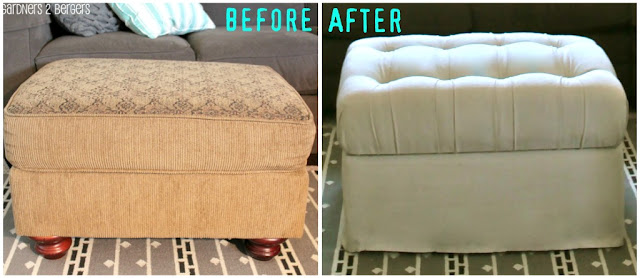
Ballard Designs Tufted Ottoman Hack

 I am 100% certain that I'm more stoked about this project than anyone else could be! See, Z and I are ottoman people. Some people are ottoman people. Others are coffee tables peeps. In theory I wish I could be the coffee table type- sporting an old railway cart as the centerpiece to my room. But it isn't practicle for the way we live, especially while we're living in a small space.
So- we're ottoman fans cause we like to lounge on our couch and you really need an ottoman for that.
When I sold our couches last June-ish I kept the ottoman. Then it sat in the middle of our room in all it's corduroy and tapestry glory. I am super excited to have  something we use every day look like it belongs in my room!

I kept it because it was the right height for the new couch, it was fairly expensive, and I had plans for this baby! The ottoman I was crushing on was from Ballard Designs- with a nubby oatmeal fabric it would fun me $495- which, I think, is how much we paid for our ottoman in the first place. All the more reason to reuse mine.

 It was pretty easy for me to get from this before pic to my after. I put this project off- forever- because of the sewing issue. See, I can't, and I knew I would need to sew the bottom portion to make this look like something I would buy- not something I made.
I used a drop cloth to make this after happen AND with minimal sewing- if you can sew a button, you can do this project!!

1] To start- flip your ottoman over and use some pliers to pull out the staples, so you can take the fabric off. Don't worry about keeping the original fabric in tact- this can easily be done without it as a template.

2] Once you ottoman is naked- you'll need this stuff to get'er done. If your foam and batting are in good shape, then you can reuse them. I reused mine. I had everything on hand except the button kits, peg board, and upholstery needles- so it was a cheap makeover.

 3] Purchase a drop cloth that is long enough to be wrapped around the entire base of the ottoman. This is a crappy pic- but if you follow the arrow, I wrapped the fabric around the base so it would meet up in one place. Also- make sure the cloth is wrapped inside out!

4] Pin it where the fabric meets up. You should try to pin it in as straight a line as possible. When I got to this point I decided to make it a skirted ottoman, instead of following the inspiration pic 100%. So it is more like a combo of Ballard's slipcovered ottoman and their tufted one.

If you're making one like mine, then make sure you use the finished edge of the drop cloth as the edge that touches the floor- less sewing, you know.

I somewhat followed this tutorial to do the tufting- it is very comprehensive, with lots of photos- so pop over if you need things clarified.
5] Cut the pegboard the same size as cushion. Use the grid to plan out the button spacing.
6] Wrap your foam in batting, then cut holes in the foam where the buttons/tufting will go. I kinda skipped this cutting step- but you should totally do it! ;-)
7] Make your buttons using the directions that come with your kit.

8] Thread your needle with the twine and create the tufting. Make sure the buttons are seated down as far as they will go.
9] Don't forget to manipulate with the fabric to create pretty tufts before you secure the button in place with your staple gun. Here's mine, pre-ironing.
Now- for my Achilles heel- sewing. I know I CAN sew, if I could just LEARN how to!! lol
I spent 2 days playing around with this beast that was given to me 2 weeks ago.
All I ever got was a tangled mess- no sewing. The thread would just bunch in a knot. Is the machine broken? Maybe it's the user!!  Hmmph!
10] Remember how I said if you can sew a button, then you can make this ottoman? Yeah, so I hand sewed it. You'd think it would take a long time- but not compared to the 2 days I spent on the sewing machine! I made sure my pins were straight, marked a straight line with a pen and that kept my stitched straight.


 On the left is my hand sewed seam- then on the right, my drop cloth came with a big fat seam down the middle of it. So I lined that one up the opposite side and opposite corner as my hand sewn one.


11] Make sure you iron the tufting- and well, the whole drop cloth for that matter. But ironing the tufting will just help it stay the way you want it to- and it will look pretty!


If you didn't want a skirted ottoman you could easily wrap the fabric {like a present} under the frame and staple it in place. Then it would look more like the original inspiration. I may do that at some point? Who knows? Z had a strong opinion that is looks better skirted- so this will work.


This makeover cost me maybe 20 bucks. The drop cloth cost me $11 {I bought a 6x9} and I used coupons when I bought all the supplies- this really kept costs down.


Even though I had an ottoman- you could easily do this with a thrifted one or something you found on Craigslist. Funky outta date ottomans are always floating around out there!
What about you? Sewn anything lately? Anybody have any advice for that machine of mine? Has you reused an out of date item, making it new again?

February 9, 2012

✥ RH Oversized Map Art Knock Off [tutorial}✥

He-llo friends! I have another knock off for you guys today. Are you sick of them yet? I mean, you can tell me if you are...I really tried to have a different type of project ready for this week but the darn materials {I'm being sneaky and not telling you what materials} took sooo long to dry. I mean, grr! 
So instead I hope you guys will be head over heels for my new maps- cuz I know I am!
 On one of my most favorite blogs ever, The Painted Hive, Kristine made a super amazing map and used it as her headboard. I totally love her map and her use of it AND she added an excellent tutorial if you want to make your own over size map!! It's pretty sweet, right?
 I have 16"x20" frames flanking our sliding glass windows that have been crying out for some real art and I have been dying over Restoration Hardware's map art for ages!! So, I knew the second I saw Kristine's post that I would be making my own version of the art ASAP.
There are tons on Restoration Hardware's site to chose from for inspiration. Here's couple I used to help me look. I love the vintage feel of this "old" Paris map.The Graphics Fairy actually has an old vintage Paris map {it's linked up below too.}
I used this LA map as for inspiration for the maps I chose. I wanted maps with subtle colors but that wouldn't demand a lot of attention.

I scoured the Internet for ages, seriously- for days and days, trying to find the best map options out there. If you're looking for maps you want to search for public domain maps, open source maps or public library maps.  I collected quite the collection of awesomeness here in case you want to make your own!!

In Kristin's tutorial she says to find a zoomable map- but then again she was making an image 47"x23"! I only needed a 16x 20, remember? I still followed her tutorial- just to be certain I didn't have any mishaps, but I think I could've gotten away with printing some of them.
It's not hard at all to make these {you know, after you spend days looking for just the right ones!} To make oversized art, especially if it's huge like Kristine's, you want a "zoomable map."

1]  Just zoom into your map and take screen shots for each little section allowing for overlap until you've copied the entire map. 
2] Then use Word to overlap all the images into one complete pic.
Since I was copying Restoration Hardware's map art, I also changed the names for some of the maps I found so the towns would match up with the RH pieces. 
3] In order to match the color of the different RH maps I converted my files from Word to jpeg. Then I was able to upload them into photo editing software {now I use Pixlr instead of Picnik.} I could then change the colors of the maps to better mimic the inspiration pieces.
4] Once the images are jpegs you can also change the dimensions of the pic so it will fit the frame you have.
5] I went to Staples and printed out my maps in color. It turned out to be a little less than 10 bucks each and the quality of the each copy was near that of a photograph!.
Although I usually do things a little thriftier than $10 each I was still pretty pleased with the price. Any prints I could have purchased would have been more than $10- and they wouldn't have been exactly what I was looking for. That is unless I bought it from restoration Hardware and then it would have gotten exactly what I wanted but also would have paid around $1400 a piece!!!
That makes a savings of nearly $5600- yup, that's my best saving for a knock off yet!!
Here's a shot of the before:
And how it looks now. I tried to get a pic at the same angle, but thought I'd avoid the glare on my frames this time.
Don't forget to check out the other maps I'm crushin on right now. I've included several favorites for you guys! Some of them are linked to sites that have tons of options- like the NY public library's selection. I can't guarantee that each map I chose is big enough to blow up- but included the ones I loved anyhow!


via
via
via
via
via

via
via
via

via
via


What have you guys been making with maps? I can think of a ton of ways to use the maps I linked up- what about you guys?