April 30, 2012

✥ Reader Feature: Rad Vintage-Meets-Modern Home ✥


You will not believe who agreed to write a post for you guys today... Cassie from Primitive and Proper!! Are you guys as excited as I am?!?

Cassie's dining room was my first introduction to her oh-so-fabulous blog. Since then I have been shocked and amazed, week after week, by her creative and stylish projects. I think Cassie has {at least} two major talents that knock my socks off.
{one} She is one of the greatest social bloggers out there. Like I bet you guys already know who she is- and- if she has been to your blog, then she has left you an awesome, heart-felt comment. I am in awe of this amazing ability to make a zillion strangers feel like friends.
{two} Nobody knows color like Cassie knows color- case in point, that dining room pic that I just shared. This girl knows how to mix and match shades, week after week she shares her freakin fabulous furniture makeovers- I mean for example check out these dresser redos!
OK- here's Cassie...
✧✧✧✧✧

Hello there!  I am Cassie from Primitive and Proper, and I am so excited to be here today on Becca's fabulous blog!  She is so talented and creative, and I am beyond flattered that she asked me to share my living room and dining room with you today.

We moved into our "new to us" home last October.  For me, this home was love at first sight.  It's a Cape Cod style home, which I had always dreamed of.  And it sits up on a hill out in the country.  It was not love at first sight for my husband however, and it took him round two to agree with me. :)  I don't know if he saw the potential I saw in this 1979 house that was stuck in, well, 1979.

I have been trucking my way through- anything that can be bettered with paint, is getting the Cassie treatment!  The very first project I tackled in the house was the mantle in the living room.  Here is a picture from the week we moved in to show you what I was working with...

I painted brick and the wood mantle in Martha Stewart's Zinc.  Also, this was the only room that had any painted trim- I finished the job by painting the baseboards as well.

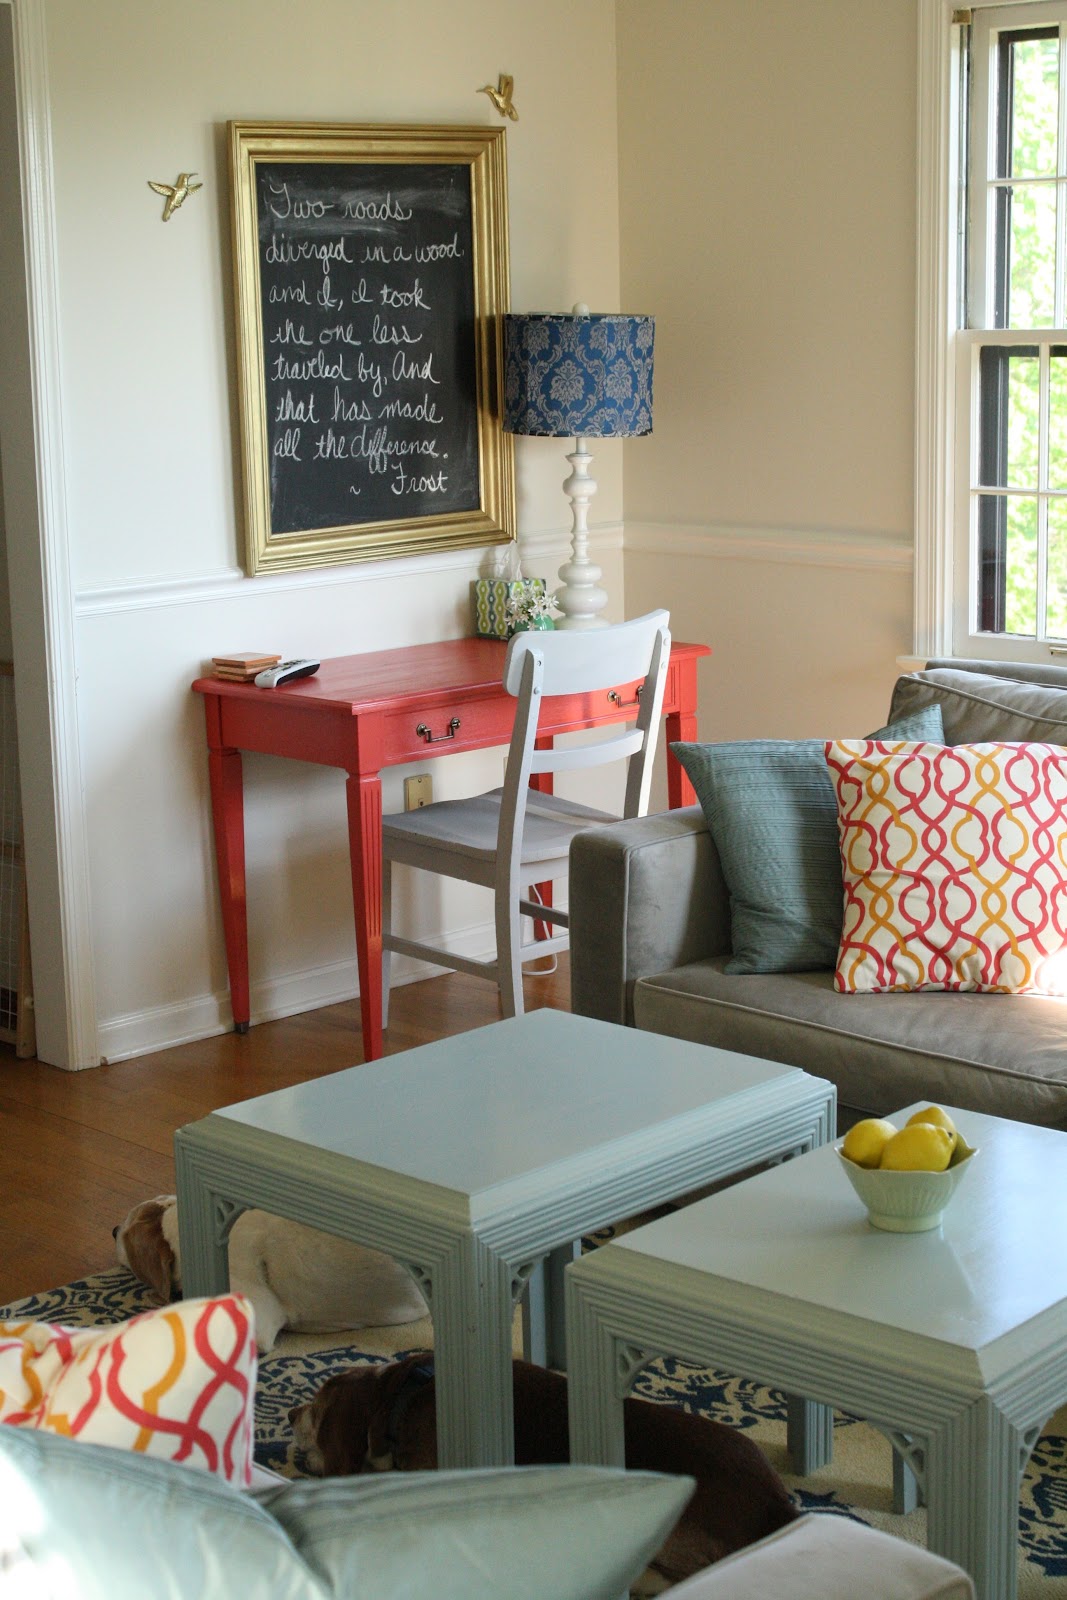
The first purchase we made were two cove gray Henry sofas from West Elm, and I had painted some tables to used as a coffee table before we moved in.  Since moving in we have added so many other elements to the room.  I have found a couple of pieces of furniture from craigslist, like the bookcases that I painted gray with an orange backing, and the desk I painted coral.  We have purchased a new rug (after the first one was peed on by my dog!), and I have made some pillows, bought a couple, and even won one in a giveaway!  And we have added a gallery wall of some fun family memories.

Ok, enough boring you with talk, let's check out some pictures!  Here is the room today....


 On the other side of the entry to the room sit the bookcases.  This picture is actually from the fall so pardon the smidgen of zebra rug you see because that was the peed on ruined rug that now lives in our playroom.


The two front rooms of our home are the living room and the dining room, with just the front door and a small hallway in between, so each room has a view into the other.  For that reason, I wanted to stick to a similar palette.

Here is where we started in the dining room....


In the dining room, I painted the trim, and painted the room white, with gray and white stripes under the chair rail.  I also found a sideboard on craigslist and painted that aqua.  I had a smaller server that was not working for us anymore, so I made it into a bar cart.  And recently I brought in some color with the addition of some coral painted chairs.  The white chairs and table came with us from our last house.

Here is where we are today in the dining room...


The best part about both of these rooms, however, is nothing that I have created.  Here you can see the view out from my desk...

Both of these rooms have large windows with amazing views!  In the Fall we get to enjoy the leaves turning, and in the winter see the snow fall, and now we are watching Spring evolve.  The living room also has the best view for amazing sunsets.

I have really been enjoying making our house into our home, but it certainly felt like home from day one to me.  We definitely have landed where we are supposed to be.

Becca, thank you so much for having me here today to share a little bit of my home with your readers!  I hope you will pop over to Primitive and Proper and say hi!
✧✧✧✧✧

Ree-diculous, right!? I love that coral color she just added to both spaces! There are so many special touches to each room. Honestly, at least one time each week I pin a piece of furniture or a color of paint she's used!
The last couple of weeks Cassie has shared room reveals for both her daughter and her son. 
I lurve her son's Star Wars themed room and pinned that sucker in a second flat.
Are you kidding me with that galaxy wall? Great idea- and great execution. Check out the rest of the post to get all the juicy details.

And this magical space for her little girl's "woodland" room! It is definitely a creative space for a little mind to play and imagine! If you love whimsy- this is the post for you! It is jammed packed with unique and creative touches- let me tell you, you wanna this!

Thanks, Cassie, for coming over today! And thanks to you guys for stoppin by!

[PS] I feature YOU GUYS  {my readers} every Monday! Do you have a room makeover- or maybe have a home tour you'd like to share? 
Drop me a email or shoot me a link. Let's see if we can work it out!!  xoxo

April 26, 2012

✥ Easy Restoration Hardware Subway Sign "95th" Knock Off ✥

Life has been kinda busy- you know, with having to read the whole Hunger Games series on top of real life commitments! So this week will be an easy peasy little project! Good news is- it will be easy peasy for you guys too, if you plan to make your own!!

Back when Z had a real office, ahem- before the living in the condo-ness- I had a bunch of black frames up in there. Since then, they've lived in a box in storage. When I saw this subway art on the Restoration Hardware site I knew my frame was a dead ringer for theirs! Perfect! 
Well, almost perfect, see theirs is ginormous. Like 8 feet tall or something. So, I guess mine is the "mini-me" version of their awesomeness! 
Buuut, mine was almost free since I had the frame on-hand. Even new it was less than 10 bucks at Walmart {of all places} The subway art print cost me 10 cents {seriously, 10 cents!} to print up at Staples. Just tell'em you want an engineering print. They can print just about any size you'd like! 

HOW TO: I used the background for my one of my other knock offs, for Z Gallerie subway art. In that post you can see how, using Microsoft Publisher, I make the background look like it has some dimension. Then you pick a few fonts and add the names. E. Z.
I made mine an homage to Boston. I grew up in the suburbs there, and I'll always love that area! This one took almost no time at all- super doable project. By using a little creativity with Word you could make an exact duplicate- if you wanted to!

What do you guys think? Not too shabby for a 10 minute project, no? Beside, I hadn't made myself any "art" in awhile- and it felt good to get back in the saddle. Thanks for reading!

April 23, 2012

✥ Reader Feature: Tour Netherlands Remodeled Home ✥

Hello dear friends of mine! I have a fun little surprise for our feature today. I got a message from Pietrik- a Netherlands native- asking me to check out her place. Well, if you follow me on Pinterest you know one of my favorite design styles is Scandinavian modern, so I thought this was a super fun chance to feature a home like that!!
She was married just this weekend and this is the home her and her sweetheart remodeled. Her blog is brand spankin new- but her are some fun pics of her place.
 ✧✧✧✧✧
{This was taken outside their home, on their wedding day last Saturday!}
My name is Pietrik Elzinga (1979), born and raised in the north of the Netherlands and married on the 20th of April this year.

About three years a go we bought this house. It was love on first sight….a big garden and a lovely house. 
October 2011 we started rebuilding it. The kitchen and the bathroom were old. and outdated. I knew I would clean and I smelled that I had just cleaned, but unfortunately I couldn’t see it! ;-) We decided to redecorate the whole house.


My style is minimal, modern, and classic Dutch design.
  
On the floors we have big grey tiles, like in the kitchen, entry and bathrooms-
We also put the tiles on the wall on some places- like in the bathroom and in the hallway.
The floor in the living room is pvc, I don’t know the translation in English for that…I especially love the colors white, grey and sand, you’ll see this colors back in the whole house. 
Riviera Maison is one of my favorite designers…unfortunately it is very expensive, so for our new tables I took a picture of the RM tables to the cabinet maker and he made them for us.
The rocking chair in the living room I bought on the internet and painted it myself, I’ve bought the lamps on the flea market and painted them myself also gave them some new lamp shades. 
The kitchen is made by the same cabinet maker who made the tables, I knew exactly what I wanted and the cabinet maker made the idea that was in my head. It turned out to be even better than I could imagine! I’m very happy with everything…It really became a home!
Becca…thanks for giving me the opportunity for sharing my home on your blog. I really appreciate it.

Hope to see you, readers, visiting my blog also some time…you’re very welcome!

Hugs, Pietrik


✧✧✧✧✧

 Oh my word- isn't she cute? 
I love the gray tones in the flooring in her living room. She said it was made of PVC, but she wasn't sure if that was the correct translation? I;m not sure, but I;d put it in my home n a New York minute! I, of course, I am a HUGE fan of the color scheme: gray, white, and tan! I also looove the arches from the living to dining room and also the wood beam ceilings in the living room are rockin my world!
 It's so fun to see how others live-this was one of my favorite features just on account of that!! If you can stop by and show Pietrik some love, and tell her I sent you!

[PS] I feature YOU GUYS  {my readers} every Monday! Do you have a room makeover- or maybe have a home tour you'd like to share? 
Drop me a email or shoot me a link. Let's see if we can work it out!!  xoxo


April 19, 2012

[Restoration Hardware Hack] Faux Zinc MDF Table Makeover

If this piece of furniture {Baker's Rack Open Shelving} and this piece {Zinc Open Nightstand} fell crazy in love and had a little furniture baby, then it could look something like my side table makeover! Can you see it?

But let's start at the beginning- this is the 3rd update for our "Spring into Action" challenge. Remember my before pic- this side table in need of TLC. I almost tossed'em or yard saled the pair- since they were only 60 bucks brand spankin new and aren't even made of real wood! BUT the size and shape could work, and I needed the little drawers for living room storage- so I stayed with it. 
  Last week I let your know I had painted the tables black- using a DIY chalk paint formula. I used chalk paint so I could skip the prime step and skip right to the paint. And for the record chalk paint does have great adhesion to MDF, I was very pleased with it. 
What I didn't show you- I took off the top of the table, to be replaced with some real wood!

To create a metallic look I started off using Jamie's {Freckled Laundry} tutorial-it's about the best tutorial I've ever seen. Jamie is so super duper talented.
 I happen to have the right paint on hand to follow through her directions. I probably shouldn't have taken a pic with the freezer paper- it's really just a trick I use to keep the paint from soaking into the paper plate. So you can disregard it when/if you buy supplies.
Following the tutorial, you use a rag to blend three shades of silver, creating a slightly varied finish in color. Buuuut, I followed all 14 steps and wasn't that happy with my version-{*super sad face.} Though this was at no fault of the tute. More like I'm still working on my glazing skills. So I backtracked to step 5.
 
You can see from the pic- it's silvery and shiny from the paint. But I wanted a more reflective surface.

Then I used my old friend, Rub n Buff, to apply another level of sheen. I also used this to create imperfections in the finish and create depth. Look at how the furniture reflects light. I took this pic n an overcast day with the curtains closed, and still you can see the shine!
Here's a few close up shots so you can see the finish. I applied the Rub n Buff with a toothbrush, like I explain here. I used it in spots, making it thicker and thinner in areas to help recreate the look of metal.
 
I used cheap-ish preassembled pine wood and had it cut it to size. I decided to cut them the same size as the base, trying to modernize the traditional tables a bit. The wood cost me 20 bucks and would have been cheaper if I had decided to make my own with planks- probably costing $12-13. This time easy won, though!

Then I used a homemade stain made from vinegar and steel wool to age and stain the wood. {I describe it in depth at the bottom of this post.} The wood is warm with gray tones in it. It is a little more yellow than I'd like- but that's due to the polyurethane, not the stain. 
I can't belive how many projects I've done in this room now! Things are finally starting to wind down in here a little bit. Looking around the room from left to right I made:
Last but not least- Z Gallerie Subway Art Knock Off  {on the left of the next pic}
 I think things are starting to come together. Although I removed the previous {fake} medium brown wood tone side tables- there's still lots of dark wood in the room. You'll find ebony wood on- the feet of the couch, picture frames, and for the entertainment center. You can see the corner of it poking out on the left side of the pic. 
And on the other side of the room, more dark wood found in the {yet-to-be-recovered}chair and mirror. It feels a lot calmer and cleaner to have just two-ish looks to the room. Of course the West Elm knock off tree stump table I made isn't an exact match for the new tabletops, since they're different woods- but since I used the same homemade stain, it is pretty similar.
That pretty much sums up the challenge- I can say I'm at peace with how the tables turned out. For about 25 bucks I don't have to stare at that red-toned "wood" ever again! Not bad for a 60 dollar Target table, huh?
I cannot wait to see how the other 11 participants fared in the challenge! Check'em out when you get a sec!