August 2, 2012

My Living Room [Before & After!!]

I've been thinking about this post for awhile. I think a lot of people get stuck in a decorating rut- due to lack of support or finance. Sometimes, you start to think you'll decorate later- when you have more time. At least that's what happened to me.
Back in 2004-05 Zack and I built our house. It was our first home and I was pretty ridiculously happy with it. Here are some pics our realtor took when he listed it.
It was staged to sell in these pics, but devoid of personality. Mostly, I just removed anything that could come off a clutter, so plants and little furniture were removed. But if I were to be honest, I'd say it never had a lot of spunk to begin with.


But like I was telling you'll last week, we sold our house because we wanted to go back to graduate school. Since both Zack and I wanted to get our MBAs- {for separate reasons of course.} We had plans to attend the same school, so we needed to do reasonably well on the entrance exam to make sure we could do that.
A little more info about how we ended up renting...
We packed up everything and moved into a condo in UT, where we proceeded to shop for homes. The housing market was just beginning to fall apart, so we finally decided to ride it out and rented our little condo. All the while I was thinking, you know, soon we'd get our own place, and I could decorate again.


I thought I could put my head down and march- just get through it and then I could breathe again- and play around with ideas again. But then- I started to hate our furniture. Especially in the new space. 
And our decor- oh, I especially loathed our decor.
Circumstances be darned- I decided I would NOT live like *this anymore! 
{*By this, I mean the feeling that you're not at home when you are, in fact, in your home!...not like we were living in squalor or anything!}


These are some pics I took right after I decided to make the change. Because, of course, I had not been planning to take any photos of the space for the duration of our existence there!
 So one night I had had enough and I took some pics, so I would at least be able to someday show people a "before" pic. 
{Note: This was before I knew not to take pics at night with the lights on- oh, how much I've learned!! Note 2: These are not watermarked fr GOOD reason!! ;-)  }


I made up my mind to sell everything we had brought with us and decided to start fresh. 
Instead of buying from big box stores and purchasing matching sets, I would search out just the right piece. I made the decision to only buy things I loved. 
I sold our old crap things on Craig'sList and Ebay so we could get the most possible for them. I even spent some time to fix up/paint/ redo some of my old goods- so I would be able to modernize'em and get more moula!!


In fact- we made enough money to pay for almost all the projects, furniture and makeovers I have done ove the last year!! Crazy, right!? Even the custom sectional we got from Bassett was paid for from the proceeds- though Z did sell a couple of guns and added that to the furniture fund. {Now that's true love, right ladies?}


I judiciously decided where chunks of the budget would go- like the couch and printer's cabinet. While most everything else cost me less than 20 bucks each- 
Either used to rehab something we already had- like my end tables, ottoman, large art over the couch, clock
 OR to make something from scratch, myself. Like the map art flanking the window, the subway art, tree stump table---to name a few.
I know you gals are no stranger to buying second hand- but I'll share my criteria with you. The second hand item cannot be bought merely because it is a good deal!! ;-) This is tempting, but should be avoided! It must have the exact lines and scale that I'm looking for. No settling! 
If you wait long enough, the right item will come along! Like my tapestry chair- I paid 50 bucks for it, but Arhaus sells it for $2200!


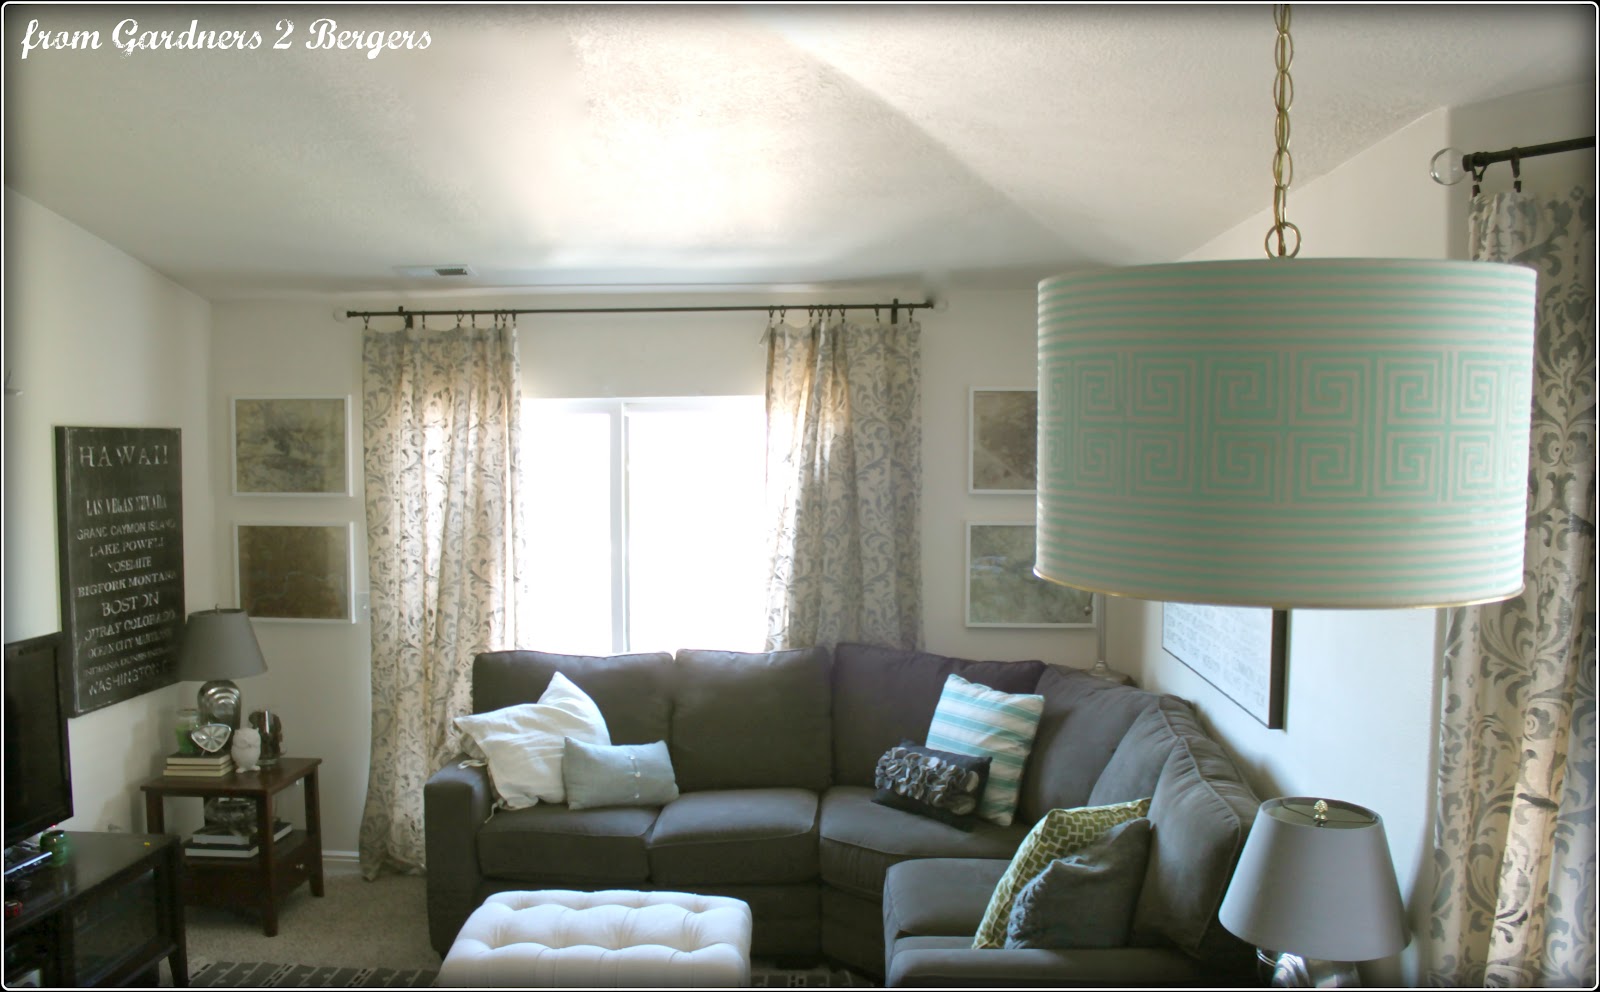
When I look around my small space- I now feel like there is something to be proud of! It is a rental- but it is MY space, I feel ownership over it. It definitely feels like it's "me"- and who could ask for more than that!
I know you guys can do it, too. No matter what your budget is, no matter where you live. Just decide what you like- and bit-by-bit, make it happen!
Zack and I are on the vacation of our lives right now- it has been so fantastic...but I do look forward to getting home and digging into my kitchen project!

July 30, 2012

✥ Feature: Sleeping Porch ✥


Good day, dear friends! The hubs and I are still on vacation- living it up as we travel all over the western US. We've seen Yellowstone and the rain forest in Washington. Right now we are traveling down the Oregon coast, and heading towards Lake Tahoe. We've seen grizzly bears, black bears, wolves, elk, moose, mountain goats- and seen rivers and mountains! It has been quite the trip!
I came across this fantastic kitchen from Maple and Magnolia when it was featured at Whisper Wood Cottage and I believe it won their "all things kitchen" contest last winter. I think was published in Cottages and Bungalows, as a result. I'm sure you can totally see why- they warm gray walls, the crisp white upholstery and china.
Mix that with a few industrial elements and some warm wood or weathered wood- and I think you have the kitchen thousands of us are striving towards and would LOVE to see in our own homes! Am I right?
I think the real kicker is the gym basket storage center. I actually remember going to summer camp when I was 5, at my Dad's old high school, and they had gym baskets like this! Who would have thought they would become to chic?
The very best part- that's not even today's feature. See,  Susan is an incredibly talented decorator and her entire home is completely fabulous! When I saw her sleeping porch, I just about died! I mean, this is your porch? Can I have it for my very own bedroom, pretty, pretty please!!!
I think one of Susan's greatest decorating talents is knowing how to mix the right shapes to create an overall vision. If you look at the curves on the antique bed and the curves on the light with the round table and clock- it is a vision of white antique loveliness!! I know there are a ton of almost all white room fans among my readers- this room is for you!!
Just perfect for your guest to write come about their stay! I know you all adore the chippy old table, serving as a desk. It is the exact look tons of us try to replicate with various paint techniques.
The only pops of color come in pale aqua- found in a few glass vases and in a very pale vintage typewriter. There is just a faint floral pattern on the sheets, enough to add interest and dimension, but still creating a light and airy feel. Oh yeah, and some perfectly droopy tulips to add some pink, perfecting the shabby chic-ness!
I know you guys don't need me to point out all these lovely details, these rooms speak for themselves. I can bet you guys are already rushing over to Maple & Magnolia right now- to subscribe, and I don't blame you! I did the same! Hope you're enjoying your week, everyone! I am having a fantastic summer- get out there and get you some sun!

July 27, 2012

✥ Ammo Box Storage {+ other finds + my real life} ✥

This is a post about making do. About being happy with what you have, when you have it and about trying to make the most of, well, everything. 
You may have noticed, I hardly ever post pics from our kitchen. For those of you new to my lil blog, I am currently renting a condo. I know- rent the 4 letter word of decorating. It limits our design options and choices. It stiffles our vision for our space.
It's basically like throwing a DIYer in the corner for a time out and telling them they can't play!
And although I have wondered on countless occasions if my landlords would even notice if the cabinets were mysteriously painted white {because, would they??!}...Instead I decided to be grateful for what I have.
To be brave, and share a few images from my space. To share how I've given myself a few vignettes that allow my eyes to rest on something beautiful, instead of something honey, oak!!
There are a few other reasons for this post. 
I wanted to share the reason why why rent in the first place. We moved to Utah with the intention of going back to school. Both Zack and I wanted to go get our MBAs. So this last year we applied to school and we are A GO to start a fantastic, highly ranked, full time program next month!
I guess selling our home and down-sizing was worth it- because the plan worked! I am so stoked to be starting school with my best friend beside me! {Because, let's be honest, I probably would be freaking out if I had to go it alone!!!}

And although I said I've decided to be grateful for what I had, you know, rather than the alternative of being an ungrateful brat blogger, I can say I have a project up my sleeve that could do a little something awesome to this little room. It would not change the color of the cabinets and actually does NOT involve paint- but I've purchased the necessary materials and I'm feeling optimistic. :-)
So let's just call these pics- the "before" shots. Cross your fingers for me that my crazy, ridiculous idea turns out awesome. Cause I hate to have to come back and share a project FAIL!
Maybe you've noticed my "new" storage boxes above the cupboards? I used to have some Ikea crap boxes up there. It's where I store extra ziplock bags and foil and spices, since we have no pantry. They are military ammo crates and they come with authentic dirt, I mean patina! ;-) The wood is all gray and they are crazy sturdy. One of them is stenciled explosives, while the other says mortars.  Did I ever mention that Z was in the Marine's for 6 years?  So this is a little nod to his past and I love them. 

I grabbed this cute owl butter dish from West Elm the other day. {clearance}

Remember the vanilla I made 2 weeks ago?
And below- a new soap dish, also from West Elm.


Although this kitchen will never look like Karianne's or Kelly's. I guess, for now, it is mine.
And anyway, instead of looking at Pinterest all day, I'll be looking at text-books instead. I think I'll decide to be grateful for that! Wish me luck on the upcoming school adventure and with the zany project I am starting next!!


I'm also linked up here.

July 25, 2012

✥ Guest Post: Setting for Four ✥


    Good morning, lovelies! Today I am excited to be guest posting over at Heather's blog {Setting for Four} and I'm sharing how I put my gallery wall together. Stop on by and find out how I got my pal, "thermie" and how I made every piece of art on my wall!

    While you're over there, make sure to check out Heather's adorable butterfly place cards! Cute, right?
    Hope to see you there!
    -xoxo-

    July 23, 2012

    ✥ Reader Feature: Rooftop Pallet Bed ✥


    I think I am going to admit something a bit shameless about the blogs I read. In my mind, I have them separated by the type of blog they are. No, I do not mean DIY or fashion or something not al all embarrassing. {Well, unless maybe I had some freakishly strange interest or hobby.}
    But rather the categories are based on the reason I follow them. Today's feature is of Karah, from the Space Between, and Karah falls into my "funny writer" category. That's not to say she doesn't have other reasons you should follow, I mean take a look at her rooftop bedroom for example. It's just that she is so real and unassuming, and I like it when someone makes me laugh and unveils a projects. THe two work well together. ;-)
    Karah hails from the North East {like me!!}, but she now lives in Curaco, while I only live in Utah. {Maybe I should talk to her about a location trade?} She now rents {like me!!}, but she rents this little island home {whereas I only rent a condo.  wah wah!}


    ✧✧✧✧✧

    I had dreams.  I had visions.  I had pinned beautiful outdoor beds, and spaces and had images of what was sure to be our awesome, Awesome, AWESOME new pallet bed on our roof.
    You saw this sneak peek this morning …
    And, I have to admit, I do NOT have all that I had dreamed of.  But, considering that we have been talking about putting a pallet bed on the roof 
    for.like.ever
     since we moved in, 2 and a half years ago, and we now have pallets on the roof with a mattress on top of it and a few cute accessories 

    that will never hold up to the wind so I have to carry them up and down whenever we use the space

    , I am thrilled.

    I am also VERY 
    relieved
     happy to report that we had a few rainy mornings this week (you would know it delayed my rooftop photo sessions if you are a Facebook friend) :) and the bed is in what, so far, has stayed a dry zone.  Yippee!!  Of course, if we get any freaky sideways rain (this has totally happened before), that would be different.

    Now, I really, REALLY wanted a hanging bed.  How cool would that have been?  Gently swinging in the breeze.  Down right dreamy I imagine.  But then I realized that the roof rafters weren’t conducive to hanging a bed.  And I didn’t see the landlord looking favorably on my drilling big holes in her rafters.
    No, I don’t know why that picture is at that angle.  I’m just taking ‘arsty photo angles’ to extremes, I guess.  And, no, I didn’t clean the roof at all or do anything with the random cords we like to keep up there to corrode in the elements.  ;)
    Aaaaanyway, back to the not-nearly-as-awesome-as-I’d-imagined-but-awesome-all-the-same-rooftop-pallet-bed.
    When push came to shove, I realized I really didn’t want to make a pallet bed at all … I really just wanted pallets to magically make a bed all on their own.  And, with a little painting of the pallet slats you can see (oh no I di -en’t paint the slats under the mattress), it does fit the bill of ‘pallet bed’.
    And, back to those stinkin’ high roof rafters, I didn’t actually realize how high they were until after I strung together what I think could be a pretty-cool, beer-bottle, star-like, hanging pendant light and realized we don’t have a ladder tall enough to hang it. So, I did what any self-respecting 
    blogger
     person would do, I nestled it by the pillows for a pic. 

    Oh, yeah, and then we have what is supposed to be the ‘headboard’ for the bed.  There was actually cutting and nailing and measuring involved.  There was also a bunch of wind and a few curse words and the need to totally re-evaluate what to do with the headboard.
    Once the mattress was in place it was more a game of ‘where’d the headboard go?’ than a relaxing spot to lean back and take in the view.  How happy am I that I didn’t 
    waste
     take the time to paint it?!?!  VERY happy.  :)

    And speaking of wind, approximately .0011 seconds after each picture I had to re-tuck, fluff and otherwise prep the photo area.  Does this photo seem inappropriate to you?  Put your duvet down!

    Yeah, just setting down 4 pallets is definitely not the only part I cut corners.  I put what I like to call a ‘skim coat’ of paint on the end of the pallet AND on the rug.  And, as you saw from the close up of the 
    useless
     headboard, I didn’t even bother with the skim coat on the other end of the pallets.
    I did, however, try my hand at up-cycling some fabric into envelope closure pillow covers with success.  Yay!!  Score 1 for the good guys.  And, for anyone who is counting, we’re at 5 for the 
    bad guys
     roof and pallets.  Sigh.

    And, I did a little DIY pillowcase/cover embellishment.
    And, I made these cute little candles …
     … and this ‘our beach house’ sign.
    Which, (side note), was intended to go across the top of the headboard all cute like until it turned out it would be hidden behind all of the pillows because I made the headboard so flippin’ short!  ACK!!!
    I also had visions of a flowing mosquito netting, especially after seeing ‘The Lucky One‘.  Hello this-isn’t-a-Disney-movie Zac Ephron.  But, with the wind, it is just impractical and unnecessary.  Would be uber romantic 
    when it’s not blowing up my nose
    , but not worth the expense or the effort to hang it from those high rafters.
    All-in-all, we are stoked to finally have our version of a pallet bed on our roof.  It has been a long time coming and it will definitely get primped, tweaked and prodded 
    again in 2 1/2 years
     over time.  But It. Is. Here!  And We. Will. Use. It!  Hip hip hooray!!

    ✧✧✧✧✧

    And, because I am the best bloggy host, ever {say that emphatically, like a valley girl from the 90's} I have rounded up a few of the tutorials included the post so you can better peruse Karah's awesomeness!
    You guys will have to stop by Karah's- to find the blog behind the humor that was happening all throughout this fantastic post!  Andknow you want to know where the beer bottle lighting fixture ended up