
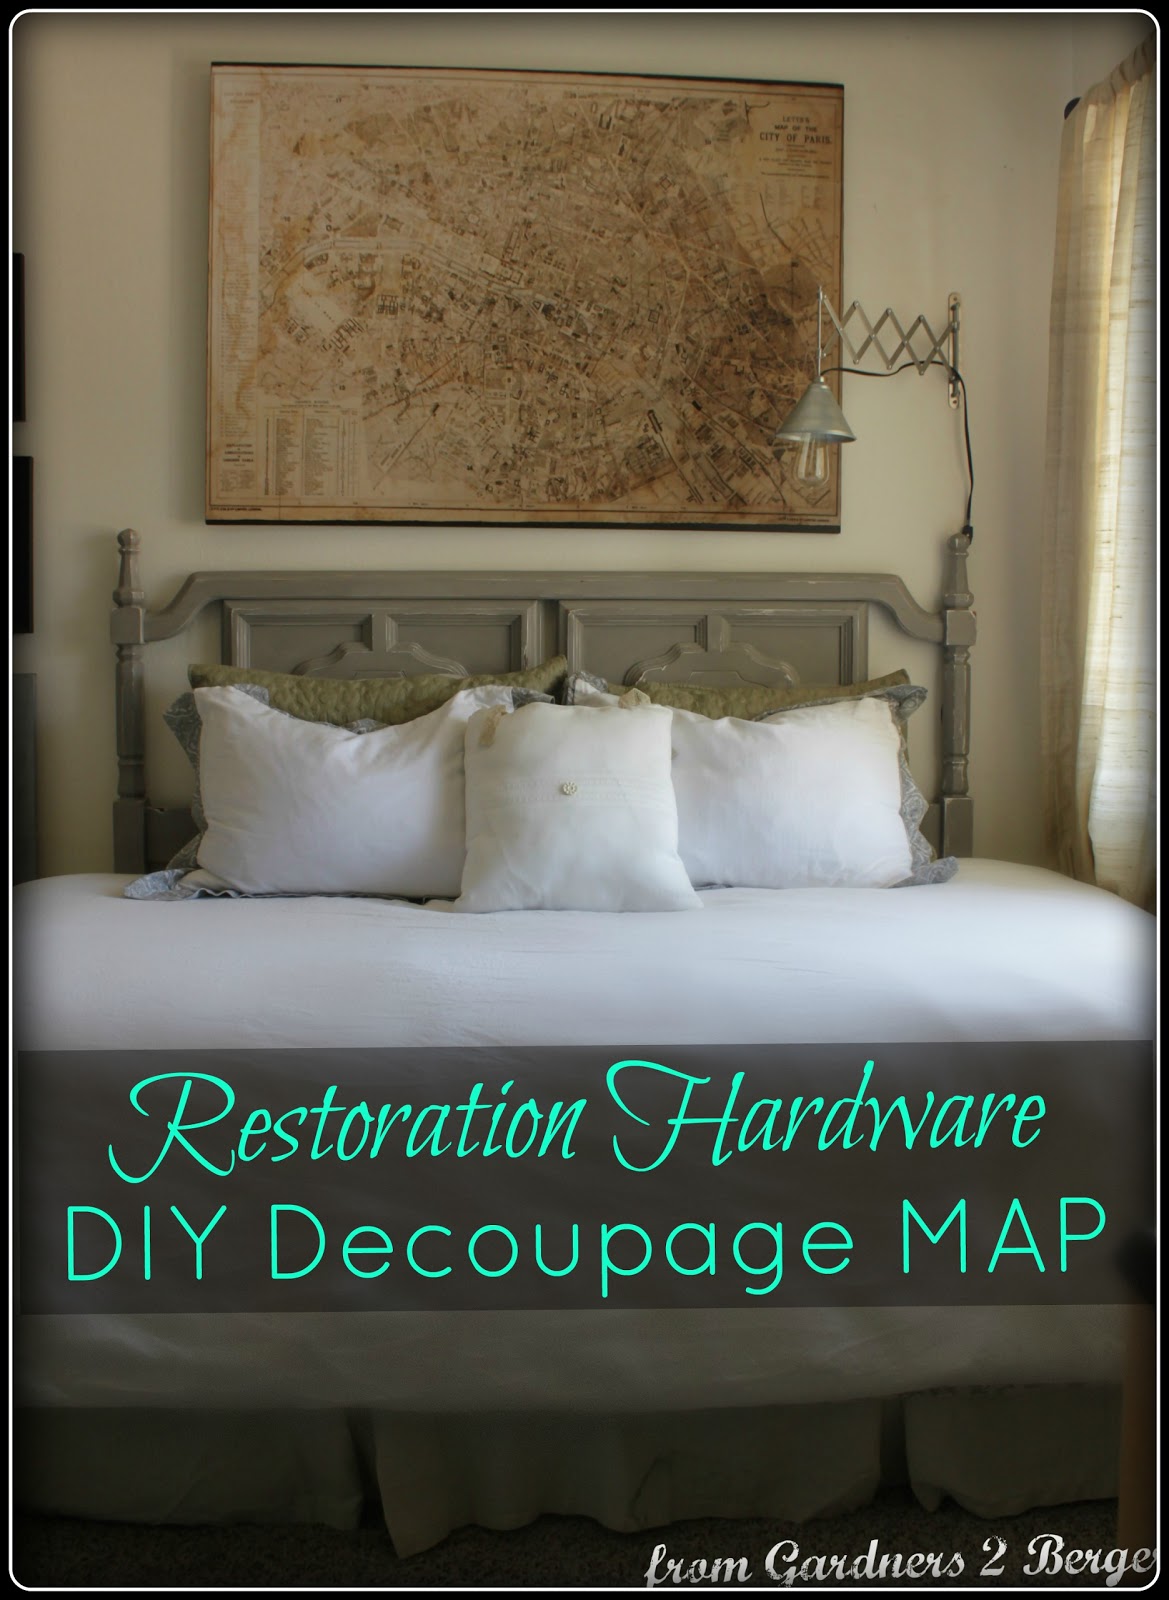
You guys know I'm a fan of Restoration Hardware's Map Art- remember these knock offs from a few months ago ?

Well, I was brainstorming a way to get bigger version of this MAP art- but also trying to figure a way to keep costs low. I figured I could use the same tutorial- {which explains on how to blow up a jpeg image of a map and keep the high resolution.}
But also- I could print off INDIVIDUAL color pages and pay per page rather then paying 60+ bucks for one giant color print off.

Which reminded me of this super-sized map art, Decoupage Paris Map, at Restoration Hardware.
They sell a decoupaged reproduction map of Paris for a couple thousand bucks! Crazy!
Well- if they can mod podge- then so can I.
Here's what you need to recreate the look.

1] Get your Image: Use this tutorial to get your jpeg images of your map- or whatever else you're blowing up
2] Print'em off: I prefer to print mine off with a laser printer when I'm going to decoupage them. So off to Staples I went. I had them do a couple test sizes- trying to determine how large I could get my map before it got too pixelated- and finally settled on the largest image I could get.
But you could also go in with specific measurement in mind and that would be easy too.
3] Cut Wood or Canvas: Once I knew how large I could get my map, I had a piece of mdf cut to size.
4]Get you Images Ready: Use a paper cutter to cut off all the excess white boarders on each page

5] Deoupage: Use Mod Podge to decoupage each piece of your map puzzle together. I started in the top corner and worked one at a time.
Brush mod podge onto your surface, then onto the back of the paper and adhere. Burnish the front of the map- making sure to work out any bubbles.
6] Edges: Either: Wrap the Map around the edges and Mod Podge them down, see where my white arrows are in the above image? That was my overhang.
or- If your map is too small to do that, you can paint the edges a matching color.
7] Seal you Map: Use a final coat of Mod Podge to cover the front and seal the work together.

My map ended up being about 3 1/2 feet by 4 1/2 feet- perfect for over the guest bed. Like I mentioned- I wanted it as big as I could get it- without having losing detail via pixelation.

The placement had me thinking of these pics I had pinned on Pinterest.
I believe all of these, mine included, are maps of Paris.


The Cost:
Color Copies: $12
Mdf: $10 {I purchased a small piece to save money}
Hanging Hardware: $6
I already had: Brush, Mod Podge, Paper Cutter, Paint
RH sells theirs for $1,700 to $2,450. Super rad savings, right?

But I did go out and buy a special cleat that allows me to hang heavy art on the wall. I don't need this thing falling on my Grandma when she comes for a visit! ;-) I also used the same type of cleat to hang my headboard in this post- in case you'd like to see what it looks like and how it works. Oh yeah- it cost 10 bucks but you can buy it at Hobby Lobby with a coupon and save 40%.

For any of my more nosey readers- I've mentioned a million times how this room has to "do it all" as a sparebedroom/craft room/ office/storage room. Here you can see how close the desk is. Just keeping it real, folks!
-xoxo-

I'm also linked up here.

 You guys! Just look at this gorgeous space!


 Des is one talented lady to compose such a beautiful space. I love all these details.