March 26, 2012

✥ Reader Feature: AWEsome Farmhouse Bathroom Makeover ✥


I hope you guys had a fabulous weekend! I went to my nephew's play, the movies and also a pedicure party, I made some new friends and hung out with some old ones! Now I'm back to the daily grind- but the good news, it's also time for our feature! Yay!! I look forward to these so much and I am constantly amazed {and thankful} for the talented gals who read my blog!

I have gotten to know Karianne from Thistlewood Farm- and man is she a sweetheart! I asked her to share a before/after with us today, so she chose her delightful bathroom makeover. She wasn't blogging when they got her house- so she's short on "before" pics. But her "after" pics speak for themselves!
Karianne could have chosen any room in her house to share- no joke! Each is more fabulous than the last. Basically, she could be our feature each week for like the next two months as we check out her home room by room! It's that great. Not to mention her writing skills put me to shame! She's got a great sense of humor and I think her posts have a poetic feel to them.
You'll see...

✧✧✧✧✧

I should have taken more before pictures.
You see, a marketing genius and I were talking recently and she told me I need “before pictures”.
Why oh why didn’t I take more?
Before I lifted a paint brush or a roller or a sander, I should have lifted my camera.

I have a few pictures.  They don’t really do the guest bathroom justice.
Why didn’t I zoom in on that shell toilet seat?
Why didn’t I know that I would have a blog and that before pictures were essential?
Really.
I mean you barely see the wallpaper….and the sink….and the faux brass towel rings.  This is not an accurate representation.
I feel like I have let us all down.
Why didn’t I take more time with the before?

Maybe because I was too focused on the after.

I wanted clean and light and bright.
So instead of photographing terrible before shots, I painted the walls.

Instead of photographing the process and journey….I hunted high and low for the perfect baskets on clearance and filled them with tea-stained flowers.
Instead of creating tutorials and step-by-step instructions, I just painted signs.

Next time I will know.
Next time I won’t be so unbelievably careless.

You can count on me.

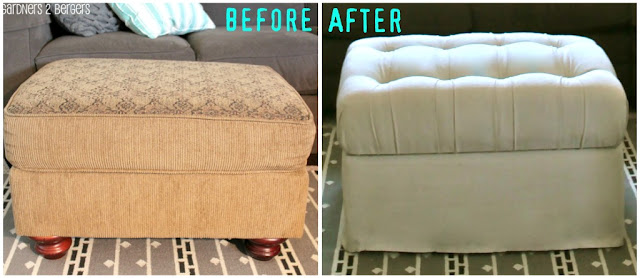
NOTE TO SELF:  When starting a project…..

Take a plenty of before pictures of this….

…..before it turns into this.
If you want to see more before and after click here.
Thank goodness for next time!
✧✧✧✧✧

Don't you just Karianne and her home? Now, do yourself a favor and check out Karianne's home tour. You will not regret it. As a little bonus,  two of my favorite rooms are:
Her rustic glam farmhouse kitchen, look at those glass-front cabinets - they're up to the ceiling!! Love.
 Her children's playroom- which I think looks totally Ralph Lauren-esque {and I want those chairs}!
Have a happy Monday you guys! I hope you enjoyed Karianne's home as much as I do.

March 22, 2012

Ballard Designs Tufted Ottoman Hack

 I am 100% certain that I'm more stoked about this project than anyone else could be! See, Z and I are ottoman people. Some people are ottoman people. Others are coffee tables peeps. In theory I wish I could be the coffee table type- sporting an old railway cart as the centerpiece to my room. But it isn't practicle for the way we live, especially while we're living in a small space.
So- we're ottoman fans cause we like to lounge on our couch and you really need an ottoman for that.
When I sold our couches last June-ish I kept the ottoman. Then it sat in the middle of our room in all it's corduroy and tapestry glory. I am super excited to have  something we use every day look like it belongs in my room!

I kept it because it was the right height for the new couch, it was fairly expensive, and I had plans for this baby! The ottoman I was crushing on was from Ballard Designs- with a nubby oatmeal fabric it would fun me $495- which, I think, is how much we paid for our ottoman in the first place. All the more reason to reuse mine.

 It was pretty easy for me to get from this before pic to my after. I put this project off- forever- because of the sewing issue. See, I can't, and I knew I would need to sew the bottom portion to make this look like something I would buy- not something I made.
I used a drop cloth to make this after happen AND with minimal sewing- if you can sew a button, you can do this project!!

1] To start- flip your ottoman over and use some pliers to pull out the staples, so you can take the fabric off. Don't worry about keeping the original fabric in tact- this can easily be done without it as a template.

2] Once you ottoman is naked- you'll need this stuff to get'er done. If your foam and batting are in good shape, then you can reuse them. I reused mine. I had everything on hand except the button kits, peg board, and upholstery needles- so it was a cheap makeover.

 3] Purchase a drop cloth that is long enough to be wrapped around the entire base of the ottoman. This is a crappy pic- but if you follow the arrow, I wrapped the fabric around the base so it would meet up in one place. Also- make sure the cloth is wrapped inside out!

4] Pin it where the fabric meets up. You should try to pin it in as straight a line as possible. When I got to this point I decided to make it a skirted ottoman, instead of following the inspiration pic 100%. So it is more like a combo of Ballard's slipcovered ottoman and their tufted one.

If you're making one like mine, then make sure you use the finished edge of the drop cloth as the edge that touches the floor- less sewing, you know.

I somewhat followed this tutorial to do the tufting- it is very comprehensive, with lots of photos- so pop over if you need things clarified.
5] Cut the pegboard the same size as cushion. Use the grid to plan out the button spacing.
6] Wrap your foam in batting, then cut holes in the foam where the buttons/tufting will go. I kinda skipped this cutting step- but you should totally do it! ;-)
7] Make your buttons using the directions that come with your kit.

8] Thread your needle with the twine and create the tufting. Make sure the buttons are seated down as far as they will go.
9] Don't forget to manipulate with the fabric to create pretty tufts before you secure the button in place with your staple gun. Here's mine, pre-ironing.
Now- for my Achilles heel- sewing. I know I CAN sew, if I could just LEARN how to!! lol
I spent 2 days playing around with this beast that was given to me 2 weeks ago.
All I ever got was a tangled mess- no sewing. The thread would just bunch in a knot. Is the machine broken? Maybe it's the user!!  Hmmph!
10] Remember how I said if you can sew a button, then you can make this ottoman? Yeah, so I hand sewed it. You'd think it would take a long time- but not compared to the 2 days I spent on the sewing machine! I made sure my pins were straight, marked a straight line with a pen and that kept my stitched straight.


 On the left is my hand sewed seam- then on the right, my drop cloth came with a big fat seam down the middle of it. So I lined that one up the opposite side and opposite corner as my hand sewn one.


11] Make sure you iron the tufting- and well, the whole drop cloth for that matter. But ironing the tufting will just help it stay the way you want it to- and it will look pretty!


If you didn't want a skirted ottoman you could easily wrap the fabric {like a present} under the frame and staple it in place. Then it would look more like the original inspiration. I may do that at some point? Who knows? Z had a strong opinion that is looks better skirted- so this will work.


This makeover cost me maybe 20 bucks. The drop cloth cost me $11 {I bought a 6x9} and I used coupons when I bought all the supplies- this really kept costs down.


Even though I had an ottoman- you could easily do this with a thrifted one or something you found on Craigslist. Funky outta date ottomans are always floating around out there!
What about you? Sewn anything lately? Anybody have any advice for that machine of mine? Has you reused an out of date item, making it new again?