Showing posts with label Printable. Show all posts

October 18, 2011

✥ Happy Halloween Alphabet {Printable} ✥

Awhile back I did this alphabet art for my own gallery wall. It was a simple piece with a hidden personal message, "It's Worth It." I wanted a subtle message to make up those walking by, including myself, pause to take in a little uplifting thought.


I was thinking it would be fun to do a Halloween version.
 
Wanna Print me?
Two options: White, like my original.
Wanna Print Me?


And a spookier, more Halloween-y, black version.


To print them, I suggest clicking on the actual links, rather than trying to drag these onto your desktop and print them. 
The version in the linked document are a much higher resolution and should adjust to being sized a lot easier. 


I just felt like giving all you awesome peeps who read my blog a little something.
Sending you some Holiday love and a big THANK YOU!

Looking for places to link up your projects? Check out my Party page.
I'm also linked up here.

October 1, 2011

DIY Greek Key Fabric [with printable]


This one time I was shopping daydreaming about shopping at Horchow online.
Mostly looking for duvet inspiration when  came across this pillow.
source
Since you've read the title of this post, you've probably inferred I am referring to the Greek Key beaut. I love the symmetry, simplicity and how you eye automatically travels through the lines. There's not even a price for the pillow I like, but the other two are 250 bucks a pop. 
Two. Hundred. And. Fifty. Dollars...Each. {umm, no thank you}

Armed with the pillow as my inspiration, I decided to make my own fabric.
I came across this super fun website that helps you make your own Greek Key patterns. It is honestly awesome. They give you so many options, you could make any pattern you want in just a few minutes. 
WANNA PRINT ME?!
Here's the one I came up with, it's pretty close to the original. I made it a square pattern and used it at 10x10 inches, but you could use it at whichever size you'd like.
Materials
Plastic sheet/folder (or stencil sheet)
Natural Fabric with Tight Weave (cotton or linen)
Paint of desired color
Fabric Medium {from Michaels'- purchased 2 but used 1/2 of one}
Spray Adhesive
Exacto Knife & Paper Cutter (or stencil-burning tool)
Greek Key Stencil

Iron
Instead of buying the stencil sheets and the stencil burning tool, yadda yadda- I used what I had on hand.
A plastic folder.
With a little deconstruction, I had a piece of plastic to experiment on.
I just used my trusty spray adhesive to attach the template to the folder, then got to work.

The stencil is designed for the black part to be removed. I used an inexpensive paper cutter to do all the straight cuts. I marked how far forward and back I could move the blade {without cutting into the white portion of the template} with a piece of white electrical tape. See in the pic below? That way I could do speedy cuts, because there really is a lot of them.

After I had done all the cutting vertically and horizontally I used an Exacto knife for some of the corners. It took me the entire episode of Project Runway to cut it out. 
A nice chunk of time- but still worth it for 
(1) the money saved &
(2) I got exactly what I wanted. 

I wasn't loving the patterns I found online, so getting the exact pattern in the exact color is a HUGE value for me. The bigger the pattern is blown up to use, the quicker and easier it will be to cut out. 

Also, if you made your own, you could simplify it quite a bit. 

As usual, I ignored the amount of time it would take and went full speed ahead towards getting a very close copy of my inspiration. Here's what I used to for the color. 
I was dying to try out the much-talked-about Martha Stewart paint line. I chose Beach Glass in Satin and mixed it with some white paint, to lighten the color a bit. I also picked up Fabric Medium and Pearlizing Medium. I bought everything from Michael's, on sale and ended up using about  1/2 a bottle of each of them (less the white paint.)

Follow the directions on the back of your paints in order to combine them properly. You can only see the shimmer in these pics of the paint while it was wet. Dry, the shimmer is super subtle and doesn't show in the dry paint pics I've taken.

Use a tight weave, natural fabric to paint on. Mine is an inexpensive cotton that feel like a 200-300 thread count sheet.

I used spray adhesive to attach the stencil to the fabric. I sprayed a light coat on the back of the stencil so the fabric wouldn't get very sticky. {You could use regular spray adhesive or stencil adhesive, both will work}

If you're following my lead and using a folder the adhesive is a must
The stencil will be in two pieces- the inner scrolls and the outer frame and lines- so you need to secure the inner scroll work to the fabric, though I still held it down as I dabbed/stippled the paint brush. The paint didn't bleed under the stencil at all, I was really impressed.

Can you see the clump of paint on the left side?
If you get one, it's probably where the acrylic didn't get mixed into the fabric medium. Just scrape'em off while the paint is wet.

Drying time is 24-48 hours. If you need to do any touch-ups the next day you should be fine. When I did there wasn't any color variation between the old and newly applied paints.

After the drying time, you need to iron the fabric to heat set the paint. Follow the directions on your specific brand of fabric medium. You should iron the reverse side of the fabric, without steam.

Want some IDEAS for your new 4 dollar Greek Key FABRIC? OK!

Pillows {of course}
 
Curtains {or Shower Curtains}
 
Headband? It's kinda chic.

PLACES to use your new, free STENCIL?
Walls. Mimic the look of mucho expensive wallpaper.

  Floors. This Greek Key rug is gorgeous,  but DIYing a runner or mat would probably be a little more realistic!
This smaller rug is $147 on Amazon I'm sure we could make it for a fraction of the price.
Add a Greek key border to pre-bought sheets or bedding, to make them look instantly expensive and gorgeous!

Here's a close up of my new fabric. It looks legit- right?


I can't wait to show you guys the end product. I love, love, love it! You can find it here!

Don't forget to grab the printable pattern & to check out the website to make any Greek Key design you want, it ROCKS!


September 5, 2011

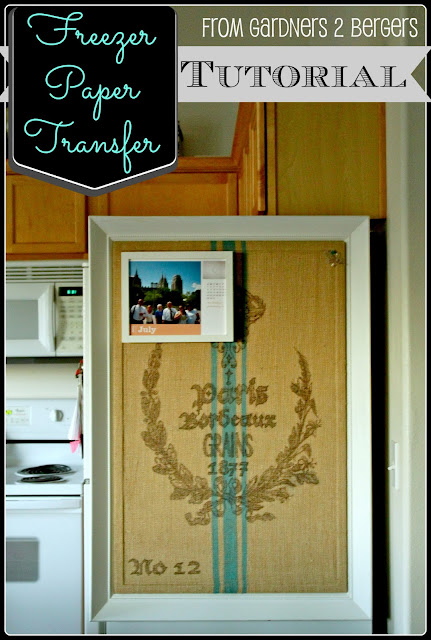
Freezer Paper Transfer [Tutorial]


This is a follow up post to my new framed bulletin board. I made a custom  bulletin board to hide this giant eye sore/ fridge that was visible in my kitchen and living room.

I used freezer paper as a transfer method, it was a little more involved than I expected, so I thought it deserved a full post, to make sure I can get all the steps down right and as to not make the last post a novel!


Materials


  • Spray Adhesive
  • Freezer Paper
  • Printer- Ink Jet
  • Printer Paper
  • Elmer's Glue
  • Hairspray 
  • Spoon
So let's walk through the process of {first} making the graphic and {second} getting it onto the fabric.

For the images, I turned to The Graphic Fairy and started putting images together on Microsoft Word. I knew the elements I really wanted and it was just a matter of putting them in the right order-
I really wanted: a wreath, crown, at least two fonts, some numbers i.e. dates. 
Feel free to grab this if you want to u
Here's what I came up with.

Once you've got things the way you want them, make sure you reverse the image! For this transfer method you need the mirror image of your graphic to be printed up.
At the last minute I thought I goofed up my graphic when I realized I wrote "Grains" in English, not French! But several online French dictionaries swear the word is the same in both languages.
It had better be, because it's too late now!

I wasn't sure how to resize the image in Word, I wanted it to end up almost 2 x 3 feet.
So I copied it into an Excel doc.
With Excel it's a piece of cake to set your exact measurements. Just double click on your graphic and a box pops up for you to choose your exact measurements.You should also adjust your border measurements. This will have you use fewer transfer sheets and then make getting the images lined up easier. Too bad I forgot to do this myself!
I'd decided to use freezer paper for a transfer method. It was a perfect tool for this project because I was going to need several sheets for printing. It also works because my end product doesn't need to be washable. You can find freezer paper at Walmart for 2 bucks and it comes in a huge roll, something like 175 ft.

Freezer paper transfers can be used with ink jet printers. You can do transfers of all sizes {as long as your printer is full of ink}. Although I haven't tried all of these, they can be used to transfer on a wide variety of surfaces: wood, painted surfaces, porous and non porous fabrics. If the surface is smooth you will get a very clear transfer versus a porous surface { like fabric with a heavy weave} you will have results that look distressed. They're basically awesome!

In order to print on freezer paper, it's a good idea to cut it into sheets a day before and then lay them under a book to flatten them out. {For those of you who want less work and don't mind spending a little more money, you can actually buy freezer paper in 8x10 sheets. For me, cutting them was not a big deal.} You should cut the freezer paper  little larger than the size of your printer paper.

After the papers are flattened out, it's time to attach them to a sheets of printer paper. I used spray adhesive to attach the papery side of the freezer paper to the printer paper. When I work with spray adhesive I set up a little zone coerced in cardboard. If you ever go to Ikea they give out sheets of cardboard over by the loading zone. I believe they're supposed to protect your roof when you bring home your goodies. I always grab a few and some of their butcher paper they provide for you to wrap your breakables.

On my kitchen counter I set up a cardboard barrier, then lay out my printer paper. I spray on the glue, then lay down a layer of paper.
I put my glued pages on the butcher paper, then smooth one sheet of freezer paper on each one. Why all the hassle? Well, if you get any glue on the back of your printer paper, it won't go through the printer. The preparation will save you a lot of grief later. Trust me!

When the freezer paper s attached to the printer paper you can trim the edges. You want  the freezer paper to overlap the printer paper a little on each edge. My printer will only take up to a 8 x 10 sheet of paper, so I could only have a little overlap. If I had a choice I would've done about 1/4 inch overlap.

When you have all the pages you need, you're ready to print. You want to print on the SHINY, plastic coated side!

You need to print them one at a time.
Let's take a look at how I learned that. Major bummer, right? My printer made it to page 9 before it grabbed 4 sheets at once and started printing across all of them. Not awesome.
I was able to wash off the ink and reuse a few of the sheets, but not if I didn't have a good overlap on that side. You can use a tiny bit of water on a paper towel and wipe off the ink, but don't get any water near the edges of your paper, it will seep under the edges of the freezer paper and ruin the paper side.

When each sheet comes off the printer you need to grab it and lay it out. The ink is very wet and will easily smear. Again, I learn the hard way. Guess that's why my tutorials and always so in depth, I seem to make every mistake possible! The ink will not dry, so keep all the pages in order and don't try to stack them or touch them.

When they're all printed up you're ready to transfer them.


I started the project just like you'd tile a room, I began from the center. First measure to make sure you're even. I always make a spacer. In this case, a piece of paper I can lie next to the image I going to transfer. That way I can easily see I'm lined up and can focus on the actual transfer.


In order to transfer the image you need to lightly wet the area. Since I was transferring to cloth I used a spray bottle to wet it.  I did a test spot on some scrap burlap and used the screwed up crown print off. I am so glad I tested it out first because the ink bled pretty badly. You can see some of my first results below on the right.
So I used an old trick for writing on t-shirts, I sprayed the fabric with aerosol hair spray. I did a few trials and three light coats, allowing for drying time, seemed to do the trick. You can see my results above on the left.
So I sprayed the hair spray over my entire fabric {again- 3 light coats}.
Then used my spray bottle to dampen the fabric, in square sections. You want to work one page at a time, that way you know exactly how wet the area will be.

Mist the area, 2-3 sprays, then lay the page down.
Hold the page firmly and use a large spoon the burnish {rub} the area. You can peak to see if you've rubbed enough. But make sure you're not moving the sheet around.
{I had a couple spots where I can tell the paper must have shifted. Mostly on my first transfer.}
 In the picture down above I tried to show you all the different degrees of ink transfer, so you know exactly when you've done it right. You're looking for the paper to look light grey, with all the fresh black ink rubbed off onto your surface.

When most the ink is rubbed off you take a warm iron and apply it to the back of the paper for 10-20 seconds. At first I thought this made the transfer darker. But then later I moved the freezer paper before I remembered to iron on top of it { twice } I cannot say I saw a difference in those areas. So it's up to you whether you want to do it or not. It's possible you're supposed to do it because it sets in the ink or something, but who knows?


That's all there is to it. Just line up the pages, making sure the edges match up and everything is straight. It takes 24 hours to cure, so don't mess up all your hard work!


That's all I can think of {like that wasn't enough!} I know it sounded like a lot, but that's only because I'd rather give you all the information so that you can do it right the first time and save yourselves some hassle.

If you wanna see how the rest of the  framed bulletin board project came together, just click here! Good luck with your projects!
Looking for places to link up your projects? Check out my Party Page!
I'm also linked up here.

September 4, 2011

DIY French Grain Sack & Framed Bulletin Board

Here's the after photo, a huge pin up board resembling a framed french grain sack. 
Wanna see how I got there?

This project started as the need to cover an eye sore.
The way our condo is set up we have a constant view of the side of our fridge. Not awesome. 
Awhile back I decided to make a custom message center or bulletin board to hide camouflage the appliance and provide some extra function in the small space. 

After deciding what I was going to do in the space, I waited goodness knows how much longer to find a frame in the right price range (it was actually free) that was big enough to fit an entire pin up board inside of it,

I needed an opening measuring 2 x 3 feet.

How do you like this gorgeous before?
{no wonder it was free, huh?)


Sorry for the sloppy pic, I had so many items to photograph that day, I just piled them on top of each other and took one after another. The bulletin board was also snagged for free the same day, one side had chipped cork, but the other was in great shape.


The next steps consisted of the usual:

sand the frame, prime it with 4 coats of Kilz to cover the red wood hiding under the gold paint, paint it with three coats of Krylon's gloss white and then spray a layer or two of gloss sealer
 For the fun stuff, the design of the board I turned to Google images and Pinterest for inspiration. 
I had pretty much decided to do a post mark/ french script theme, but the project never seemed to get started. My fridge is located very close to the new gallery wall, so I felt a huge framed piece needed to be just right; as to not compete with all the other frames but to compliment what was already done instead.
Finally, I went back to the drawing board for the design.

After looking through some of my Pinterest favorites I decided a French Grain Sack look would work better for my space. This I knew exactly how I wanted it to look.
I started by attaching fabric to the bulletin board.
For a fabric, I used regular old burlap. It is supposed to look like a grain sack after all. To adhere the fabric to the board I used some spray adhesive I already had. It worked like a charm.

I wanted a pop of color on the "grain sack" to keep things from getting too boring in the kitchen.
I mixed a few colors (turquoise, sea green, white and black) until I liked what I saw, then watered it down- a lot.

I used painters' tape to create stripes on the burlap and dry brushed the watered down paints on, while also working in some brighter shades here and there.
I think watering down the paint helped it to appear older, more weathered and kept it from looking thick or freshly painted.
I was a little worried the paint would seep down onto the cork board, but it didn't at all.
I'm sure it I wasn't dry brushing it on than it would have.
I also didn't have any bleeding under the tape- which obviously rocks!
Feel free to grab this and use it, it you'd like.


It took about ten minutes to dry, then we were ready to transfer our images.


I  created an image using graphics form the Graphic Fairy. Then used freezer paper to transfer it onto my burlap. The 2 tutorials I read were pretty brief so I learned a lot through trial and error {a lot of the later.}
 

I'll post the full freezer paper transfer tutorial tomorrow, that way you guys can get all the details and learn from my mistakes experiences. My total graphic ended up being 26 inches high and 16 inches wide- and took a total of 12 printed pages to transfer.

I was initially hoping to separate the bulletin board from its frame. Then cover only the cork with fabric and paint the bulletin board frame the same color as the real frame. I had hoped to make it look like the frame was really thick.

{Does that make sense? A frame inside a frame?}

Unfortunately, my pin up board was an inch shorter than the backer board.  It would have left a gap on one side of the frame and was just enough of a size difference to ruin that plan. You can see it right below.

So instead I wrapped the burlap around the whole board. I used a ruler to make the burlap crisp where the cork met the frame. I don't mind the look of it at all, thankfully.
  
  When the front was secured I used a strong glue to attach the bulletin board to the original backer board/ hard board that came with the frame. It was actually automotive glue- but that's only because I knew it was strong and I already had it on hand.
I let it dry for a few hours.
You don't have to go and buy it, but it worked great for me. I'm pretty sure they'll be stuck together forever.

I used more spray adhesive to attach the burlap around the outside of the bulletin board frame and around the back of the hard board. After it was straightened out, you really cannot even tell the heights were unequal.

Now the boards are glued together, the burlap is affixed to the front and of the bulletin board and wrapped around both of the boards. By affixing the bulletin board to the backer board it's now possible to fit the hardboard into the frame exactly how it was supposed to fit.
The hard board sits on a grooved wood ledge and the bulletin board rises up from inside the frame.
So you can pop the bulletin board into the frame and nail the back into place.
At one point I someone may have jammed the board into the frame before they were fitted properly.
This caused all four corners to split a little. No biggie though, all you need it a little silicone and you'd never know a crack was there. I apply it with my finger, then wipe it smooth with a clean finger. {real technical stuff!}
If you've made it this far, congratulations! Imagine if I'd thrown in the freezer paper tutorial?
I used this "Industrial Strength" Velcro to attach the frame to the side of the fridge. It is so strong I think it could hold me to the side of the fridge! 
The Velcro adhesive takes 24-48 hours to cure. 
So I had this {book holding up frame and blocking garbage can} situation happening overnight. 


Here you can see see how the side of the fridge is visible from everywhere in the living room. I'm pleased with how the grain sack turned out, is looks legit.

If you want an awesome, complete, and in depth tutorial on the freezer paper transfer technique, then check out my post tomorrow.

Thanks for reading!

Looking for places to link up your projects? Check out my Party Page!

I'm also linked up here.