
Maple floors are less common now, because maple doesn't take traditional wood stains very well. But they were very common back in the day. You will find old maple floors, with these skinny 2" boards all over in old homes, especially in the east and mid-west. Staining maple is not a problem with our products, as you can see. Just apply stains and let them air dry! So this is a great project for your old maple flooring, to update it and bring it into the 21st century! Not to mention, this is the easiest way to stain your own flooring. Let's get to it!
MATERIALS
- Hard Maple Flooring
- Sand 80, 120, 320
- Weatherwood Stains' Reclamation Stain
- Weatherwood Stains' Polyurethane Topcoat
Directions
1. SAND
We had our floors sanded by professionals, since this is the trickiest part to refinishing floors when using Weatherwood Stains. Normally, floors are tricky all the way around- sanding, staining, and topcoating, but we make things easier with our products. We had them sanded to a 80, then a120 grit. Another option is to purchase wood that's pre-sanded and ready for a stain.

4. STAIN APPLICATION
We had our floors sanded by professionals, since this is the trickiest part to refinishing floors when using Weatherwood Stains. Normally, floors are tricky all the way around- sanding, staining, and topcoating, but we make things easier with our products. We had them sanded to a 80, then a120 grit. Another option is to purchase wood that's pre-sanded and ready for a stain.
2. REMOVE DUST
Remove all the dust. Using a dustless sander can help with this. Now they are ready for stain.

3. PREP
Pour all your stain into a 5 gallon bucket. Tape off anything you don't want stain to touch, tiles or whatever. You may want to tape off your sections of wood, as well.
After sanding- you can apply a heavy coat of Weatherwood Stains' Reclamation wood stain. Do not wipe off- allow wood to absorb stain. This time-lapse video condensed 30 minutes into a few seconds. You're gonna love watching it! It looks so cool-- the gray just sort of appears out of nowhere. You can see that I applied a heavy coat of stain and then the wood does the rest.
4. STAIN APPLICATION
Edge the floors using a brush or large sponge brush.
5. DRY TIME

1. Use one rag to apply oil to the wood's surface, working boards by board or in 10-12 inch sections.
2. Apply oil and wipe off immediately with new clean rag.
3. Keep working in sections, applying with one rag and wiping with the other.
4. You can apply up to three coats of maintenance oil. Each coat will continue to lighten the finished product.
5. Allow maintenance oil to cure 24-48 hours.
6. Either apply annually or as needed. Or apply Polyurethane overtop to seal the look for a maintenance free finished product.
- Dip the broom into the bucket and lightly push the stain into the wood grain, cracks, and grooves. Unlike most waterborne finishes, the goal is not to wipe on and wipe off, but rather you should flood or drench the wood's surface and then allow the wood to absorb the stain.
- Work in sections, a few planks of wood at a time. Either tape off the floor into sections or keep a wet edge as you work across the floor, this will avoid overlap marks. Do not stain half a piece of wood and then come back to stain the other half. Like regular stains, it will be difficult to blend the stain if the product dries mid board, and then you add more stain to the other half.
- See above video for additional information.
- Floors will dry within 2-4 hours, drying is quickened in warm environment with good air flow.

TONER Directions
You can watch the video above, or you can follow the directions below. If you're al, there's another faster way t apply this product. That's on the website. :)
1. Use one rag to apply oil to the wood's surface, working boards by board or in 10-12 inch sections.
2. Apply oil and wipe off immediately with new clean rag.
3. Keep working in sections, applying with one rag and wiping with the other.
4. You can apply up to three coats of maintenance oil. Each coat will continue to lighten the finished product.
5. Allow maintenance oil to cure 24-48 hours.
6. Either apply annually or as needed. Or apply Polyurethane overtop to seal the look for a maintenance free finished product.
Looking for more floor tutorials?

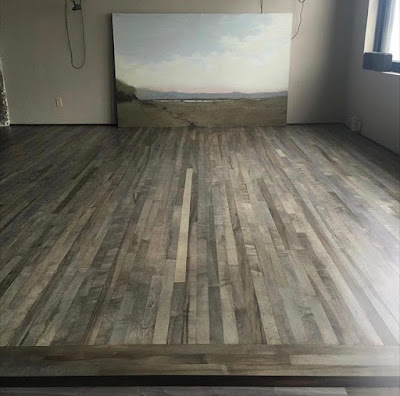
Didn't the color turn out dreamy? The process could not be easier. Do not forget readers save 10% with code: WELCOME10. If you have any questions, leave'm in the comments below and I will see you tomorrow at the party!

