You know I love to get that Restoration Hardware color, especially for this Salvage Trestle Wood Table. You know what they say, "good things come to those who wait." Any ways, I wanted RH, but with their tables are too stinking expensive! It did take me forever to plan the project, find the table, and get the time to do it, but I fought the law and guess what... I won!
I used this [here] color sheet to determine what color the wood could turn. I knew I wanted a drift wood color so I needed the table to be maple. I purchased the above maple table and chairs for $200 bucks. It took me a month or so of on again off again looking to find a pedestal table that was made from maple and not oak. Once I found this baby, I was golden.
Here's how to turn an outdated 90's, golden maple table into a drift wood masterpiece, worthy of RH.
MATERIALS
- Table to Refinish
- Sand Paper- 60, 120, and 220 grits
- Citristrip or other stripper brand (this is optional)
- Palm Sander
- Weatherwood Stains' Reclamation Stain
- Weatherwood Stains Varnish
DIRECTIONS
I knew I was planning to use Weatherwood Stains for the stain, so the wood species had to be maple to get that drift wood look.
1st: SAND:
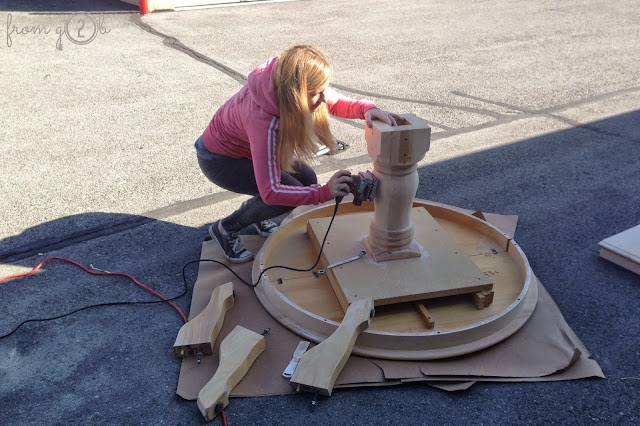
Here's the thing, you have two options to strip the finish off. You can either use a chemical stripper with Weatherwood + sand the wood or you can just sand. No matter what, you're gonna be sanding because you HAVE to get down to the raw wood grain. So that's what we did- we sanded the ever living heck out of this thing. We sanded with 60 grit sanding with the grain. Then we used 80 and 120. It isn't necessary to do that much sanding, but we wanted to be sure that the wood grain was opened up. We could have easily just done 60 grit, then used a 220 grit to get the rough grooves out.
The top wasn't too difficult, we sanded the top with the leaf in. I contemplated painting the base to avoid this whole sanding thing, but in the end, I was too curious about how the grain would turn out. The bottom was a lot more work, it took maybe twice the time of the top? We took the feet off, but we still had to hand sand all the rings.
2nd: Stain
1. After sanding- you can apply a heavy coat of wood stain.
2. Do not wipe off- allow wood to absorb stain.
We stained it outside so I could make a mess, but if we had a garage then that would have been fine.
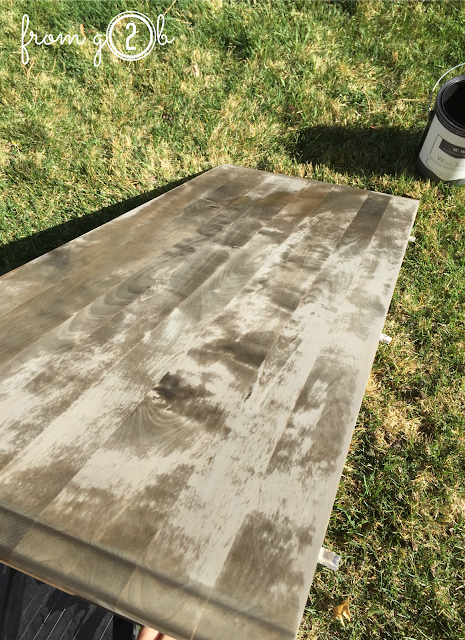
This timelapse video condensed five minutes into 17 seconds. You're gonna love watching it! It looks so cool-- the gray just sort of appears out of nowhere. You can see that I applied a heavy coat of stain and then the wood does the rest. [Do NOT ever wipe Weatherwood Stains off!]
After the video, I applied a second coat of stain. If this were a brand new custom table one coat of stain would have been perfect. But on refinished pieces I've noticed that a second coat can be utilized to get the wood to it's darkest shade.
When it's time to stain it's easiest to do all the components separately but the staining process was the same for all of them. Just roll it or paint it on and let it dry.
When it's time to stain it's easiest to do all the components separately but the staining process was the same for all of them. Just roll it or paint it on and let it dry.
The leaf was even easier to apply stain to. You can see the second coat of stain drying here. BOTH coats of stain took only 45 minutes to apply and dry- especially being outside with good air circulation and the sun.
This is an important photo- see my Weatherwood Stains products are reactive wood stains. That means the stain interacts with raw wood to product color. If you're refinishing furniture and you miss getting some off the original lacquer or stain off it will look like this spot once you've stained with Weatherwood. Although that spot sticks out, it's easy to fix. You need to get your 60 grit sandpaper back out. Sand the lacquer/stain spot back down to raw wood and stain that spot again.
BEFORE:
AFTER:
Total cost-
Ok, so let's get down to the nitty gritty details. Was all this work worth it? Well, I purchased the table for $200 and then I sold the chairs for $150, so I'm in the table $50 bucks. I paid $20 for stripper, sand paper, and other miscellaneous. I had the wood stain and the topcoat, but even if I had purchased the stain for $44 and the topcoat for $40, then the entire Restoration style table would have been 154$!! What a bargain!
What do you think? Would you have made over the entire table or just the top?


