Showing posts with label ReclamationStain. Show all posts

January 13, 2023

Family Life Centers Around a Great RH Style Table & Baby Angel Art, Florence


All the baby angels!! In Italy, these angels are called Putti. 👼🏻 👼🏻 👼🏻 The ones I shared in the below post are all from larger portraits in the Uffizi - found in Florence, Italy. I love the ones with colored wings. I hope you will friend me on Facebook, so I can see what you like to do, too! 


This project is so heartwarming. The kitchen in the center of the home today and this one is no exception! Let's see how to get the look of their gorgeous table!


Materials


Directions

1.] SAND
For this project we used alder, if you're using a different species check out this color chart for weathered wood options: Color Chart. Sand the boards and with 80 grit sandpaper and now they're ready for you to apply stain. 

2.] STAIN
If you want a pure gray, you should use Reclamation, if you want a gray with brown in it, use Salvage. Using a wide brush or sponge brush, apply heavy coat of stain. Like in the above video, the wood will absorb the stain as it dries. The color will change from raw wood to stained. 


3.] LIGHTEN
To lighten the wood, use White Maintenance Oil Topcoat. This will lock in that light driftwood look and protect the wood. It's a wipe on and wipe off application. Use a brush or rag to apply and a clean rag to immediately take it back off the wood. The longer it stays on the wood, the whiter the wood will get.

4.] PROTECT
To seal the wood, use Weatherwood Polyurethane. This will lock in that light driftwood look and protect the wood. Just brush on 2-3 coats. 


You can save 10% on Weatherwood products, like you saw here, with code WELCOME10. 
photo signature7-2.jpg


November 1, 2021

Wood & Steel Reclaimed Tables


Happy New Year's, friends! Last New Year'e Eve we were in a tiny town in Southern Italy called Broncaleone. We were the only people staying at the resort, since it's mostly a summer spot. So Zack and I danced in the moonlight on our rooftop terrace and rang in the holiday underneath a bright winter moon. It was romantic and unforgettable. This year we're excited to ring in the New Year in London! Have you been? What should we go see? 

This week's project is everything industrial!

Materials

Directions

1] CONSTRUCT
To achieve this look, start with douglas fir that's been milled into a headboard. We hand selected some douglas fir and took it to our local mill. They glued the edges and then planed it to create one flat surface. Planing the wood after glueing it removes all traces of glue. The milling cost was nearly nothing and it was totally worth it because I don't have the clamps to keep the boards drying flat, so the cost of the clamps was about the same as having it done for me!

2] SAND
The wood must be sanded, especially being that it's douglas fir. That's because of the way douglas fir reacts when the wood is cut with a saw. You can have it sent through a large sanding machine at the mill or you can sand it really well with a hand sander. You should start with 60 grit and then 80 grit.


3] STAIN
Applying the stain is like a piece of cake. Using a large brush and drench the wood with stain. (See above video.) Let the wood air dry. 


4] PROTECT
Weatherwood is a stain, not a topcoat, so you'll need to seal the wood. To hold this weathered look, I recommend using our Varnish sealer.


This project was a piece of cake. We actually made a few of them as mockups for a retailer. This color was really popular. I hope you like it! Let me know if you have questions, I'm happy to help. You can save 10% on Weatherwood products, like you saw here, with code WELCOME10. I hope to see you at tomorrow's party!

Follow on Bloglovin
photo signature7-2.jpg

July 15, 2021

Restoration Hardware Modern Table Hack


Have you seen Restoration Hardware's new-ish branch, RH Modern? It's the same gorgeous RH look, but with the clean lines of mid-century modern pieces. I found this bedroom with the perfect "gray oak" furniture and I had to see if I could replicate it! 

Materials


Directions

1.] SAND
For this project we used alder, if you're using a different species check out this color chart for weathered wood options: Color Chart. Sand the boards and with 80 grit sandpaper and now they're ready for you to apply stain. 


2.] STAIN
If you want a pure gray, you should use Reclamation, if you want a gray with brown in it, use Salvage. Using a wide brush or sponge brush, apply heavy coat of stain. Like in the above video, the wood will absorb the stain as it dries. The color will change from raw wood to stained. 

3.] LIGHTEN
To lighten the wood, use White Maintenance Oil Topcoat. This will lock in that light driftwood look and protect the wood. It's a wipe on and wipe off application. Use a brush or rag to apply and a clean rag to immediately take it back off the wood. The longer it stays on the wood, the whiter the wood will get.

4.] PROTECT
Apply 2-3 coats of Weatherwood Varnish to protect furniture. 


You can save 10% on Weatherwood products, like you saw here, with code WELCOME10. I hope to see you at tomorrow's party!

Follow on Bloglovin
photo signature7-2.jpg


May 13, 2021

RH Style Balustrade Coffee Table & Bologna, Italy


Take a walk down this Bologna restaurant alley with us!! It’s packed with tourists, fresh food, people eating, & rad details. I’m crazy obsessed with these colorful buildings- they’re all shades of red, orange and yellow. It’s looks so warm and inviting. Bologna was such a wonderful surprise. We did an overnight here and toured the famous spots!


Materials


Directions


1.] SAND (SORT OF): Normally, I'd say you should sand wood and with 80 grit sandpaper, but for projects that have intricate carving you'll want to use something else. You can purchase denatured alcohol, it's inexpensive and faster than sanding. Apply it like you would stain, with a spray gun or paint brush. Make sure to the wood the day before you plan to stain, so it can completely dry. 

Create & Hold White Washed Gray Cabinetry

2.] STAIN: If you want a pure driftwood gray, you should use Reclamation. If you want a brown with brown in it, use Salvage. Using a wide brush, roller, or sponge brush, apply heavy coat of stain. Like in the above video, the wood will absorb the stain as it dries. The color will change from raw wood to stained. 


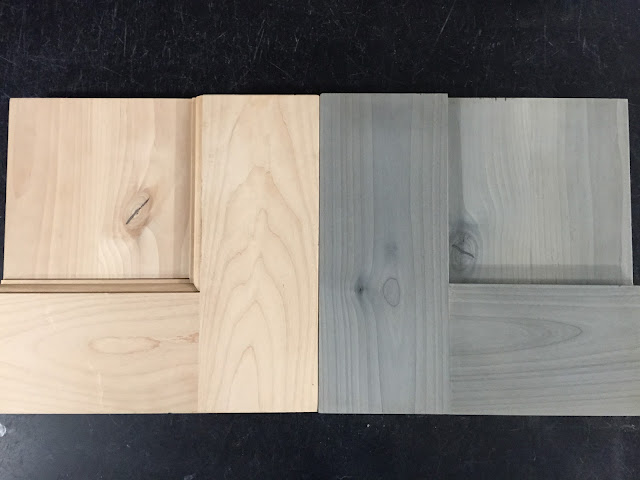
Once you're wood is dry, which takes about 30 minutes, you're ready to move to the next step. You will see the before and after transformation of raw alder to Reclamation stained below. 

Then you want to decide if you like the color as is, in which case just seal it with Weatherwood Varnish. 


If you want to lighten it, you'll want to use Weatherwood's WHITE Maintenance Oil Topcoat, RIGHT. However, if you want to darken it, and enhance the warmth of the wood tone, then use  Weatherwood's CLEAR Maintenance Oil Topcoat (LEFT).


If you want to lighten it, White Maintenance Oil Topcoat. This will lock in that light driftwood look and protect the wood. 


3.] LIGHTEN / DARKEN: We decided to lighten the wood, so we used wipe on application, brushing is faster but a rag will make the product go further. It's a brush or rag it on.


Allow the oil to penetrate for 5-10 minutes. The longer it sits, the whiter the effect. The use a clean rag to wipe off. If it gets too pale, just buff the finish back down. The White Maintenance Oil will provide light to medium wood protection. 

4.] SEAL: Depending on your project! If you need heavy duty wood protection, you will want to use Weatherwood Varnish over the cured oils. If it's a cabinet or something, that will need the varnish!


If you're really loving this color and you'd like another project idea, check out this:

Awesome DIY Restoration Hardware Reclaimed Gray Oak Finish Tutorial and Video#fg2b

1-2-3 that was so easy! If you have any questions, don't hesitate to reach out! 
Lots of love!

Follow on Bloglovin
photo signature7-2.jpg

April 3, 2020

Salvaged RH Style Pine Coffee Table & The Vecchio Bridge


We were on our way to dinner, but the second we stepped out the amazing sunset demanded to be seen! So we headed to our favorite spot, the Ponte Vecchio bridge, to take in the colors. The bridge was a totally party, as usual!! Enjoy the videos!


Let's get to this awesome project. It's my favorite kind of post! Where usually hard to achieve colors are a piece of cake! This client wanted to match her new farmhouse coffee table to Restoration Harware's "natural" color, on this Salvaged Trestle Table. This look is easy to achieve on pine and it's just a subtle aging.


Materials


  • Pine Furniture 

Directions


1.] SAND: Begin by sanding the wood piece, that way the wood will easily accept the stain and create a good pallet to begin your work. Start with a rough grit with a 120 grit. 


2.] STAIN: Once the wood has been stripped or sanded back down to raw, you can stain it using Weatherwood Stain's Reclamation stain. Simply apply Reclamation with a sponge brush, brushing product onto sanded wood and allowing it to air dry. Allow to dry one hour. You'll see in the above time-lapse, the color change is subtle and is pretty similar to Restoration Hardware's "Natural" color. 


3.] SEAL: Apply a wax or varnish seal coat to protect the piece. SatinVarnish will give the look of raw wood, but the protection of cabinetry!


The texture on this maple just makes the color POP, don't you think? This stain will turn most wood species this shade. 

Follow on Bloglovin
photo signature7-2.jpg

March 11, 2020

Restoration Hardware's Natural color on PINE & Palazzo Vecchio TOUR


Ever wonder what it looks like inside a Florence castle? This Medici castle doesn’t disappoint! This castle sits in the square right outside of our AirBNN- in the promo tourist area of Florence. We walked by it nearly every day for four months- if you're interested what the inside looks like, check out my post!


February 12, 2020

Dramatic Bog Oak Bathroom


Create this beautiful RH Modern black oak finish in 3 easy steps! 
Ironically, all you'll need is...white oak and Reclamation stain. What are you waiting for? Isn't it time you get the RH look at a price you can actually afford?  

December 25, 2019

Oak Flooring & the Perfect Gray Brown


Hey friends! I hope you're having a fabulous holiday! It's the happiest time of the year and we are spending it in Paris! It's our first time to the city, lost pics to come, I promise!  

December 18, 2019

Refinished Maple Dresser


Today is Zack and my 18th Anniversary! I can't believe how the time has flown. I feel like no time has passed, except for how our love grows and grows. I think that not having kids, creates this sort of permanent date for he and I. You hardly realize how time is flying until you hang out with your friends' kids. The you remember, you're old! Ha!

November 27, 2019

Maple Desk and Built-Ins


Weatherwood stains are a great choice for maple! It stains up to be the perfect grey and you can still see the wood grain! You will find maple for cabinets and floors because it's such a hard wood. That's why we choose it for this project and you'll love how easy it was to do!

November 20, 2019

Recipe for Perfect Gray/Brown Hardwoods


Maple floors are less common now, because maple doesn't take traditional wood stains very well. But they were very common back in the day. You will find old maple floors, with these skinny 2" boards all over in old homes, especially in the east and mid-west. Staining maple is not a problem with our products, as you can see. Just apply stains and let them air dry! So this is a great project for your old maple flooring, to update it and bring it into the 21st century! Not to mention, this is the easiest way to stain your own flooring. Let's get to it!

October 30, 2019

Layering Reactive Stains Buffet


This week's project comes from the talented Urban Farmhouse! This project is awesome because I've been dying to show you all how you can layer reactive stains! 

October 23, 2019

Restoration Hardware's "Natural" Color


Let's get to this awesome project. It's my favorite kind of post! Where usually hard to achieve colors are a piece of cake! The inspiration comes from Restoration Harware's "natural" color.  This look is easy to achieve and it's just a subtle aging.

October 16, 2019

Faux Barnwood Garage Doors


If you're lucky enough to have wood garage doors, this is right up your alley. But the tutorial will also work well for any wood on which you're trying to get this color! These garage doors are cedar and once they were stained, they looked legit like barn wood. Check it out:

September 4, 2019

Easy Brown/Gray Floors & Palazza Vecchio


We are staying at the best location in Florence! We are a 5 minute walk from the famous Santa Maria Fiore and Palazza Vecchio is right outside our door. The palazza has near continuous free weekend concerts and is always filled with people and street performers. It is so much fun. We are so close we just listen for the music and head down tot palazza to enjoy the performance. 


The other day we walked outside and there was a large parade with women dressed in incredible gowns, flag throwers, and military. 🇮🇹  I have absolutely no idea what we were celebrating but it was a blast. The parade closed with a real wolf being walked through the streets! 🐺

July 24, 2019

DIY Barnwood Walls & Beams & Catacombe San Sebastiano, Rome


This ancient church was built over top St Stephan’s Catacombs. 💀 The catacombs buried ancient Romans & then Christian Saints who had been martyered in the coliseum. ✝️ It was also used as secret church for the early Christians who didn’t want to end up in the coliseum like their saints. ⛪️ 


July 17, 2019

Beachy Side Table Transformation & Santa Scala, Rome


The Santa Scale was quite the experience! 💜💙 According to Catholic tradition, these are the Holy Stairs from Pontius Pilate in Jerusalem. They are the stairs Jesus Christ stepped on his way to trial during his Passion. ✝️  

July 3, 2019

Custom Birch Kitchen & Tre Fountain Abbey


The Apostle St Paul was beheaded in this small spot between an abbey and a (now) church. 👼🏻 The cream building called the Scala Cceli was Paul’s last prison. 😢 The top floor is now a church, ⛪️ while the basement holds the original cell. When we visited there were several nuns also visiting, praying, & singing.