Showing posts with label Tutorial. Show all posts

April 13, 2012

Herringbone Pelmet Tutorial


Isn't pelmet a funny word?
Well I think it is, and I decided it was the perfect solution to my kitchen window dilemma. I'm not a kitchen curtain person- and if you are, I'm not judging. I'm just saying, they're not for me. I saw a pelmet tute ages ago from Cassie, and filed the idea away for later.  Today, my friends, is later!
Wanna know how to make one? {This is where you start skimming if you don't care how to make one of these bad boys!}
Here's how I did mine. You Need: Fabric, Foam Core, Exacto knife {or something like it} Ruler or Carpenter's Triangle and Batting, L bracket or Curtain Rod Hardware

1] First, measure your window and determine the measurements of your pelmet. I used two pieces of foam core- then taped them the length of the window with packing tape.
2] Measure your curtain rod hardware, then cut the top of your board the same amount as your hardware is long. Like my hardware was 2.5 inches, so I cut down the board 2.5 inches.  Make sure you don't cut all the way through the board. I cut through the outer layer and the foam so I could bend it.
  3] Then cut out the corners. You can cut them all the way through, then remove the piece.  
 4] Then bend the sides and the top down and secure the corner. Again, I just used packing tape. I also taped the tops and sides to reinforce them. You can see from the pic on the right what mine looked like.
5] Once you have the pelmet shape, you can cover it with batting. I used a spray adhesive to secure the batting to the board. Then again, I just used tape to adhere the batting to the back of the board.

6] Lay out you fabric, and repeat the process of the securing it to the board just like you did the batting. This time I used a combo of staples and tape because I wanted the fabric to be stretched tight.
About this time- I looked over my finished pelmet and thought my linen looked a bit plain. So although I had already secured the fabric- I decided to spice it up a bit.
I wanted a herringbone print- but I couldn't find a place that sold a stencil resembling anything like I wanted. So- I made one with Word. I just manipulated rectangles and their angle, until I made something I liked. I wanted an abstract herringbone with a Native American flair. I love how this resembles the feathers on an arrow.
If you want to make your own print, here's what you need: Freezer Paper, Paint, Fabric Additive, Exacto Knife, Cutting Board, Brush, Container, Spray Adhesive and a pattern
I] Make a pattern or download a template.
II] Once I had a pattern I cut it out using my Exacto knife, then used that as a template to cut a stencil from freezer paper. It didn't take long at all, and if I did anything differently, I would have spent the time to cut out a bigger stencil. That would have saved time in the end. 
III] Mix your fabric additive and paint
IV] Use the spray adhesive to coat the PAPER side of your new stencil.
V] Your ready to use your stencil, make sure you're stencil is straight and using a foam brush apply the paint. Make sure the stencil is pressed down firmly and that there isn't a lot of paint on your brush.
And that, folks, is how you do it! I wanted a slightly handmade look. Like I the end product to look like it was hand done or done with block printing. You know- how the color will have variations and each line will look different? So I was careful to load the brush differently here or there, or apply different amounts of pressure.
I used the same gray paint that I used to stencil the damask curtains in the rest of the room. I wanted something that tied in- but that stood out. Damask is such a timeless print, but I wanted something more fun and current for the small kitchen area. 
And remember, you cannot judge these glorious {yeah right} honey oak cabinets. You guys know we rent this place- so what you see is what you get! Though I did try to convince Z that the landlord would never notice if they were suddenly turned white! Sadly, he was not on board! ;-)
Now for the money details! I purchased my supplies mostly at Joann's. With several coupons for "March Madness" the supplies totaled around 15 bucks. I bought a linen fabric (2 feet, half off, coming in at $8.) At the time I thought linen was important {to tie on with the linen-like Ikea curtains}, but now that I see the final product- I think a drop cloth would have looked almost the same. If I had used the leftover dropcloth this would have cost $6. 
Now who wants to make one of these bad boys!?


March 29, 2012

Faux Zinc Mirror [Laminate Mirror Makeover]


Good morning dear friends. I've been blogging for awhile now- so there's really no good excuse for the terrible, awful thing I've done. But let me tell you what it is- and then try to explain myself, then, and only then, I hope you can forgive me.
The story begins, before I started blogging, and before I decided what my style was. I lived in a very brown house, with very brown furniture and very brown decor. One of those brown items- a laminate mirror with scrolling flowers on it. I bought it back in 2004 when the hubs and I moved into our first real apartment. Since then I've had it stored- you know, until I could figure out something to do with it.
Then, late one night, Z was meeting with his editor and I was hiding out in our room. So I used what was in there to keep me busy. 
Some Rub-n-Buff, an old toothbrush, and this mirror.

Now, how in the world was I to know this mirror would start to look awesome!?! When I figured it out- I grabbed the camera and took a pic of the last but of brown, flowery-ness.
There you have the truth. Can you forgive me? 

UPDATE: I found a before pic! However, since I didn't really know how to take pics then, the detail on the mirror isn't very prominent. But you get the idea.

Now my problem is, how are you going to understand the amazing before and after transformation?! You won't. Bummer, guess you'll just have to take my word for it. I've used the Rub n Buff for zillions of things in the past. But never on a whole mirror and never with results this cool!
 

I used a toothbrush cause that stuff can soak through cloth and even rubber gloves!! This way, your hands stay clean. 
If you look on the left side of the frame, where the toothbrush is, you'll see a light coating of Rub n Buff. You can see the original texture showing through. 
But if you look on the right side of the frame, you can see where I built the Rub n Buff up higher in some places. It made the finish uneven and mottled looking.
Then, an amazing thing happened, it really started looking like zinc!! An incredible stroke of luck!

 If you don't "Buff" the Rub n Buff, it will come off on your hands. I used the toothbrush to polish it- then some cheese cloth to give it one last once over. It makes the mirror safe to touch- and look at how reflective the finish is. 

I used a little black glaze to darken some of the areas and catch in some of the grooves. If you rub too hard it WILL take off some of the silver finish. So use it sparingly with a light touch. You can see in the pic above, the mirror's a little darker in places. 

I found this listing for a real zinc mirror- selling on Amazon- and I think it looks so similar!! Can you believe it? Restoration Hardware- you know, my favorite store- sells zinc mirrors and they charge an arm and a leg for them. Their version is a darker gray zinc, though.


I totally cannot believe this mirror turned out well! Like I thought I would salvage the mirror but that it would need a whole new frame. For a 2 dollar bottle of silver finish I replicated the look of a $90 mirror!

I don't think paint could have transformed it the same way, it would have either left the same flowers or there would have been a plain silver finish. This way I have the textural look of one of my favorite metals!

I just love when you can salvage something that you saw as garbage. But I still wish I had a before pic. Just trust me, it's better now! ;-)
{Psst: If you're interested- I made the giant B from cardboard and paper mache, tutorial is here- and the French Bee Lamp tutorial is here.}


March 22, 2012

Ballard Designs Tufted Ottoman Hack

 I am 100% certain that I'm more stoked about this project than anyone else could be! See, Z and I are ottoman people. Some people are ottoman people. Others are coffee tables peeps. In theory I wish I could be the coffee table type- sporting an old railway cart as the centerpiece to my room. But it isn't practicle for the way we live, especially while we're living in a small space.
So- we're ottoman fans cause we like to lounge on our couch and you really need an ottoman for that.
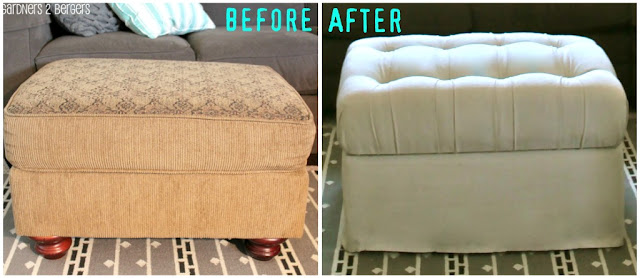
When I sold our couches last June-ish I kept the ottoman. Then it sat in the middle of our room in all it's corduroy and tapestry glory. I am super excited to have  something we use every day look like it belongs in my room!

I kept it because it was the right height for the new couch, it was fairly expensive, and I had plans for this baby! The ottoman I was crushing on was from Ballard Designs- with a nubby oatmeal fabric it would fun me $495- which, I think, is how much we paid for our ottoman in the first place. All the more reason to reuse mine.

 It was pretty easy for me to get from this before pic to my after. I put this project off- forever- because of the sewing issue. See, I can't, and I knew I would need to sew the bottom portion to make this look like something I would buy- not something I made.
I used a drop cloth to make this after happen AND with minimal sewing- if you can sew a button, you can do this project!!

1] To start- flip your ottoman over and use some pliers to pull out the staples, so you can take the fabric off. Don't worry about keeping the original fabric in tact- this can easily be done without it as a template.

2] Once you ottoman is naked- you'll need this stuff to get'er done. If your foam and batting are in good shape, then you can reuse them. I reused mine. I had everything on hand except the button kits, peg board, and upholstery needles- so it was a cheap makeover.

 3] Purchase a drop cloth that is long enough to be wrapped around the entire base of the ottoman. This is a crappy pic- but if you follow the arrow, I wrapped the fabric around the base so it would meet up in one place. Also- make sure the cloth is wrapped inside out!

4] Pin it where the fabric meets up. You should try to pin it in as straight a line as possible. When I got to this point I decided to make it a skirted ottoman, instead of following the inspiration pic 100%. So it is more like a combo of Ballard's slipcovered ottoman and their tufted one.

If you're making one like mine, then make sure you use the finished edge of the drop cloth as the edge that touches the floor- less sewing, you know.

I somewhat followed this tutorial to do the tufting- it is very comprehensive, with lots of photos- so pop over if you need things clarified.
5] Cut the pegboard the same size as cushion. Use the grid to plan out the button spacing.
6] Wrap your foam in batting, then cut holes in the foam where the buttons/tufting will go. I kinda skipped this cutting step- but you should totally do it! ;-)
7] Make your buttons using the directions that come with your kit.

8] Thread your needle with the twine and create the tufting. Make sure the buttons are seated down as far as they will go.
9] Don't forget to manipulate with the fabric to create pretty tufts before you secure the button in place with your staple gun. Here's mine, pre-ironing.
Now- for my Achilles heel- sewing. I know I CAN sew, if I could just LEARN how to!! lol
I spent 2 days playing around with this beast that was given to me 2 weeks ago.
All I ever got was a tangled mess- no sewing. The thread would just bunch in a knot. Is the machine broken? Maybe it's the user!!  Hmmph!
10] Remember how I said if you can sew a button, then you can make this ottoman? Yeah, so I hand sewed it. You'd think it would take a long time- but not compared to the 2 days I spent on the sewing machine! I made sure my pins were straight, marked a straight line with a pen and that kept my stitched straight.


 On the left is my hand sewed seam- then on the right, my drop cloth came with a big fat seam down the middle of it. So I lined that one up the opposite side and opposite corner as my hand sewn one.


11] Make sure you iron the tufting- and well, the whole drop cloth for that matter. But ironing the tufting will just help it stay the way you want it to- and it will look pretty!


If you didn't want a skirted ottoman you could easily wrap the fabric {like a present} under the frame and staple it in place. Then it would look more like the original inspiration. I may do that at some point? Who knows? Z had a strong opinion that is looks better skirted- so this will work.


This makeover cost me maybe 20 bucks. The drop cloth cost me $11 {I bought a 6x9} and I used coupons when I bought all the supplies- this really kept costs down.


Even though I had an ottoman- you could easily do this with a thrifted one or something you found on Craigslist. Funky outta date ottomans are always floating around out there!
What about you? Sewn anything lately? Anybody have any advice for that machine of mine? Has you reused an out of date item, making it new again?

March 14, 2012

DIY Cardboard Letters [Paper Mache Tutorial]


So this is like a Pinterest challenge, times 2! I have been in love with this whole pic for the longest time. Not just for the ombre dresser, but also the giant B- this blog ain't called from Gardners 2 Bergers for nothin' yo!
Then I saw this pin about making your own cardboard letters with cereal boxes and paper mache! Say what!!  The "B" I was envisioning was bigger than a cereal box- I stuck the idea in my brain for later and that was that. Until, dun, dun, dun (that's supposed to be climatic music) I was in the gift wrapping isle and saw the answer- 24 inch gift boxes! Word! 
Now, here's how I made my own paper mache letter.
You can use any sturdy cardboard to make the letter. I think a thin cardboard would work better, like a quality gift box or a cereal box. I don't know for certain, but I'm guessing that a regular cardboard box wouldn't work that well. It seems more porous and I think the coats or wet paper (paper mache) would warp it- but if you try it and let me know what happens!
I drew my letters using a tupperware lid and ruler as a guide. 
Then I cut it out with an Exacto Knife. 
Using the cut out letter as a stencil I traced it on the bottom half of the box and then cut that baby out.
For the sides of the B I used the sides of the original box. I used scotch tape to attach the sides to the bottom. Then created the insides of the B the same way. Next you was to add the top of your letter and tape it on the same way. I probably used a whole roll of tape to make this secure. I wasn't sure how well it should be adhered and figured, better safe than sorry.

Next step- paper mache! I used this step by step for the paper mache. Here's what I did.

YOU NEED:
flour, water, paper (preferably newspaper), and your letter

You want to make the paper mache paste- it's equal part flour and water. I used about 1c flour and 1c water to paper mache the entire letter one time. {Are you thinking to yourself now that maybe I did it more than once? Yup- 3 times!}
 
Whisk the mixture until the lumps are gone. You have the consistency of pancake batter, it's OK to add a little flour or water, which ever you need, to get the right consistency. The paste will still work even if it's a little thick or thin- if it's a little thin it may saturate the cardboard too much, if it's a little thick it may take longer to dry. See the thick/thinness in this BH&G pancake batter pic? That's about how my paste looked.

I used our old phone book for the paper {recycling?} That's the type of paper that works best. You want the paper in strips from 1-2 inches. Don't cut them, instead tear them to the right size- torn edges adhere best. 
Really liked the mixture of sizes for different parts of the B. Curved portions did best with thinner strips where the flat surfaces would go faster with larger ones.

Wet the strips in the mixture, remove the excess then apply to your form. Make sure your apply the strips in a criss-crossed manner. There was no way I could apply the paper mache and take pics- and since I do all my crafty stuff at like midnight or later no one was around to play photographer!


After the whole box is covered you're done for the day- or the night like in my case. You should wait 24 hours in between paper mache coats. If you add additional layers when the bottom isn't dry then you can get mold. Eek!


So, I did 3 coats of paper mache, over the course of 3 days. It's pretty much hard as a rock at this point. If you had an easier letter, like I or J, then I'm pretty sure 2 layers would've worked fine.
I painted it with some 59 cent spray paint- it's the same stuff I used on my Z Gallerie lamp copy and the mantel clock makeover. That can has gone the distance- seriously!
I used some gray and some brown glaze- the faux glazing stuff you tint yourself {Behr Premuim Plus Faux Glaze, from Lowe's}- and kept layering until it looked like something I found instead of something I made the other day!
You can see from the side shot that the B is really sturdy and is probably 4 inches thick. I initially imagined it on the wall- but it can pretty much go anywhere since it's so thick. So now I have a 2 foot tall- giant- B!


I found these awesome book ends thrifting- they're bronze and amazing and I painted the lampshade myself awhile back. 
Have you paper mached lately? I have another project planned for paper mache clay-I can't wait to start, it'll be A-May-Zing!! Thanks for reading!